Post your 'before' and 'after' pictures

Englischdude

Senior Member
what a great thread!

This is the difference between the before and after shot of a typical Infrared photo. My converted D70 has a 720nm filter, the WB is not a custom camera setting, rather the "cloudy" preset:

Before

dsc_4061_01.jpg


And after:

sam14mm_ir1.jpg
 

Englischdude

Senior Member
Nice recovery Martin.

thanks Chris, but that is pretty standard post-processing requirement for IR photography! Unfortunately my converted D70 has a hard time with custom WB setting, the only thing I can WB off for IR which sort of works is my dark brown leather couch! this reduces the PP effort by about 5% :D
 

sonicbuffalo_RIP

Senior Member
thanks Chris, but that is pretty standard post-processing requirement for IR photography! Unfortunately my converted D70 has a hard time with custom WB setting, the only thing I can WB off for IR which sort of works is my dark brown leather couch! this reduces the PP effort by about 5% :D

I'd have a mountain to climb to learn IR. Love how some of the shots turn out though. It's amazing.
 

J-see

Senior Member
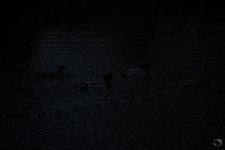
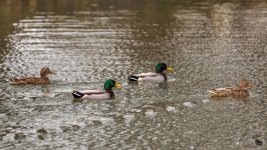
Here's another. I didn't lose one shot using this approach compared to my previous shooting. Yes there is noise too and black or very dark feathered birds are as hard as before but it does provide me control over my RAW files I did not have before.

I'm going to keep shooting like this and time will tell what the limitations are.

_DSC2414-2.jpg

Same processing as the rest, first exposure then the usual.

_DSC2414.jpg
 

Englischdude

Senior Member
Here's another. I didn't lose one shot using this approach compared to my previous shooting. Yes there is noise too and black or very dark feathered birds are as hard as before but it does provide me control over my RAW files I did not have before.

I'm going to keep shooting like this and time will tell what the limitations are.

View attachment 134720

Same processing as the rest, first exposure then the usual.

View attachment 134721


the two pics you have posted raises for me the question, why are your pics so incredibly underexposed?
 

J-see

Senior Member
the two pics you have posted raises for me the question, why are your pics so incredibly underexposed?

My shots are underexposed because I no longer change ISO and in that move the actual exposure of the RAW to post processing. In that I always shoot at the best quality my cam can deliver.
 

J-see

Senior Member
J-see, are you going to end up taking completely black shots and the recovering beautiful, vibrant pictures out of them? :)

The black shots are identically exposed to would I shoot them at high ISO but I keep my DR, tone range and color sensitivity at max. The same for my SNR. All that is different is that I skip the process of ISO that is done during A/D conversion.

My RAWs look underexposed but all the info is there and I can get a better picture out of it than I could before. It's the result that is more important than the process. ;)
 
Last edited:

J-see

Senior Member
I can see why others have left you think you know it all good for you I'm deleteing my post now aswell

Why do you people have such a hard time accepting a method that works because it is based upon the actual working of the cam? If you prefer shooting at limited quality by boosting ISO, good for you. I prefer shooting the quality I bought the cam for.

The shots show enough but I guess change is hard.

You said no detail, I showed you a crop so you can see for yourself and explained why it doesn't affect that. And this pisses you off? Strange at the least.
 
Last edited:

Rick M

Senior Member
@ J-see I think you'll have a missed opportunity as far as the amount of data recorded. I would think it limits flexibility in post by starting at an extreme?
 

wornish

Senior Member
I can see why others have left you think you know it all good for you I'm deleteing my post now aswell
Why ?

Jsee has his own style so do other members. This place allows criticism good or bad.

Don't leave without explaining your viewpoint is just as valid as others .
 

J-see

Senior Member
I think a problem here is that what I say or do goes against the common ideas about exposure.

A remark was made in a reply to me about it not being different from shooting SLR in the past. Maybe that's the best way to explain it for those of us that were familiar with them.

When we used an SLR, we set aperture and shutter and that defined the amount of light our film received. Whether we put a 100 or 400 ISO film inside didn't affect the amount of light it received. Only shutter and aperture has an effect on that.

When using DSLR it is not different but there's such a widespread misconception about ISO, we are not aware of what it does and what we can do when we take control. I stumbled upon conflicting results during my nightshots and to find an answer to those, ended up using this method.


Just like in the days of the SLR, shutter and aperture define the light captured on the sensor. When we use the native ISO, the image the sensor captures resembles the RAW after A/D conversion. ISO is a manipulation of the received data not that different from WB, contrast and the rest we can define. The only major difference with this is that ISO affects the data during A/D conversion and in that adjusts the light the sensor received to the exposure we prefer for our shots. If we increase ISO with one stop, we tell the cam to interpret the analog data differently.

The main problem is it being a definitive manipulation because it happens during A/D conversion and in that affects some settings of our RAW. And it comes at a price; every stop of ISO lowers our DR, tonal range, color sensitivity and SNR.

The way to get around it is not adjusting ISO and adjust the exposure of the shot in post. Instead of using ISO 800 as an example, we now increase exposure by 3 stops in post. The main reason to do so is to avoid any quality loss ISO increase causes.

The shots look crap just like the negatives looked crap in the past. Only when we manipulate them, the real shot comes out.
 
Last edited:

Felisek

Senior Member
It is an interesting approach, but, I think, it has its limitations. Because you are expanding a very limited amount of discrete intensity levels from a dark image, you might see banding when your image contains smooth intensity gradients, for example in the sky.
 

Scott Murray

Senior Member
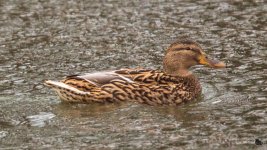
It doesn't affect detail. That depends on how close I can get and how much light there is for my shutter/aperture.

View attachment 134724
For an ISO 100 photo I would expect less noise than what is shown here, you are basically limiting what great shots you could get by producing ordinary underexposed shots and hoping for 'magic'. I for one would rather seeing my shot in the viewfinder and know that I have a great photo than use guess work from an all black image.
 

J-see

Senior Member
It is an interesting approach, but I think, it has its limitations. Because you are expanding a very limited amount of discrete intensity levels from a dark image, you might see banding when your image contains smooth intensity gradients, for example in the sky.

No, that's the beauty of this. If I had shot the ducks using ISO 1600, my sensor would have captured the exact same data in manual mode as me shooting it at ISO 100. There is zero difference there. The only difference is that at ISO 100 I use the data as is while at ISO 1600, that same data gets multiplied.

In reality my ISO 100 shot has an 14.5EV DR (if the scene has such range) while the ISO 1600 has less, even when it looks correctly exposed.

It just looks like being limited in data because we are used to "correctly" exposed shots. Mine require me to manually do that but I use the same data, except in some cases.

If you open one of your shots in post and underexpose it three stops, that shot will look like the RAW I start with. Yet by you underexposing it 3 stops, you don't throw away data. Neither do I by not "overexposing" it.

It's really easy to test this. Take a shot of something that requires you to increase ISO and then take the same shot at ISO 100. In post adjust the 100"s exposure with the same stop increase the high ISO has. Then compare the data. You have to do this in manual mode else A or S will change.
 
Last edited:

J-see

Senior Member
For an ISO 100 photo I would expect less noise than what is shown here, you are basically limiting what great shots you could get by producing ordinary underexposed shots and hoping for 'magic'. I for one would rather seeing my shot in the viewfinder and know that I have a great photo than use guess work from an all black image.

ISO does not trigger noise; low light levels do. ISO only multiplies them. 100 ISO does not imply noise free shots.
 
Top