Vacation Shots...

TonyD315

Senior Member
I recently took a vacation to Disney with my girlfriend and family. I shot in RAW for the first time and attempted to teach myself how to edit in Lightroom when I returned. I have a very basic understanding of how to do it, but I plan on taking some lessons to understand more about post processing but these are a few attempts to spruce up my photos. Any advice for someone still getting their feet wet would be great. I have a bunch of shots that I'd like to get some feedback but I'll start with these two. Also, I'm not sure about the settings to upload to this site because I've never done it before, so if they are too big or too small please let me know. Thanks!

epcotresize.jpg


This first one was taken as I was leaving, 24mm, f/2.8, 1/20, ISO 1600

dsc_0714resize.jpg


This one was the one shot that my GF wanted the most when we were down there... 19mm, f/6.3, 1/320, ISO 200. This one was shot on a cloudy day, the original was underexposed, but I brightened it up and tried to make it a little more vibrant...
 

Krs_2007

Senior Member
For me the the second one, try to bring up the shadows a little bit. Hard to see Mini Mouse. The first looks pretty good. Something that will make it easier is to post one shot per post in this section. Its hard to critique multiple shots in one post.

So second shot only, the colors look good, bring up the shadows and maybe try a direct shot on the same plane as the subject. The looking up shot doesn't really work for me but I know you wanted the balloons in the shot so that can be overlooked. The white balance looks a tad off.

Cant wait to see what else you have. We did that trip a few years back and there is so many thing to take pictures of that its overwhelming.
 

TonyD315

Senior Member
First off, thank you very much for the comments. Obviously when I show them to friends and family they all love them. It's something that I really want to get better at so any feedback it welcomed. I came home with over 700 pictures from 4 days in the parks, so it's taking me a little bit of time to get them out. I'm about halfway there. I will definitely take the comments and go back to Lightroom to make some adjustments.

As for getting them out there for feedback, what do you suggest the best way I do that? I have a Flickr account and put a bunch on there. Some I really want feedback on, others are just regular shots taken. Would it be best to link the Flickr account in here? Or make an album in my profile?
 

Krs_2007

Senior Member
You can put them here in the feed back section, its just easier to do one at a time. Thats a bunch of pictures and I think I came back with about that many as well, easy to do there.

Dont get the critique wrong that I gave, just pointing out a few things that will help make them better. I for one would love to see your take on Disney, love that place.
 

TonyD315

Senior Member
Here's another one. I may have over processed it, but the original came out very under exposed and when I look at the two they are night and day...

lakedisney.jpg

This was shot at 17mm, f/2.8, 1/3200, and ISO 200
 

TonyD315

Senior Member
I wasn't sure if the ferry of the hotel in the background were too dark...but I figured it is sunset and you still get the idea. Like I said the original was very dark, but from what I understand they tend to be when you shoot in RAW correct?
 

TonyD315

Senior Member
Ok, one more before I leave for work...there's a cool little story behind this one. We had breakfast reservations at 9am and got there a little early. The park wasn't technically open to the public yet, just people who had reservations, so I was able to grab this shot of Walt and Mickey with pretty much an empty park. There were two people in the photo but I took them out..

waltandmickeyday.jpg
45mm, f/3.2, 1/400, ISO 400
 

TonyD315

Senior Member
I'm having a tough time with this one. I turned down the highlights to bring out the blue in the sky, and I tried to darken the blues because I want to get a deep blue sky. I can't seem to get it any darker without having a bluish tint in the water and a dark blue in the mountain. Any suggestions??
dsc_0254resize.jpg
 

southwestsam

Senior Member
If you are in Lightroom you can apply graduated filters which you can set to apply to the sky/top of the photo and have no effect at the bottom. You could use this to reduce the exposure value which should help deepen the blue. There is also an adjustment brush in LR so you could set the changes you want and just paint over the bits you want changed.

Alternatively you could have more control in Photoshop using adjustment layers, but not sure if you have used it or have access to it?

You have image editing set to no, but if you are happy for me to do so, I can post an example with details of what I did?
 

Lawrence

Senior Member
Ok, one more before I leave for work...there's a cool little story behind this one. We had breakfast reservations at 9am and got there a little early. The park wasn't technically open to the public yet, just people who had reservations, so I was able to grab this shot of Walt and Mickey with pretty much an empty park. There were two people in the photo but I took them out..

waltandmickeyday.jpg
45mm, f/3.2, 1/400, ISO 400

Just a pity the top is cut off.

Great photos though and your post processing is good.
As for "underexposed" try changing your exposure control - up it a click or two in dark scenarios and lower it in bright ones. Great feature to understand and use
 

southwestsam

Senior Member
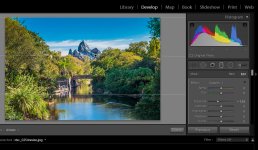
So apologies in advance - but here is what I have done as an example in LR...

Screenshot 1.jpg

This is the graduated filter in LR - you can see the three white lines? These are adjustable and show where the filter reaches 0%, 50% and 100% effect.

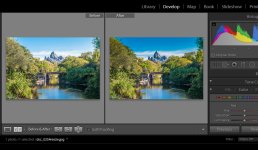
Below you can see the comparison between the original and the effect the filter has made. Filter was set to EV -1.15 and Saturation boosted to 90. You will notice that it has brought out more colour in the trees as well.

Screenshot 2.jpg

If you wanted to be more selective, Photoshop has some great tools. Let me know if you want me to show you what I mean.
 

TonyD315

Senior Member
Just a pity the top is cut off.

Great photos though and your post processing is good.
As for "underexposed" try changing your exposure control - up it a click or two in dark scenarios and lower it in bright ones. Great feature to understand and use

dsc_0620resize.jpg
Here is a different shot I had. I chose the previous one because I'm trying to expand my creativity and I feel that sometimes a part is greater then the whole. I understand that will come with time. I will definitely take a look at the exposure control. Thanks for the tip!
 

TonyD315

Senior Member
So apologies in advance - but here is what I have done as an example in LR...

View attachment 68276

This is the graduated filter in LR - you can see the three white lines? These are adjustable and show where the filter reaches 0%, 50% and 100% effect.

Below you can see the comparison between the original and the effect the filter has made. Filter was set to EV -1.15 and Saturation boosted to 90. You will notice that it has brought out more colour in the trees as well.

View attachment 68277

If you wanted to be more selective, Photoshop has some great tools. Let me know if you want me to show you what I mean.

Please, no apologies are necessary. Im' still learning and I will take all the advice I can get. I am a little familiar with the graduated filter in LR. I actually tired to mess with it a little but I kept getting one part very dark and then the other very washed out. I will go back and try to experiment some more with it. I also have Photoshop, but I'm not quite to the point where I can start understanding it. I'd like to get LR down first.

As for the no edit option, I saw that and I'm not quite sure how to change it. If you could tell me where to find it I will gladly switch it. Thanks!
 

southwestsam

Senior Member
Edit option is on profile settings.

when you use the grad filter in LR you can hover your mouse over the dot in the middle line and you'll get a hand. You can click and drag to move the filter. You'll get the same if you hover over any part of the top or bottom lines and this will move the 100%/0% lines respectively. The further you move the top/bottom lines from the middle line the more gradual the filter is.

so, if the lines are really close together you will get a quick change from light to dark (for example), if they are far apart, the effect is much softer/gentler.
 

TonyD315

Senior Member
Sorry for the delay, I got busy at work. I went back in and messed around with the graduated filter, this is what I could come up with. While the sky isn't as blue as I might like it, I found if I try to go darker then the snow on the mountain starts to darken also...

animalkingdomedit2-0254.jpg
 

southwestsam

Senior Member
You can use an adjustment brush to 'paint' areas that you want to make changes to - set it to increase the saturation and you should get the desired effect.
 
Top