You are using an out of date browser. It may not display this or other websites correctly.
You should upgrade or use an alternative browser.
You should upgrade or use an alternative browser.
Jake's Backdoor Hippie-palooza, 2014 Edition
- Thread starter BackdoorArts
- Start date
BackdoorArts
Senior Member
Wow! Beauty.
Second one is HDR..
Actually, it's the first. As good as HDR Efex Pro has gotten and ghost removal, there's something about the tree branches in photos that always look just a little too thinned out. I'll say this, for similar looks it was about 1/2 the time with the HDR set, but it just goes to show that the dynamic range of the D600 sensor (and the D800) is pretty incredible. Because of the brightness of the sun, I used the -2EV image in the single exposure and pulled the light out of the darker areas.
@BackdoorHippie, Jake still waiting on that before/after training video you said you would do... LOL. I need to explore more of the add-on's that I have for Lightroom.
BackdoorArts
Senior Member
Who said I was going to do Before/After training of any kind, let alone video?! What I was offering to do was to post a single before image and let folks post their edits and settings.
You're confusing me for someone who apparently has both free time and the ability to put together a video like that. LOL
Seriously, though, as time permits I'll try to do something, but at present just finding time to take pictures and get a couple up for this thread is challenging enough.
You're confusing me for someone who apparently has both free time and the ability to put together a video like that. LOL
Seriously, though, as time permits I'll try to do something, but at present just finding time to take pictures and get a couple up for this thread is challenging enough.
wud
Senior Member
Actually, it's the first. As good as HDR Efex Pro has gotten and ghost removal, there's something about the tree branches in photos that always look just a little too thinned out. I'll say this, for similar looks it was about 1/2 the time with the HDR set, but it just goes to show that the dynamic range of the D600 sensor (and the D800) is pretty incredible. Because of the brightness of the sun, I used the -2EV image in the single exposure and pulled the light out of the darker areas.
Haha amazing! It was the top of the trees which fooled me. Thats pretty incredible..
Who said I was going to do Before/After training of any kind, let alone video?! What I was offering to do was to post a single before image and let folks post their edits and settings.
You're confusing me for someone who apparently has both free time and the ability to put together a video like that. LOL
Seriously, though, as time permits I'll try to do something, but at present just finding time to take pictures and get a couple up for this thread is challenging enough.
Hey, I was always told to ask for more, can't blame for me trying. But seriously if you get time I would love to see some before/afters with a description of what you used. I love reading this type of stuff.
I hear on the challenge, been struggling myself on getting at least one picture and without repeating the same picture.
I really do enjoy the shots you get and the processing you do.
I wish there was an easy way to get this info from Lightroom, so if you know how to extract the processing info then let me know. I was asked about one the other day and had to manually type it out. I know Scott did a screen capture of one for me, but there has to be an easier way to get your adjustment settings from LR. Just talking about the settings used in LR and not the add-on's.
BackdoorArts
Senior Member
I wish there was an easy way to get this info from Lightroom, so if you know how to extract the processing info then let me know. I was asked about one the other day and had to manually type it out. I know Scott did a screen capture of one for me, but there has to be an easier way to get your adjustment settings from LR. Just talking about the settings used in LR and not the add-on's.
There is not way to export them to a text file or anything. You can Save your setting as a new Preset (Develop menu -> New Preset), then right-click on the newly saved preset in the Preset panel on the left, open it in the Finder/Windows Explorer, and then open it with a text editor. Cut and past the settings and you get something like this...
s = {
id = "6CF21C6E-2A99-4431-89C3-7B3D004A00FB",
internalName = "Test Preset",
title = "Test Preset",
type = "Develop",
value = {
settings = {
AutoLateralCA = 1,
Blacks2012 = -31,
BlueHue = 0,
BlueSaturation = 0,
CameraProfile = "Adobe Standard",
ChromaticAberrationB = 0,
ChromaticAberrationR = 0,
Clarity2012 = 31,
ColorNoiseReduction = 25,
ColorNoiseReductionDetail = 50,
ColorNoiseReductionSmoothness = 50,
Contrast2012 = 1,
ConvertToGrayscale = false,
CropConstrainToWarp = 0,
Defringe = 0,
DefringeGreenAmount = 0,
DefringeGreenHueHi = 60,
DefringeGreenHueLo = 40,
DefringePurpleAmount = 0,
DefringePurpleHueHi = 70,
DefringePurpleHueLo = 30,
EnableCalibration = true,
EnableCircularGradientBasedCorrections = true,
EnableColorAdjustments = true,
EnableDetail = true,
EnableEffects = true,
EnableGradientBasedCorrections = true,
EnableLensCorrections = true,
EnableSplitToning = true,
Exposure2012 = 0.2,
GradientBasedCorrections = {
{
CorrectionActive = true,
CorrectionAmount = 1,
CorrectionID = "91FD3759-B5CB-4324-984A-16471E0DC4B2",
CorrectionMasks = {
{
FullX = 0.598846,
FullY = 0.02055,
MaskID = "F0F47049-0C40-4A45-8E9D-05834BCCF141",
MaskValue = 1,
What = "Mask/Gradient",
ZeroX = 0.588536,
ZeroY = 0.947695,
},
},
CorrectionReferenceX = 0.593691,
CorrectionReferenceY = 0.484122,
LocalBrightness = 0,
LocalClarity = 0,
LocalClarity2012 = 0.156699,
LocalContrast = 0,
LocalContrast2012 = -0.087913,
LocalDefringe = 0,
LocalExposure = 0,
LocalExposure2012 = -0.320402,
LocalHighlights2012 = 0.329113,
LocalLuminanceNoise = 0,
LocalMoire = 0,
LocalSaturation = 0.529634,
LocalShadows2012 = 0,
LocalSharpness = 0,
LocalTemperature = 0,
LocalTint = 0,
LocalToningHue = 0,
LocalToningSaturation = 0,
What = "Correction",
},
},
GrainAmount = 0,
GrainFrequency = 50,
GrainSize = 25,
GreenHue = 0,
GreenSaturation = 0,
Highlights2012 = -32,
HueAdjustmentAqua = 0,
HueAdjustmentBlue = 0,
HueAdjustmentGreen = 0,
HueAdjustmentMagenta = 0,
HueAdjustmentOrange = 0,
HueAdjustmentPurple = 0,
HueAdjustmentRed = 0,
HueAdjustmentYellow = 0,
LensManualDistortionAmount = 0,
LensProfileEnable = 1,
LensProfileSetup = "LensDefaults",
LuminanceAdjustmentAqua = 0,
LuminanceAdjustmentBlue = 0,
LuminanceAdjustmentGreen = 0,
LuminanceAdjustmentMagenta = 0,
LuminanceAdjustmentOrange = 0,
LuminanceAdjustmentPurple = 0,
LuminanceAdjustmentRed = 0,
LuminanceAdjustmentYellow = 0,
LuminanceNoiseReductionContrast = 0,
LuminanceNoiseReductionDetail = 50,
LuminanceSmoothing = 0,
ParametricDarks = -4,
ParametricHighlightSplit = 75,
ParametricHighlights = 12,
ParametricLights = -26,
ParametricMidtoneSplit = 50,
ParametricShadowSplit = 25,
ParametricShadows = -3,
PerspectiveAspect = 0,
PerspectiveHorizontal = 0,
PerspectiveRotate = 0,
PerspectiveScale = 100,
PerspectiveUpright = 0,
PerspectiveVertical = 0,
PostCropVignetteAmount = 0,
PostCropVignetteFeather = 50,
PostCropVignetteHighlightContrast = 0,
PostCropVignetteMidpoint = 50,
PostCropVignetteRoundness = 0,
PostCropVignetteStyle = 1,
ProcessVersion = "6.7",
RedHue = 0,
RedSaturation = 0,
Saturation = 32,
SaturationAdjustmentAqua = 0,
SaturationAdjustmentBlue = 0,
SaturationAdjustmentGreen = 0,
SaturationAdjustmentMagenta = 0,
SaturationAdjustmentOrange = 0,
SaturationAdjustmentPurple = 0,
SaturationAdjustmentRed = 0,
SaturationAdjustmentYellow = 0,
ShadowTint = 0,
Shadows2012 = 52,
SharpenDetail = 25,
SharpenEdgeMasking = 0,
SharpenRadius = 1.3,
Sharpness = 117,
SplitToningBalance = 0,
SplitToningHighlightHue = 0,
SplitToningHighlightSaturation = 0,
SplitToningShadowHue = 0,
SplitToningShadowSaturation = 0,
ToneCurveName2012 = "Linear",
ToneCurvePV2012 = {
0,
0,
255,
255,
},
ToneCurvePV2012Blue = {
0,
0,
255,
255,
},
ToneCurvePV2012Green = {
0,
0,
255,
255,
},
ToneCurvePV2012Red = {
0,
0,
255,
255,
},
Vibrance = 50,
VignetteAmount = 0,
VignetteMidpoint = 50,
WhiteBalance = "As Shot",
Whites2012 = 42,
orientation = "AB",
},
uuid = "1AB502A5-26FF-4C1D-A341-E22C149ED942",
},
version = 0,
}
Which is clear as mud. But, if you wanted to share, if you have the preset you might be able to attach it (likely as a .txt file - just add a new extension), and whoever wanted to see what you did could save it, remove the extension, load it to LR and then apply it to the image.
What you don't get are any of the partial adjustments like spot removal, gradient filters, brush adjustments, etc.
Yea, tried something like that before. Mud is right. But exporting/saving it could be a way. Might have to play with that.
BackdoorArts
Senior Member
If you want to test it, I've attached the above template as a .txt file here (you have to use the Manage Attachments option in the Advanced editor to do this). Try and save it to your computer without the .txt extension and then import it into Lightroom (right-click on the User Template folder in the preset menu and choose Import).
Attachments
If you want to test it, I've attached the above template as a .txt file here (you have to use the Manage Attachments option in the Advanced editor to do this). Try and save it to your computer without the .txt extension and then import it into Lightroom (right-click on the User Template folder in the preset menu and choose Import).
Ok, now that is really cool. It worked and I used it on an old photo. I have always wondered when downloading presets how they made them.
BackdoorArts
Senior Member
Ok, now that is really cool. It worked and I used it on an old photo. I have always wondered when downloading presets how they made them.
And I didn't even need to make a video!!
And I didn't even need to make a video!!
Nope, not this time.
BackdoorArts
Senior Member
It's not a matter of having to push them around more, it's knowing what sliders do what and when you use them.
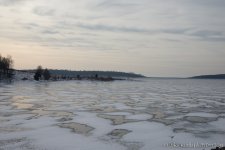
For the morbidly curious, here's the before and after images that go with the preset I uploaded...
Before
After

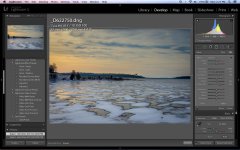
In addition to the settings in the preset, I also used a gradient filter to bring out the sky (see settings here)...
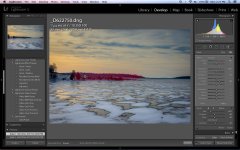
...and a brush adjustment to bring out and warm up the treeline (effected area in red)...
Just to note, this is very high on the radically over manipulated side as I was trying to replicate some of the things I had produced on the other images taken with this one yesterday. You'll hardly ever see me boosting Clarity, Vibrance and Saturation like this - but it's nice to know you can do it.
And please realize, if you save the first image and attempt to apply the preset to it there's no chance it's going to look the same since you're dealing with a low-res jpeg and not the full RAW file.
One hint, if you ever run out of room on a slider, use the brush tool and paint the entire image (100% opacity), then run only that slider to its max position, then adjust using the regular set of sliders from there.
As I've said many times, if I could only have one tool for post it would be LR.
For the morbidly curious, here's the before and after images that go with the preset I uploaded...
Before

After

In addition to the settings in the preset, I also used a gradient filter to bring out the sky (see settings here)...

...and a brush adjustment to bring out and warm up the treeline (effected area in red)...

Just to note, this is very high on the radically over manipulated side as I was trying to replicate some of the things I had produced on the other images taken with this one yesterday. You'll hardly ever see me boosting Clarity, Vibrance and Saturation like this - but it's nice to know you can do it.
And please realize, if you save the first image and attempt to apply the preset to it there's no chance it's going to look the same since you're dealing with a low-res jpeg and not the full RAW file.
One hint, if you ever run out of room on a slider, use the brush tool and paint the entire image (100% opacity), then run only that slider to its max position, then adjust using the regular set of sliders from there.
As I've said many times, if I could only have one tool for post it would be LR.
Last edited:
BackdoorArts
Senior Member
2014-034:
8 inches of new snow makes for more more shoveling than shooting, unfortunately, but I managed to get these thru the kitchen window. LR-only edits.
Dark Eyed Junco Kicking Up The Snow

Biting Down On A Frozen Peanut May Not Be A Good Idea


8 inches of new snow makes for more more shoveling than shooting, unfortunately, but I managed to get these thru the kitchen window. LR-only edits.
Dark Eyed Junco Kicking Up The Snow
Biting Down On A Frozen Peanut May Not Be A Good Idea
Michael J.
Senior Member
Fantastic shots.
It's not a matter of having to push them around more, it's knowing what sliders do what and when you use them.
For the morbidly curious, here's the before and after images that go with the preset I uploaded...
Before
After
In addition to the settings in the preset, I also used a gradient filter to bring out the sky (see settings here)...
...and a brush adjustment to bring out and warm up the treeline (effected area in red)...
Just to note, this is very high on the radically over manipulated side as I was trying to replicate some of the things I had produced on the other images taken with this one yesterday. You'll hardly ever see me boosting Clarity, Vibrance and Saturation like this - but it's nice to know you can do it.
And please realize, if you save the first image and attempt to apply the preset to it there's no chance it's going to look the same since you're dealing with a low-res jpeg and not the full RAW file.
One hint, if you ever run out of room on a slider, use the brush tool and paint the entire image (100% opacity), then run only that slider to its max position, then adjust using the regular set of sliders from there.
As I've said many times, if I could only have one tool for post it would be LR.
Very true, I just do slight tweaks and need to learn more in order to push them more. But thats up to me to learn, so Thanks for posting this. Its interesting for me to start to finish and how you got there. There is a lot in LR to learn.
