You are using an out of date browser. It may not display this or other websites correctly.
You should upgrade or use an alternative browser.
You should upgrade or use an alternative browser.
Deezeys Pert' near every day or so
- Thread starter Deezey
- Start date
Alright. Some quick and dirty iPhone shots of the memory upgrade!!
Ok. Here we go!
Step 1: SHUT DOWN you iMac
Step 2: UNPLUG your iMac (this step must be done!)
Step 3: Place your iMac FACE DOWN on a LINT and STATIC FREE cloth or towel
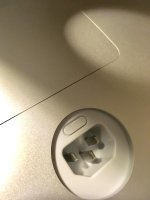
Step 4: You will notice a small button just above the plug prongs of your iMac. You will want to use a NON METALLIC object to press down on this button until the cover pops up. This button does take a bit of STEADY force. See photo below.


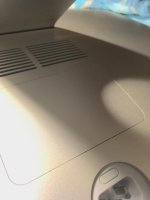
Step 5: Remove the tray when it pops up. The entire lid comes off. There are no hinges.

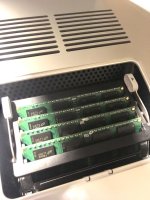
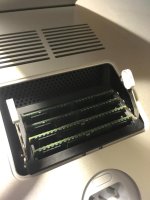
Step 6: There are TWO white levers marked with arrows pointing away from the memory sticks. Push the levers away and at the same time gently pull the levers up to raise the memory compartment for access.

Step 7: You may now remove or add memory. Please use GENTILE but FIRM pressure to remove or replace memory. It is actually hard to damage a memory chip, but still use some caution.
Step 8: Once you have made the desired changes to your memory you now reverse the process. Using the levers you may now push the memory bay back into your iMac using GENTLE but FIRM pressure.
Step 8: Replace your iMac cover with you guessed it GENTLE but FIRM pressure. You will really need to press the lid firmly. It is a very tight fit.
Step 9: Set your iMac back upright and plug the iMac back in.
Step 10: You may now turn your iMac back on and boot it up.
Step 11: Once your iMac is up and running you can check your memory status
Go to the Apple Menu. Then click About This Mac.Then at the top of the new window click Memory. If you did everything right you will see this.

This was my first attempt at doing this. It took me less than 5 minutes after i flipped my iMac face down.
So all in it took lets say 10 minutes and price wise was $148.00. Sure beats the hell out of the $600 Apple wishes to charge you for installing 32 gigs of memory.
Ok. Here we go!
Step 1: SHUT DOWN you iMac
Step 2: UNPLUG your iMac (this step must be done!)
Step 3: Place your iMac FACE DOWN on a LINT and STATIC FREE cloth or towel
Step 4: You will notice a small button just above the plug prongs of your iMac. You will want to use a NON METALLIC object to press down on this button until the cover pops up. This button does take a bit of STEADY force. See photo below.


Step 5: Remove the tray when it pops up. The entire lid comes off. There are no hinges.

Step 6: There are TWO white levers marked with arrows pointing away from the memory sticks. Push the levers away and at the same time gently pull the levers up to raise the memory compartment for access.

Step 7: You may now remove or add memory. Please use GENTILE but FIRM pressure to remove or replace memory. It is actually hard to damage a memory chip, but still use some caution.
Step 8: Once you have made the desired changes to your memory you now reverse the process. Using the levers you may now push the memory bay back into your iMac using GENTLE but FIRM pressure.
Step 8: Replace your iMac cover with you guessed it GENTLE but FIRM pressure. You will really need to press the lid firmly. It is a very tight fit.
Step 9: Set your iMac back upright and plug the iMac back in.
Step 10: You may now turn your iMac back on and boot it up.
Step 11: Once your iMac is up and running you can check your memory status
Go to the Apple Menu. Then click About This Mac.Then at the top of the new window click Memory. If you did everything right you will see this.

This was my first attempt at doing this. It took me less than 5 minutes after i flipped my iMac face down.
So all in it took lets say 10 minutes and price wise was $148.00. Sure beats the hell out of the $600 Apple wishes to charge you for installing 32 gigs of memory.
I have Affinity Photo for a few months now, I don't use it a lot, but when I need some of the features it has over Apple Aperture, it really comes in handy.
I got it at a discounted price and am happy with what I paid for it. I think you would be going backwards if you moved to Affinity from CC, but if you don't like paying the continuous rental, it might be worth a look.
Heres a thread I started a while back- http://nikonites.com/computers-and-...ng-affinity-photo-software.html#axzz4NPKe0C6a
I have Affinity Photo for a few months now, I don't use it a lot, but when I need some of the features it has over Apple Aperture, it really comes in handy.
I got it at a discounted price and am happy with what I paid for it. I think you would be going backwards if you moved to Affinity from CC, but if you don't like paying the continuous rental, it might be worth a look.
Heres a thread I started a while back- http://nikonites.com/computers-and-...ems ok. Sent from my iPhone using Tapatalk
Danno_RIP
Senior Member
My back is an old SI joint injury from getting hit by a texting driver. High sided my motorcycle. It crops up every few years to remind me to take better care of myself.
Sent from my iPhone using Tapatalk
Ouch... I have come off a bike more then once... but never high sided... Texting drivers were the worst. Hope the flare up passes soon.


