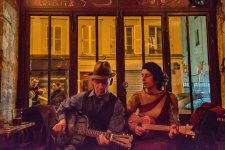
I assumed that was the case and that's why I only touched on the topic of fill-flash. Live performances, especially in what appeared to me to be a rather intimate setting, does not lend itself to using flash for a multitude of reasons. Sometimes we simply have to work with the available light and make it work as best we can; get creative with it. Admittedly, though, sometimes circumstances conspire against us and getting exactly what we want is simply not possible. If that's the case, we have to take a pass on the shot or accept less than optimal results.
I was trying to use HDR function. When I want to active HDR in the setting, it says my camera doesn't support.
I w
There is a technique called HDR (High Dynamic Range) that uses multiple shots of the same subject, each with a different level of exposure (one or more shots is exposed properly for the Highlights, one or more shots for the Midtones and one or more for the Shadows), and merges all of them into a single shot that captures the entire dynamic range. You can Google "HDR Photography", if you want, and see how it works. In my personal opinion, and this is JUST my opinion, this scenario did not call for HDR.
.....
Thanks!
That's short-hand for post-processing.
")