You are using an out of date browser. It may not display this or other websites correctly.
You should upgrade or use an alternative browser.
You should upgrade or use an alternative browser.
RAWTherapee
- Thread starter J-see
- Start date
Anyone using RT have this happen. I did quite a bit of processing on a .nef file. I hit the "new window" (I think that is what it is called) to get the small zoom box. I got the box with the magnified portion, but the entire image had a bunch of yellow dots similar to the lost highlight indicators. This was in both the main image and the magnified box. The only thing I could do was to close RT and start over. 
I still have a lot to learn with RT. Ha!
I still have a lot to learn with RT. Ha!
That never happened to me but I did have some crashes before. But the Mac is at least partly to blame for that.
I always process in 2 to three steps to avoid losing a shot completely.
First I go to the NEF folder and apply cam + lens settings and crop. That I export as a TiFF to another map. There I do most processing on a shot and resize it to my final format and save that as a TiFF again to another folder.
I fine-tune that, do final sharpening if needed and export as whatever it needs to be.
Even if a crash happens, at worst I lose one step. If I do multiple shots, even if it should crash, I can pick up the pp3 of a previous shot, apply it on the new one and continue.
I'm posting anything I find about the new wavelet tools here. This far I'm only using the contrast wavelets and it can pull detail very nicely when you start toying with the different contrast levels. The rest I have to find out. There's very little documentation out there.
scribble's scribbles: First View--The Wavelet Tool
scribble's scribbles: First View--The Wavelet Tool
I'm toying with wavelet sharpening. I gave up trying to understand wavelets since it would require me to get a math degree first so it's going to be trial and error learning.
I took some old shot, high ISO and moved the sliders. This shot was pretty bad at 100% but it does improve a degree with wavelet sharpening. I don't see any (obvious) artifacts caused by the additional sharpening.


I took some old shot, high ISO and moved the sliders. This shot was pretty bad at 100% but it does improve a degree with wavelet sharpening. I don't see any (obvious) artifacts caused by the additional sharpening.


Last edited:
I'm toying with wavelet sharpening. I gave up trying to understand wavelets since it would require me to get a math degree first so it's going to be trial and error learning.
I took some old shot, high ISO and moved the sliders. This shot was pretty bad at 100% but it does improve a degree with wavelet sharpening. I don't see any (obvious) artifacts caused by the additional sharpening.
Maybe its me but I am struggling to see any difference in the two pics at least on here at this size.
Maybe its me but I am struggling to see any difference in the two pics at least on here at this size.
The thing with wavelets is that it is processing at output size. If my final image will be 1000*800 there is little use in wavelets at the full sized image since you'll only see it well at 100% and that is lost when scaling the shot to a smaller output size.
I work always in at least two steps:
Rough processing and RL Deconvolution sharpening, crop and save as output size.
Fine-tuning and final sharpening, save as JPEG.
I think wavelets will work best when I use them in step two. The contrast levels are great to pull detail and the sharpening enables me to drop the normal sharpening that uses unsharp mask and in that end up with less artifacts like the fringing.
Also; you need to click the activate button for the wavelet tool else nothing happens even if you move the sliders. They changed that for all tools since the previous versions.
Last edited:
Maybe its me but I am struggling to see any difference in the two pics at least on here at this size.
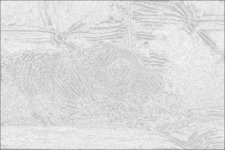
I see a very obvious difference. Save them both to your desktop and then flip from the one to the other. The bottom shot has a lot more detail. It's about 550k vs 620k file size.
I pulled the difference between both shots in PS:
Last edited:
I see a very obvious difference. Save them both to your desktop and then flip from the one to the other. The bottom shot has a lot more detail. It's about 550k vs 620k file size.
I pulled the difference between both shots in PS:
View attachment 162010
You are right.
Just did as you suggested and you can see the difference when you quickly flip between the two.
I'm experimenting some more with wavelet sharpening.
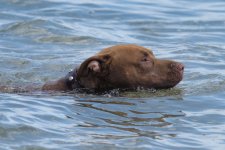
This is the shot without wavelets (811Kb):
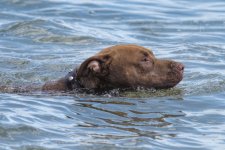
Using wavelet sharpening on a slightly larger version, adjusting the residual image and then saving as 1024 pixels (884Kb):
That version sharpened in Affinity using frequency separation (978Kb):
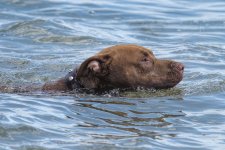
The amount of detail I gain is most visible in the water behind and below the dog. Wavelets are promising. It's just a very steep learning curve.
This is the shot without wavelets (811Kb):

Using wavelet sharpening on a slightly larger version, adjusting the residual image and then saving as 1024 pixels (884Kb):

That version sharpened in Affinity using frequency separation (978Kb):

The amount of detail I gain is most visible in the water behind and below the dog. Wavelets are promising. It's just a very steep learning curve.
Last edited:
It's hard to explain how to use wavelets since it is different for every image but I processed a previous moonshot and took some screenshots of my settings. It's how I use them for this image but it shows a standard sharpening workflow which might be usable for every shot. I have added Affinity to my workflow and use frequency separation but if you use PS, using the High Pass might lead to a similar result.
In RT I always use RL deconvolution as a first step when cropping. Usually min size, strength 40, damping 50, itterations 60. Those settings pull detail without causing artifacts. Depending the size I increase or decrease those settings.
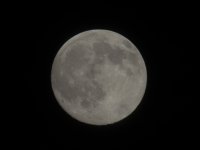
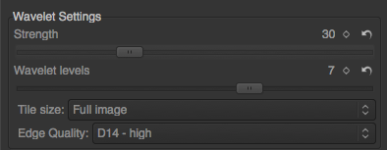
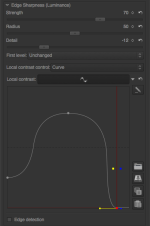
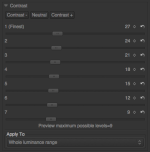
Save for Affinity:
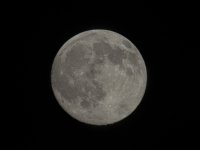
Affinity:
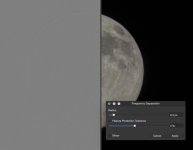
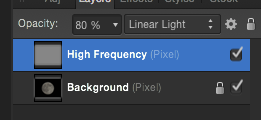
Delete low frequency layer, lower opacity and merge, save.
Open in RT
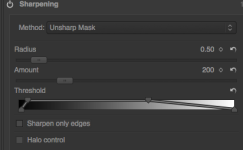
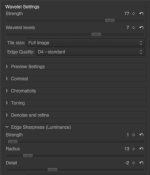
And save the end result:
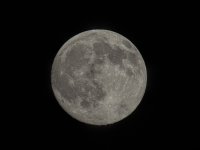
This is a quick edit and it needs some fine-tuning but it gives some idea how to use wavelets and pull detail.
In RT I always use RL deconvolution as a first step when cropping. Usually min size, strength 40, damping 50, itterations 60. Those settings pull detail without causing artifacts. Depending the size I increase or decrease those settings.


Save for Affinity:

Affinity:


Delete low frequency layer, lower opacity and merge, save.
Open in RT


And save the end result:

This is a quick edit and it needs some fine-tuning but it gives some idea how to use wavelets and pull detail.
Some more about wavelets.
What I find giving the best result is applying contrast and chromaticity wavelets at strength 30 to the full NEF together with RL deconvolution sharpening and then converting the shot to the output format (1024*whatever for here).
To that output format I apply the wavelet sharpening usually at strength 25.
The result is phenomenal when it comes to pulling detail and sharpening and it doesn't suffer any of the artifacts or halos you get when applying unsharp mask sharpening.
Also; applying the igv demosaicer delivers better quality than the rest of the options. It does make a difference which demosaicer you use.
I've always been impressed by what RT brings to the table and allows me to do but since I can use wavelets this editor simply has no competition.
It's free; try it. It's a better investment than new glass.
If anyone is curious if RT is worth the effort of learning you can always process your shot to the max in your editor of choice, show it here and upload the NEF. I don't mind processing it in RT and show that result so you can decide if it makes enough difference and is worth the bother.
Last edited:
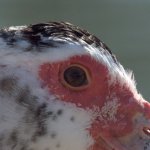
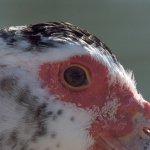
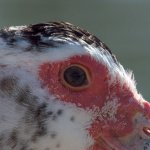
unsharpened vs unsharp mask vs wavelet + sharpening. (100% crops)
The unsharp mask comes pretty close to the wavelet IMHO.
The wavelet does manage to get more out of the pink skin around the eyes though.
Considering its free RT is amazing.
The unsharp mask comes pretty close to the wavelet IMHO.
The wavelet does manage to get more out of the pink skin around the eyes though.
Considering its free RT is amazing.
You notice it better when you compare the shots on the computer. If you look at the white feathers between the eye and the beak you see that where unsharp leaves them a bit fuzzy, wavelets manage to pull slightly more detail.
Wavelets combined with RL Decon are able to recover a degree of the lp/mm the lens can not resolve and when applied within reason, they do so with very little artefacts. It artificially boosts the capacity of my Tamron and makes her better than she is.
It's indeed amazing what it can do for a program that is free. It shows that if the right people cooperate free soft can turn out to be fantastic.
But it depends a bit upon the shot itself how much effect it has. On my moonshots it works phenomenal.
Here's someone explaining wavelets on his blog.
https://rawtherapeewavelets.wordpress.com/
It might be helpful.
It'll take some time before I'm used that I no longer work at the full image but at its individual layers.
https://rawtherapeewavelets.wordpress.com/
It might be helpful.
It'll take some time before I'm used that I no longer work at the full image but at its individual layers.
Last edited:
Here's someone explaining wavelets on his blog.
https://rawtherapeewavelets.wordpress.com/
It might be helpful.
It'll take some time before I'm used that I no longer work at the full image but at its individual layers.
Thanks for this. I now get what wavelets are. (the name makes sense when you see the preview pics)
I downloaded his pic and followed the tutorial. Wavelets are very powerful, hope he does a part two.
I am still struggling to get the shadows and highlights better in images with a high dynamic range - more playing required.
The menu system in RT takes some getting used to.
He indeed managed to explain it in an understandable manner. When I read the manual about wavelets I more often than not ended up scratching my head and having no idea at all what they are saying.
For highlights and shadows I usually use the LAB part in the first module. The first RGB mode doesn't work as well since in RGB the colors combined also define the luminosity so it is hard to adjust anything there without it affecting colors too.
In the LAB part you can edit the luminosity separate and I find that using the curves and other options there lead to more satisfying results. Even when I have to increase exposure, in RGB I rarely go higher than 1.5 stops. The rest I do in LAB by increasing brightness and when needed, increase chromaticity to add some more depth/richness to the colors. Chromaticity does not suffer the same problem saturation does when increasing. Even when too much will be too much, it somehow remains more natural in its look.
He indeed managed to explain it in an understandable manner. When I read the manual about wavelets I more often than not ended up scratching my head and having no idea at all what they are saying.
For highlights and shadows I usually use the LAB part in the first module. The first RGB mode doesn't work as well since in RGB the colors combined also define the luminosity so it is hard to adjust anything there without it affecting colors too.
In the LAB part you can edit the luminosity separate and I find that using the curves and other options there lead to more satisfying results. Even when I have to increase exposure, in RGB I rarely go higher than 1.5 stops. The rest I do in LAB by increasing brightness and when needed, increase chromaticity to add some more depth/richness to the colors. Chromaticity does not suffer the same problem saturation does when increasing. Even when too much will be too much, it somehow remains more natural in its look.
I left a comment on his blog and he responded saying he is working on a part 2.

