Photo Restoration

Horoscope Fish

Senior Member
Okay. I'm sorry for the hassle. I couldn't figure out what I was doing wrong in Dropbox, so I uploaded everything to Google. Here is the link:

https://goo.gl/photos/85EysCchY8De3bPG9

I'm also going to create a Nikonites list in Google+ right now.
Well you can do quite a bit with these shots if you know what you're doing. I'm not that good at color correction and I'm not totally happy with how this turned out (someone who really knows what they're doing could certainly do a much better job), but here's what I was able to get out of one of your shots.
.....
.....

Your Original:
.....
Original.jpg

.....
.....
.....
My Edited Version:
.....
Corrected.jpg

.....
.....
 

Retro

Senior Member
Thank you, Paul. I look forward to sending all of the corrected photos to friends and family when I have them all. I appreciate all the help. This roll of film was just in a junk drawer for many years, and I never bothered to bring it in for development. I never knew what was on it.
 

Scott Murray

Senior Member
Thank you, Paul. I look forward to sending all of the corrected photos to friends and family when I have them all. I appreciate all the help. This roll of film was just in a junk drawer for many years, and I never bothered to bring it in for development. I never knew what was on it.
Well you have some work to do then ;) or do you want forum members to edit/correct them for you?
 

Scott Murray

Senior Member
I haven't had time yet to find Lightroom and download it, but I will. I'll have to play around with it, and hopefully I can do what you guys have done.
We could edit them for you but I think you would get more value out of editing them yourself as you will learn more that way and can edit future ones if needed.
 

Retro

Senior Member
I have JASC, PS, and Picasa. I just looked up LR. It's $150 for the PC. Since I have the other 3, I see no reason to spend money for LR. Could you tell me what settings you play with to correct these photos? I'm sure one of the programs I have will have those controls. While playing around with options in the top menu bar for those first two programs, I have seen many things I knew nothing about. I'm sure I can make the corrections with one of them. Thanks.
 

Scott Murray

Senior Member
I have JASC, PS, and Picasa. I just looked up LR. It's $150 for the PC. Since I have the other 3, I see no reason to spend money for LR. Could you tell me what settings you play with to correct these photos? I'm sure one of the programs I have will have those controls. While playing around with options in the top menu bar for those first two programs, I have seen many things I knew nothing about. I'm sure I can make the corrections with one of them. Thanks.
Well the things that you are editing are the white balance mostly as the photos have a magenta cast, then you can change other aspects like contrast/shadows/highlights/exposure/noise reduction/sharpening etc each photo will be different, so have a play in PS and see what you come up with.
 

Horoscope Fish

Senior Member
I'd suggest you start with the White Balance tool in Adobe Camera RAW (or the Camera RAW filter in Photoshop). Find something neutral in the photo (watch the R, G & B indicators and when they're all equal, or very, very close to being equal, you know you've found a neutral spot) and hope for the best. Exposure and Contrast settings can be a big help as well. After the White Balance tool, I use Levels and/or Curves adjustment layers in Photoshop to make global edits (meaning RGB collectively) and tweaking the color-channels individually.

There's no single button-fix for this sort of thing, no recipes you can follow. You just need to learn what the tools are and how to apply them to get where you want to be.
....
 

WayneF

Senior Member
I have JASC, PS, and Picasa. I just looked up LR. It's $150 for the PC. Since I have the other 3, I see no reason to spend money for LR. Could you tell me what settings you play with to correct these photos?


Regarding White Balance correction:

Corel bought Paint Shop Pro from JASC about nine years ago. Back then, I don't remember it having a white balance tool. I don't know how it may have changed now.

Picasa has one, Temperature and Color Picker.

PS does too, the center gray eyedropper in the Levels tool is a WB tool. And of course PS also has its raw editor too (Adobe Camera Raw), with an even better newer WB tool. ACR does JPG too, but JPG has less range possible than raw.

We can just move the Temperature and Tint sliders back and forth, looking for a better white balance. Often the correct color will jump out at us, after we have the exposure adjusted about right.

The way the eye dropper WB tools work is that we click a white or neutral gray spot in the image, and any color cast there is removed from the image.

The best such white spot is a known white balance card (Known to be accurately neutral) placed in the scene (as a test) for the purpose.

But many pictures naturally have something pretty white in them, paper or envelopes, signs, T-shirts or shirt collars, a white dot in the pajamas, white plates or table cloths, church steeples or picket fences, etc, etc. Things that are adequately pure white, naturally found in many scenes. Vastly beats nothing.

Not all white things are pure and neutral, many things (like room walls or door frames and some clothes) are intentionally off-white, and not acceptable. If it does not work better, don't use it. But lots of things are intended to look very white, and they work greatly better than nothing at all.
See Easy White Balance Correction, with or without Raw
 
Last edited:

Felisek

Senior Member
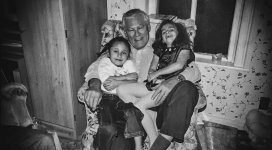
Here is my quick attempt. This one was tricky due to red cast, dominant in the background. I suppose I could do better with more time spent.

Image024_N24.jpg


Image024_N24 copy.jpg
 
Last edited:

Felisek

Senior Member
Far better skin tones than I was able to get! Would you mind explaining, briefly, what you did?
...

Don't remember every step, it was a few iterations, but roughly speaking:

- I used Photoshop CC and Nik tools.
- I cropped the image.
- I corrected the white balance in Camera Raw filter, picking white from the unwrapped thing (paper?) the lady is holding in her left hand
- In Viveza
-- selected the background on the right, reduced red channel, desaturated slightly and darkened
-- selected wall behind the sofa and darkened it, desaturated slightly
-- selected girl's face, brightened it, warmed it up a little (it looked greenish)
-- selected woman's arm, darkened very slightly to tone down flash reflections
- In Color Efex Pro, used the Glamor Glow and Dynamic Skin softener filters: this helped with skin tones a bit more
- Applied Sharpener Pro and Define to remove excessive noise

I think this is more or less it. After every step I was looking for more things to correct. I think skin tones can be further improved, and when I look at it again, the girl's face is still a touch too dark.
 

Horoscope Fish

Senior Member
Don't remember every step, it was a few iterations, but roughly speaking:

- I used Photoshop CC and Nik tools.
- I cropped the image.
- I corrected the white balance in Camera Raw filter, picking white from the unwrapped thing (paper?) the lady is holding in her left hand
- In Viveza
-- selected the background on the right, reduced red channel, desaturated slightly and darkened
-- selected wall behind the sofa and darkened it, desaturated slightly
-- selected girl's face, brightened it, warmed it up a little (it looked greenish)
-- selected woman's arm, darkened very slightly to tone down flash reflections
- In Color Efex Pro, used the Glamor Glow and Dynamic Skin softener filters: this helped with skin tones a bit more
- Applied Sharpener Pro and Define to remove excessive noise

I think this is more or less it. After every step I was looking for more things to correct. I think skin tones can be further improved, and when I look at it again, the girl's face is still a touch too dark.
Okay, yeah, I get the gist. Thank you... Viveza is nothing short of amazing (bummed I don't have NIK here in the office).
 

Retro

Senior Member
I think skin tones can be further improved, and when I look at it again, the girl's face is still a touch too dark.

The girl in the middle is my daughter, and that is her real skin tone. Thank you for doing that. I sent your correction to my sister-in-law.
 

Carroll

Senior Member
When scanning a print for editing, I have had the best luck at scanning at a minimum of 600 ppi, and a minimum of 300 resolution, and converting to a .tiff file. Most scanners can do this easily.

I used PS CC for this edit.

With the Saturation filter, I used the Red filter within this filter, to reduce the Red cast, and a little of the others.

I used Nik tools Glamour Glow in Color Efex Pro 4, to soften the harshness of the jpeg pixels.

And did some other stuff, too.

This is a small file, and will not print much bigger than 5x7, which is what I cropped it to. Because of the resolution (230), file size (143kb), it is difficult to do much with it. The larger you make this image, the worse it will look, due to those limitations. And, in my limited experience, the more you do to a jpeg, the more you risk making it look bad.

View attachment 173866
 

Retro

Senior Member
You guys are great! Thank you. I haven't had time yet to sit down and play with these. I've been working a lot of O.T., and also getting some grief for my computer time, so my chances are limited. I need to buy LR it seems. The watermark I've been using looks very unprofessional. I will try to play with these images as soon as I can, and try out all of your suggestions. I hope I can help you somewhere down the road.
 
Top