Clovishound
Senior Member
Disclaimer, I am still fairly new to macro. I am certainly no expert, nor did I stay in a Holiday Inn Express last night. These are some of the things I have learned that may be of help to some of you out there. These things are probably already known by the more experienced. Some of them may be wrong. If you think so I encourage you to say so, and why.
1. Get out there and shoot. That seems somewhat obvious, but it is important to spend time scouting locations and taking pictures when you find those good locations. The more I go out, the more keepers I get, and the keepers get better.
2. Luck is important. A prime example is this picture I took yesterday.
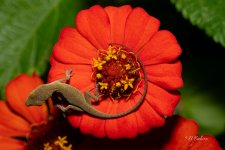
I'm not saying it's a great picture, but it is one of my best macro shots to date. I was incredibly lucky to get him with his tail curled around the center of the flower. The circles within circles and curves really made this shot, as well as the vibrant color of the flower. While there was certainly luck involved, the other side of the coin was that I spent a lot of time slowly walking back and forth in front of this flower bed looking for likely subjects. Had I just made one or two passes, I would have missed it, as he moved shortly after I took a series of shots. In many ways you make your own luck. You also have to be ready to take advantage of the lucky opportunities when they present themselves. In this case I had my camera set and ready to go without delay.
3. Take lots and lots of shots. With macro, even with the best technique, you will fall short many times with focus, composition and changes by the subject itself. Many subjects are on plants, webs etc that move with the least little bit of wind and the point of focus moves drastically. There are a few things that will mitigate this, but the best is to take a lot of insurance shots. You will quickly learn the situations that need a lot of extra shots, and those that may only need a few.
4. Try manual for everything. I quickly found that manual focus, manual exposure, manual ISO and manual flash settings were the way to go for me. Auto focus doesn't deal well with the extremely narrow focus band with close up photography. The lens will often hunt and hunt as that narrow band moves back and forth with the slightest movement of the subject or camera. I tried, briefly, TTL mode for my flash. It was a disaster. Many subjects are a bug on a stick, so the subject is very close to the flash, and the background can easily be many feet or yards away, giving little or no light back to the camera from the flash. The TTL system averages the scene, and will very frequently extremely overexpose the image. Since the flash is in manual, you will want your exposure set to manual. Set the shutter to sync speed, or slower and change the aperture as needed for DOF or exposure needs, although I change the flash power most often when I need to change exposure. Because the flash is in manual you will also want to have your ISO in manual. If the ISO is changing based on ambient light, you will have a real mess on your hands with either ghost images from low shutter speeds providing too much ambient light, and lots of noise from high ISOs trying to compensate for low ambient light levels. Not sure how different cameras deal with auto ISO settings when flash is connected and on. That may be a non issue with some cameras.
5. Small apertures can be your friend. Some say that small apertures, such as F16, and above can negatively impact picture quality. I haven't noticed this to be a problem for me. I see great benefit from the increased DOF offered by these small apertures. Of course the other solution to this problem these days is to use focus stacking. That is certainly a great option, but it can be time consuming and doesn't work well with live subjects unless they stay still for long periods of time. The down side to small apertures is that you need lots of light. Read on for the solution to that.
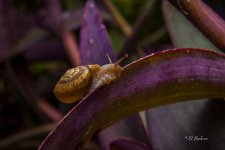
This shot was made at F22. The very front of the shell is not in focus nor is the very back of the shell. The DOF for this image was sufficient for the subject, barely.
6. Bring your own light. Since you will probably want small apertures, as well as low ISOs, you will need a bunch of light. Full sunlight will certainly give you that, but at the price of harsh light with deep shadows. Long shutter speeds will also give you that, at the expense of sharpness, unless the subject is rock still. They seldom are. The obvious solution is a flash. If you have a built in flash, it may work for you, but generally they have limited power. On camera flashes are fairly inexpensive, depending on what you get, and will easily provide you with lots of light since the flash is so close to the subject. You will want to diffuse the light to keep it from being so harsh, and there are many excellent and very inexpensive solutions out there, as well as some homemade ones.
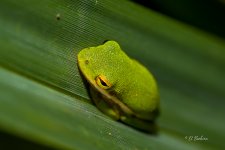
This image was taken with a Godox 685 and an $8 slip on the lens diffuser from Amazon. It was taken in deep shade that would have required an extremely long exposure to get to the ISO and aperture I wanted.
7. Learn the art of sneaking up on your subjects. Insects and other small subjects are the mainstay of macro work. There is a learned skill in getting close to them without spooking them into flight. It won't work with every individual, but you once you get the knack, you will get a much higher percentage of subjects that will tolerate your being close to them. Move slowly and steadily towards them. Stop whenever you see the critter getting nervous, give them some time to calm down and slowly move forward again. Avoid any sudden movements with your hands or feet while approaching, and also once you are in position close to them. Another technique is to find a spot that the insects like, and hang out close to it, and wait for the critters to lose their fear of you and come back. It takes a lot of patience, but can sometimes do the trick.
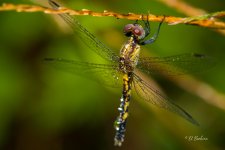
This dragonfly was pretty skittish, but I was patient and finally able to get close enough. He was very comfortable with my lens just inches away, until I made a sudden movement with my hand without thinking.
8. Tripod or not? There are upsides and downsides to using a tripod for macro. I started out using one almost exclusively. It is a must for ambient light macro work. Even using flash it can assist in making focusing easier and more precise, as well as making composition easier. The downside is they are heavy, cumbersome and by the time you get one set up the subject may be gone. Changing shooting angles and positions are also time consuming, and may very well scare off your subject. If you are using flash, they are unnecessary to obtain sharp photos. Shooting handheld gives you the freedom to quickly take from different angles and perspectives and doesn't lock you in. I always have my tripod in my car when I shoot macro now, but seldom do I use it. If you are shooting static subjects, it is probably worth using. If you are shooting insects or other small animals with flash, it's probably better to leave it in the car.
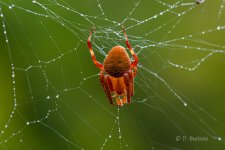
This is a picture I took before I got my flash. I shot it at F16 and 1/15 sec. It would have been nearly impossible to get a sharp shot handheld without a flash.
9. Keep an attitude of constant improvement. Certainly enjoy your pictures after you shoot and edit them, without that enjoyment you will quickly tire of the hobby. However, if you become complacent about the quality of your images, you will not move on the next level. Don't be afraid to be critical of your work. Not in a negative way, but to observe the good points that make it a pleasing image to you. You also need to observe the things about it that you could have done differently and would have made it better, and apply those things to your next shoot. It should be a growth process that continues.
10. Above all, have fun. It should be an enjoyable process.
1. Get out there and shoot. That seems somewhat obvious, but it is important to spend time scouting locations and taking pictures when you find those good locations. The more I go out, the more keepers I get, and the keepers get better.
2. Luck is important. A prime example is this picture I took yesterday.

I'm not saying it's a great picture, but it is one of my best macro shots to date. I was incredibly lucky to get him with his tail curled around the center of the flower. The circles within circles and curves really made this shot, as well as the vibrant color of the flower. While there was certainly luck involved, the other side of the coin was that I spent a lot of time slowly walking back and forth in front of this flower bed looking for likely subjects. Had I just made one or two passes, I would have missed it, as he moved shortly after I took a series of shots. In many ways you make your own luck. You also have to be ready to take advantage of the lucky opportunities when they present themselves. In this case I had my camera set and ready to go without delay.
3. Take lots and lots of shots. With macro, even with the best technique, you will fall short many times with focus, composition and changes by the subject itself. Many subjects are on plants, webs etc that move with the least little bit of wind and the point of focus moves drastically. There are a few things that will mitigate this, but the best is to take a lot of insurance shots. You will quickly learn the situations that need a lot of extra shots, and those that may only need a few.
4. Try manual for everything. I quickly found that manual focus, manual exposure, manual ISO and manual flash settings were the way to go for me. Auto focus doesn't deal well with the extremely narrow focus band with close up photography. The lens will often hunt and hunt as that narrow band moves back and forth with the slightest movement of the subject or camera. I tried, briefly, TTL mode for my flash. It was a disaster. Many subjects are a bug on a stick, so the subject is very close to the flash, and the background can easily be many feet or yards away, giving little or no light back to the camera from the flash. The TTL system averages the scene, and will very frequently extremely overexpose the image. Since the flash is in manual, you will want your exposure set to manual. Set the shutter to sync speed, or slower and change the aperture as needed for DOF or exposure needs, although I change the flash power most often when I need to change exposure. Because the flash is in manual you will also want to have your ISO in manual. If the ISO is changing based on ambient light, you will have a real mess on your hands with either ghost images from low shutter speeds providing too much ambient light, and lots of noise from high ISOs trying to compensate for low ambient light levels. Not sure how different cameras deal with auto ISO settings when flash is connected and on. That may be a non issue with some cameras.
5. Small apertures can be your friend. Some say that small apertures, such as F16, and above can negatively impact picture quality. I haven't noticed this to be a problem for me. I see great benefit from the increased DOF offered by these small apertures. Of course the other solution to this problem these days is to use focus stacking. That is certainly a great option, but it can be time consuming and doesn't work well with live subjects unless they stay still for long periods of time. The down side to small apertures is that you need lots of light. Read on for the solution to that.
This shot was made at F22. The very front of the shell is not in focus nor is the very back of the shell. The DOF for this image was sufficient for the subject, barely.

6. Bring your own light. Since you will probably want small apertures, as well as low ISOs, you will need a bunch of light. Full sunlight will certainly give you that, but at the price of harsh light with deep shadows. Long shutter speeds will also give you that, at the expense of sharpness, unless the subject is rock still. They seldom are. The obvious solution is a flash. If you have a built in flash, it may work for you, but generally they have limited power. On camera flashes are fairly inexpensive, depending on what you get, and will easily provide you with lots of light since the flash is so close to the subject. You will want to diffuse the light to keep it from being so harsh, and there are many excellent and very inexpensive solutions out there, as well as some homemade ones.
This image was taken with a Godox 685 and an $8 slip on the lens diffuser from Amazon. It was taken in deep shade that would have required an extremely long exposure to get to the ISO and aperture I wanted.

7. Learn the art of sneaking up on your subjects. Insects and other small subjects are the mainstay of macro work. There is a learned skill in getting close to them without spooking them into flight. It won't work with every individual, but you once you get the knack, you will get a much higher percentage of subjects that will tolerate your being close to them. Move slowly and steadily towards them. Stop whenever you see the critter getting nervous, give them some time to calm down and slowly move forward again. Avoid any sudden movements with your hands or feet while approaching, and also once you are in position close to them. Another technique is to find a spot that the insects like, and hang out close to it, and wait for the critters to lose their fear of you and come back. It takes a lot of patience, but can sometimes do the trick.
This dragonfly was pretty skittish, but I was patient and finally able to get close enough. He was very comfortable with my lens just inches away, until I made a sudden movement with my hand without thinking.

8. Tripod or not? There are upsides and downsides to using a tripod for macro. I started out using one almost exclusively. It is a must for ambient light macro work. Even using flash it can assist in making focusing easier and more precise, as well as making composition easier. The downside is they are heavy, cumbersome and by the time you get one set up the subject may be gone. Changing shooting angles and positions are also time consuming, and may very well scare off your subject. If you are using flash, they are unnecessary to obtain sharp photos. Shooting handheld gives you the freedom to quickly take from different angles and perspectives and doesn't lock you in. I always have my tripod in my car when I shoot macro now, but seldom do I use it. If you are shooting static subjects, it is probably worth using. If you are shooting insects or other small animals with flash, it's probably better to leave it in the car.
This is a picture I took before I got my flash. I shot it at F16 and 1/15 sec. It would have been nearly impossible to get a sharp shot handheld without a flash.

9. Keep an attitude of constant improvement. Certainly enjoy your pictures after you shoot and edit them, without that enjoyment you will quickly tire of the hobby. However, if you become complacent about the quality of your images, you will not move on the next level. Don't be afraid to be critical of your work. Not in a negative way, but to observe the good points that make it a pleasing image to you. You also need to observe the things about it that you could have done differently and would have made it better, and apply those things to your next shoot. It should be a growth process that continues.
10. Above all, have fun. It should be an enjoyable process.
