Closeups with D3400 - having great difficulty !!

Clovishound

Senior Member
The 18-55 was a "kit" lens that was offered with the D3400 and other crop sensor cameras. It was often paired with a 70-300. I purchased a D3400 for my daughter several years ago. It came with both of these lenses, plus a camera bag and memory card, and the kit was on sale, new, for $500. It isn't a top of the line lens, but, IMO, is a solid performer, especially considering the price point. Light, quiet, fast and positive AF, and decent optical performance. The Ken Rockwell review I read gave it very favorable marks, and even bragged about the close focusing it offered. They are available used, for around the price of a decent, but not extravagant, sit down meal for two.


Good idea to try out your buddy's lens on your camera.
 

MoreCowbell

New member
Okay, if you might please indulge this. I have learned a lot from comments in this thread - perhaps the most important one from Clovis about the subtle "half-trigger". I'm embarrased that I forgot that technique.

I made a few more attempts with the AF-P DX NIKKOR 18-55mm f/3.5-5.6G VR lens - this time with perhaps a little more success.
The pics are attached and I here provide a map indicating the settings. Perhaps you can vote on what you think is the best one, or maybe you have addditional suggestions. In what I did here, I think the key factors are:

1. The lighting (To do this, my lens needs a lot of light, which probably goes to comments about the flash attachment.)
2. The "half-trigger" before taking the final click.

My takeaway:
• The jalapeño pictures are probably the best (most useful).
Instructions for Form 1040-X (Rev. January 2023)
• The A/F mode was underwhelming.
• Macro mode was probably the best (read: sharpest).
• The A-priority mode rendered a decent image with a little wider DoF (but not as convenient as Macro.
• I still think this is not the best lens for doing shots like this but it's the best I have. An upgrade is in order ...

1719786251791.png
 

Attachments

  • 1719784928047.png
    1719784928047.png
    123.4 KB · Views: 52
  • DSC_0005.JPG
    DSC_0005.JPG
    901.7 KB · Views: 60
  • DSC_0006.JPG
    DSC_0006.JPG
    387.8 KB · Views: 60
  • DSC_0008.JPG
    DSC_0008.JPG
    728.5 KB · Views: 66
  • DSC_0009.JPG
    DSC_0009.JPG
    2.3 MB · Views: 72
  • DSC_0010.JPG
    DSC_0010.JPG
    2.3 MB · Views: 79
  • DSC_0011.JPG
    DSC_0011.JPG
    2.1 MB · Views: 65

Clovishound

Senior Member
Firstly, all the shots were sharp (within their depth of field) and had good resolution. This is a good starting point.

I notice you choose to shoot many at full wide angle. If you are looking at macro shots, I would choose the longest focal length on a zoom, unless you are using extension tubes and are able to get more magnification with a closer minimum focus distance at shorter focal lengths. I know, it's counter intuitive, but that is the reality with extension tubes. Having said this, you don't always need maximum magnification, but if you are up close, it's usually quite easy to back up a little to get everything you want in frame.

The other thing I noticed is that you were set at ISO 3200 in A mode. As a result you had unnecessarily high shutter speeds. ISO 3200 will give you very noisy images. I would use something like ISO 100 or 200 unless you really need higher ISOs in order to shoot faster shutter speeds handheld, or with a moving subject. Find out how low a shutter speed you can produce consistently sharp images at maximum magnification.

I would point out the difference in depth of field between the F8 shots and the F22/F36 shots. Of course the trade off is it requires more light. As magnification increases, DOF decreases, so the smaller apertures become more useful.

The other thing you need to do is to figure out what you want to take pictures of. Flowers, insects, snails, watches, each have their own needs and appeal. I remember Edward Weston was obsessed with peppers. I lean more towards insects, but am willing to branch out to other subjects when they present themselves.
 

Needa

Senior Member
Challenge Team
Already making improvements. (y) The difference I see with the clammyweed and the jalapeño is the frame is not filled, excluding the setting differences.
 

MoreCowbell

New member
By "closeup", what I mean is pointing the lens at an object about a foot away. Nothing is in focus !!

And that is exactly the point. You cannot bring that lens that close to your subject. It cannot focus that closely. Unless you assist it with the macro extension tubes.

If I can't figure out how to find a workable setting, I may have to splurge for the 105mm "micro" lens you mention. On that note, and just for the hell of it, can you pleae tell me the difference between these 2 lenses ($100 difference in price but they look superficially the same):


With your D3400, the first lens (less expensive) cannot autofocus at all. It uses the screw-drive system that your camera body does not have. You are forced to manually focus. The more expensive option is the correct one to autofocus on your camera body.

And this is a link for the macro extension tubes we have been taking about. Much lower cost option. Keep in mind if you seek out the cheaper under $20 versions they tend to not have the pass-through data connectors that allow the lens to talk to the D3400 and autofocus.

One last note - Even though Nikon specs the minimum focus distance at 9.8 inches be aware this certainly is at the max zoom of 55mm.
When you say:
"Even though Nikon specs the minimum focus distance at 9.8 inches be aware this certainly is at the max zoom of 55mm."
I'm a little confused. At this veryclose-in distance, NOTHING is in focus at the 55mm lens setting. I have to go to 18mm - just the opposite !! Maybe I'm not understanding something.
 

MoreCowbell

New member
I appreciate all review comments.

To be clear:
  1. All pictures I have posted are “hand-held”.
  2. No wind.
  3. The jalapeño pic is, imho, the best close shot attainable with my lens.
To Clovis:
  1. When you say “I notice you choose to shoot many at full wide angle. “ I’m not sure what you mean. For the images I posted, I simply come in as close as possible while trying to maintain focus.
  2. You also commented on the high ISO setting for the A-priority pic. In this mode, I only adjusted the F-stop up as high as possible (per BF’s advice above). I don’t remember any way to also tweak the ISO value. In this mode, ISO 3200 was chosen by the camera. Maybe I’m missing something.
To Needa:

“The difference I see with the clammyweed and the jalapeño is the frame is not filled, excluding the setting differences.”

I think you’re referring to the clammyweed pic, which isn’t very clear. For that pic, I came in as close as possible while trying to remain I focus. For some reason, the jalapeño pic just came out better in several aspects. As I said above, I simply come in as close as possible while trying to maintain focus.
 

Clovishound

Senior Member
4 of the 6 shots were shot at 18mm. If you were at minimum focus distance with these shots, at 18mm you will have far less magnification of the subject than shooting from the same distance and using the maximum focal length of this lens, which is 55mm. Your first jalapeño shot was taken at 18mm, and includes a lot of the plant and background. The next two were taken at 48mm and fill the frame with the pepper. Not all shots need to fill the frame with a small object, but that is what I understand you are attempting to do, and is generally considered to be the point of closeup photography. When using a zoom lens choosing a focal length setting is as crucial to framing an object as is focus distance. If you are looking to fill the frame with a small object, then choosing a longer focal length will help you do that, unless you are using something else to decrease minimum focusing distance.

If you aren't happy with the ISO setting in the closeup mode, you can change it by going into the menu and manually choosing the ISO you desire. The camera will then choose exposure settings at that ISO. I'm sure that your camera is currently in auto ISO mode. If you manually set the ISO, it will stay at that setting unless you switch to Auto Mode on the mode dial. It should then switch back to your selected ISO when you switch out of Auto Mode to any of the modes, like Aperture preferred, or closeup.

Regardless of the mode you are in, you need to pay attention to the exposure settings you are getting and make changes as necessary. You should find a mode that works best for you, your shooting style and what you are shooting. I use manual with auto ISO for most of my bird shooting. That works well for me, but I do have to watch what is happening with the ISO and sometimes change the shutter speed, or perhaps aperture. When I am shooting macro, I use full manual for everything when I'm using flash. If I switch to an available light macro shot, I normally switch to aperture preferred with manual ISO. These modes work for me. They may not work well for you.
 

MoreCowbell

New member
This comment:
"If you were at minimum focus distance with these shots, at 18mm you will have far less magnification of the subject than shooting from the same distance and using the maximum focal length of this lens, which is 55mm."

is similar to the one BF posed and to which I responded above (4:31 yesterday).

In further checking, I think I responded incorrectly. I had all along thought that the 55mm shots were hopelessly out of fucus. I just took another shot of the clammyweed blossom and was AMAZED at the result !! This pic was taken in A-priority mode at 55mm with max. F-stop (F22) and 1/800s exposure. The camera, being in "auto ISO mode", chose 3200. The detail here blows me away and is such that I have never accomplished. The shot (with its great resolution) was possible by using the "half-trigger" technique. That was the key ...

I take you point about going into the menu and selecting a hard-wired value for ISO, to keep it "low". But can you please explain what effect the ISO value has on image quality? I'm unclear on that. Why is 3200 "bad"? (Sorry to be so thick. :unsure:)
 

Attachments

  • DSC_0014.JPG
    DSC_0014.JPG
    1.8 MB · Views: 72

BF Hammer

Senior Member
Exposure is a triangle. A balance of lens opening (f-stop), shutter speed, and sensitivity to the light (ISO) must be found for good exposure.

With the tiny f-22 aperture, the photo needs a lot more light. It either means slower shutter speed or higher ISO, or both.

Each setting has trade-offs. Changing the Aperture (f-stop) also changes apparent depth of field. Shutter speed has other factors like how steady you can hold still before needing a tripod for motion blur (another way to make an unclear photo). ISO as it is increased will make extra noise in the image because the electric signal is having to be amplified way more, the ambient signal noise also gets amplified.

So when I advised Aperture priority mode at f/22, I knew the camera would adjust the shutter and ISO (hoping you used auto iso) to give that deeper depth of focal range. But at the risk of motion blur and more noise in the photo.

Ps: I like how you composed that new shot much better.
 

Needa

Senior Member
Challenge Team
A good exercise would be to set your camera at a given aperture then change the ISO say 100, 400, 800, 1200 and 3200 while changing the shutter speed to get a correctly exposed image. Make sure the image has both light and dark colors then examine different areas to see the how they are affected. Or check out some videos.

There is an image of the exposure triangle here with the side effects. https://creativeraw.com/practical-use-exposure-triangle-explained/

Here is a crop of the one of the images you posted. It has nice detail and since it was cropped in you can see it. I see you did similar by changing the focal length in today's post, nice image. These are what I was saying about filling the frame.
DSC_0010.jpg


Good luck with your journey.
 

MoreCowbell

New member
Excelent comments BF Hammer and Needa, including your triangle analogy and explanation of ISO. I will look at that link Needa - thanks.

As to "filling the frame", it seems like there are 2 ways to do it:
1. zoom in enough w/ any focal length setting to fill the frame.
2. Don't come in so close and, in postprocessing, crop the image to fill the frame.

I have been doing (preferring) #1.

The reason the Red-whiskered clamyweed blossom makes a good subject (imho) is that it presents a lot of fine detail, which I was finally (with great help on this thread) able to capture with my 18/55 lens.

Regarding ISO, it seems that Clovishound was arguing to go into settings and permanently set as a lower value (e.g., 100) whereas BF Hammer argued to leave as Auto. Maybe I have the wrong impression here ...

As to BF Hammer's question:
I just went out in good morning sunlight, set the camera in A-priority mode, and attempted a focus with full zoom to 55mm. Before I snapped the picture, I ramped up the F-stop to 22 (using the knurled wheel) and let her rip. The camera chose 1/800s exposure and in "auto ISO mode", chose ISO 3200. The camera was hand-held and even with that high ISO value, I got no blur.

As I said before, in the final analysis, I find that the Macro mode for this camera yields reasonably good photos for such subjects but this last one in A-priority mode is (in my mind) acceptable - and way better than what I was getting when I started this thread.
 

Clovishound

Senior Member
I don't think you should always use ISO 100. Just realize that high ISOs make for noisy images. There are definitely times when it is preferable to have a sharp, but noisy image vs a blurry image with little noise.

I do believe strongly that it is counterproductive to set your camera to some type of automatic mode and then pay no more attention to the exposure settings the camera is choosing. On the other hand, I am not one of those that think that anything other than manual mode is bad.

Just pay attention to what your camera is doing, and be ready to step in and make changes when necessary. Macro photography is one of those genres that, I believe, require a more hands on approach to settings.

If the Macro mode on your camera works best for you right now, then that is probably the technique you should use at this time. Just be open to trying other things and have an attitude of growth, vs stagnation.

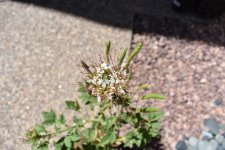
As to what high ISOs do to an image, I went out and took two pics with my D3400 and the 18-55 lens. Both were cropped to emphasize the differences. There is a difference of sharpness in some areas, like the center, that is due to a different focus point, or possibly motion blur (it was windy. I was looking just to show noise, so didn't bother to set up to get two aboslutely identical photos.

This is ISO 100

_DAB0073.jpg


This one is ISO 3200.

_DAB0074.jpg


If you look at the first, it is smooth and has lots of detail. The ISO 3200 has a lot of noise , which is particularly evident in the green portions between the petals at the corners of the image. This also translates to a loss of detail. The higher you go, the more noise is present.

I routinely shoot at somewhat higher ISOs. This is usually when I am shooting with a long telephoto handheld, and often have moving subjects, like birds. In this situation, it is either a noisy image that is sharp, or a blurry image. The latter is unacceptable. The difference with macro photography is that, usually you are going to be using smaller apertures, for increased DOF, which means that you are going to have to either add light, or use a tripod which will allow low shutter speeds. If you are going to do that, then often you have the option of keeping your ISOs low as well. Also, with macro, fine detail is a very important aspect of the image, and should not be discarded needlessly.

If you need higher ISOs to get a sharp photo, then by all means use a high ISO. That is preferable to either not getting the shot, or getting a useless, blurry shot. FYI there is software that will clean up noise from high ISOs, although usually at a cost of detail, and noisy images already have less detail to start with.

The photos you posted that had ISO 3200, also had shutter speeds of 1/400 sec and 1/1600 sec. You should be able get sharp photos handheld with a 55mm focal length using VR at 1/20 sec or lower. The rule of thumb without VR is 1/focal length. IE at focal length of 55 you should be able to get sharp handhelds at 1/55 sec.
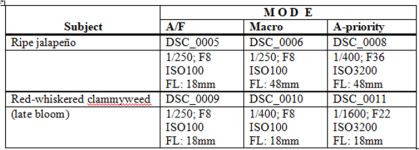
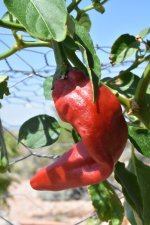
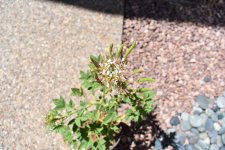
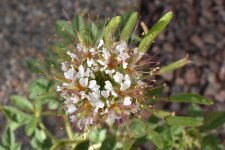
 

MoreCowbell

New member
Interesting comments Clovis ... The “noise” factor is subtle; I’d have to see many pictures to fully appreciate its effect. Both of the sunflower pics look great and I really appreciate the time you took to post them.

If I understand the D3400 at all, I believe one may select (say) the A-priority mode and – just before a picture is taken – pres “Info” and with the cursor select ISO and choose a different (perhaps lower) value for that shot. I have a lot of experimentation to do – long learning curve.

This is probably a good place to pause this thread. I wish to thank all who provided such quality information and guidance – far exceeded my expectations at the outset! Time is valuable and I really appreciate the time taken here to shepherd me through this close-shot dilemma with my VR 18-55mm lens. This has been a great forum. When I started, I was unable to get any decent shots and – thanks to help here – I got past that. I was almost ready to punt my 18/55 lens. The good suggestions about the AF-S Micro NIKKOR 105mm lens, as well as extension tubes, were all well taken. Now I think what I have is workable for my purposes. My sense is that close-in pictures are more challenging than long-range photos. I also have a Nikon VR AF-P NIKKOR 70-300mm lens I haven’t even used yet. My idea was to use if w/ a tripod for scenery/wildlife shots. If and when I get to that point, I may post back if I have issues.

P.S: That last closeup of the sweat bee on the sunflower is a money shot !!! :)
 
Top