BF Hammer
Senior Member
In another thread I created a small tangent regarding making panoramas with Autostitch. I think posting information here is more useful.
Autostitch is a free demo program created to showcase the code for stitching panoramas, and is commercially licensed through the University of British Columbia. Autopano Pro, Serif Panorama Plus, and Calico use the code with commercial license. The demo program is limited by design, but really still very powerful for an average user.
The current version 2.2 has been improved from the early releases. There are fewer things to change in the setup menu, but what is important is still there. It is 64-bit native now and the program is self-contained to 1 folder and does not leave a trace in Windows registry. It can be run from a thumbdrive or SD card and transplanted from 1 computer to another. A very lightweight footprint.
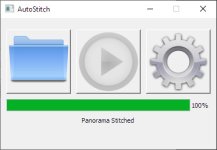
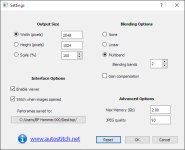
When you start the Autostitch.exe file, you see the first screen. Selecting the gear on the right brings up the settings menu. Changes here become defaults after. I have my width selected for the output file and the height will be automatic to match. The location where the panorama is save is also done here. After that just click on the file icon to select your files (jpeg only) and then just select the center "run" icon to make the image. Images will be analyzed, rotated if needed, and aligned.


I recommend taking images with at least a 25% overlap to get great results. This works equally well for vertical and horizontal stitches. Autostitch can also assemble in 2 dimensions, so 3 high and 6 wide is possible. Just do a good job of getting proper overlap while taking photos.
Some examples I have made in past years.
Ferry Bluff along the Wisconsin River (180-degree view)

Lake Superior shore at the mouth of the Montreal River (MI-WI border)

Tree at Picnic Point, Madison WI

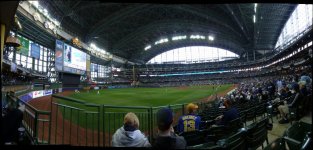
A couple of samples of "fails". I really made it tough with not enough overlap and moving people in the images. Given the location, not much to be done about that (Miller Park, now AmFam Park in Milwaukee). The stitching gave artifacts very obvious in the foreground.

Now here I have used Autostitch for the upper image and Hugin panorama for the lower image. Autostitch was unable to resolve the rightmost photo due to not enough overlap and just rejected it without comment. Hugin using the automatic modes did manage to stitch it without any real complaint. But Hugin is not anywhere near as intuitive to use. And looking around the rest of the image, the 2 different apps certainly give similar artifacts in the foreground.


No Autostitch won't be the only solution, but certainly it is quick and easy as a first try at stitching a pano.
Autostitch is a free demo program created to showcase the code for stitching panoramas, and is commercially licensed through the University of British Columbia. Autopano Pro, Serif Panorama Plus, and Calico use the code with commercial license. The demo program is limited by design, but really still very powerful for an average user.
The current version 2.2 has been improved from the early releases. There are fewer things to change in the setup menu, but what is important is still there. It is 64-bit native now and the program is self-contained to 1 folder and does not leave a trace in Windows registry. It can be run from a thumbdrive or SD card and transplanted from 1 computer to another. A very lightweight footprint.
When you start the Autostitch.exe file, you see the first screen. Selecting the gear on the right brings up the settings menu. Changes here become defaults after. I have my width selected for the output file and the height will be automatic to match. The location where the panorama is save is also done here. After that just click on the file icon to select your files (jpeg only) and then just select the center "run" icon to make the image. Images will be analyzed, rotated if needed, and aligned.


I recommend taking images with at least a 25% overlap to get great results. This works equally well for vertical and horizontal stitches. Autostitch can also assemble in 2 dimensions, so 3 high and 6 wide is possible. Just do a good job of getting proper overlap while taking photos.
Some examples I have made in past years.
Ferry Bluff along the Wisconsin River (180-degree view)

Lake Superior shore at the mouth of the Montreal River (MI-WI border)

Tree at Picnic Point, Madison WI

A couple of samples of "fails". I really made it tough with not enough overlap and moving people in the images. Given the location, not much to be done about that (Miller Park, now AmFam Park in Milwaukee). The stitching gave artifacts very obvious in the foreground.

Now here I have used Autostitch for the upper image and Hugin panorama for the lower image. Autostitch was unable to resolve the rightmost photo due to not enough overlap and just rejected it without comment. Hugin using the automatic modes did manage to stitch it without any real complaint. But Hugin is not anywhere near as intuitive to use. And looking around the rest of the image, the 2 different apps certainly give similar artifacts in the foreground.


No Autostitch won't be the only solution, but certainly it is quick and easy as a first try at stitching a pano.
