Jake's Backdoor Hippie-palooza, 2014 Edition

BackdoorArts

Senior Member
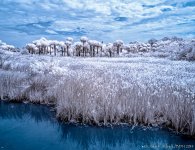
Since I haven't posted anything in a couple days, here are a couple edits from IR's I took this past Monday, taken at Merritt Island Nature Preserve.

20140324-IR0_9945-Edit.jpg


20140324-IR0_9942-Edit.jpg
 

hark

Administrator
Staff member
Super Mod
Contributor
I'm going off of sheer memory here, Jake, but is this coloring different from your Princeton photos? I seem to recall you once mentioned your brother helped you reconfigure something with IR, yes? If so, did you decide to keep the color change?
 

BackdoorArts

Senior Member
I'm going off of sheer memory here, Jake, but is this coloring different from your Princeton photos? I seem to recall you once mentioned your brother helped you reconfigure something with IR, yes? If so, did you decide to keep the color change?

I use different methods for different shots. Initially my Princeton shots were pure red/blue channel swaps and then some additional PP. I redid some of them after I got what amounts to a yellow/blue IR camera profile that my brother created using the Adobe DNG Profile Editor. Essentially I gave him an unretouched IR shot from my D7000 and he built the base profile. I then added it to the D7000 folder under LR's Camera Profiles and simply choose that if I want.

When I have time I'm going to start playing with creating custom profiles that replicate many of the basic adjustments I do for each camera. Once I have that under my belt I'll do a tutorial.
 

Marcel

Happily retired
Staff member
Super Mod
I like the blue color of the grass and trees but the brownish color of the water and clouds doesn't fit (just in my opinion). Maybe desaturate the brown to make it black&white? I don't know but maybe worth a try.

Great composition and detail!
 

BackdoorArts

Senior Member
I like the blue color of the grass and trees but the brownish color of the water and clouds doesn't fit (just in my opinion). Maybe desaturate the brown to make it black&white? I don't know but maybe worth a try.

Great composition and detail!

It's Infrared, Marcel, it's not supposed to fit. ;)

I could easily desaturate specific colors or go with pure B&W, but I really like how IR twists worlds around - dark is light, blue is yellow, etc. There are times I want to make beautiful landscapes, and others where I want the viewer to have to work to get it. I realize that not every, or even most viewers will, but that's OK because I was once there when I looked at my brother's work. When I start with an IR shot I know there are 3 or 4 different directions I can go with the color palate and if I don't have something specific in mind it's interesting to try several of them. These, for me at least, worked best going the way I did.

It would have been easy to do a channel swap IR and eliminate the "cotton candy" look to get this far more familiar look...

20140324-IR0_9945-Edit-2.jpg

...but where's the fun in that? :)
 

BackdoorArts

Senior Member
Now the REAL interesting thing is when you take the 2 IR images and open them as layers in Photoshop and start playing with blend modes. (insert evil laugh here)...

IR0_9945-Edit-2.jpg
 

Pretzel

Senior Member
It's really disheartening the way you just fart out edits while the rest of us "dabble for hours" and go to bed at 4 a.m. whilst crying the tears born of futility. :cool:

For the record, though, I absolutely love the 2nd edit, above, with the browns still in it. (the wider landscape)
 

BackdoorArts

Senior Member
It's really disheartening the way you just fart out edits while the rest of us "dabble for hours" and go to bed at 4 a.m. whilst crying the tears born of futility. :cool:

For the record, though, I absolutely love the 2nd edit, above, with the browns still in it. (the wider landscape)

Remember, farted out edits are a part of keeping your system regular, so there's a lot of fiber and dietary regulation going into this stuff. The real key to getting sleep is knowing how soon to give up on an image that won't turn into something. The rest is just practice.

The last one was just a whim - open the two photos as layers in Photoshop and then use a great shortcut I learned...
  1. Highlight the top layer
  2. Click on the Move tool
  3. Hold down the Shift key and us '+' and '-' to move through the Layer Blend Modes

Once you find something that works, play with the opacity until it's close and then flatten (or create a new layer from visible layers) and edit. With this one it was 100% Exclusion blend, which made it look like a negative, so I applied an Invert adjustment and then adjusted contrast. Nothing I ever would have thought to do, but once it's in front of me, I can see where I want to take it.
 
Last edited:

BackdoorArts

Senior Member
I love the IR look. I'm definitely planning on getting some IR filters.

IR is a lot of fun. Just realize that with IR filters you are going to need a tripod as the camera you have has a filter in the stack to remove a good chunk of the IR light, so when you stick the filter to remove the visible light in front then you're going to need longer exposure times in order to allow sufficient light into the camera to get a proper image. With a converted camera they remove the IR filtration from the stack and insert a visible light filter. Or, you can go dual spectrum in which case they do not insert the visible light filter and allow you to place either a visible light filter (allowing you to choose varying wavelengths for different IR effects) or an IR filter which lets you use the converted camera as before, to take photos with normal light. This is a little more expensive since you have to buy separate filters, but it allows the most flexibility.
 

wreckdiver1321

Senior Member
IR is a lot of fun. Just realize that with IR filters you are going to need a tripod as the camera you have has a filter in the stack to remove a good chunk of the IR light, so when you stick the filter to remove the visible light in front then you're going to need longer exposure times in order to allow sufficient light into the camera to get a proper image. With a converted camera they remove the IR filtration from the stack and insert a visible light filter. Or, you can go dual spectrum in which case they do not insert the visible light filter and allow you to place either a visible light filter (allowing you to choose varying wavelengths for different IR effects) or an IR filter which lets you use the converted camera as before, to take photos with normal light. This is a little more expensive since you have to buy separate filters, but it allows the most flexibility.

I knew I could either do the conversion or just use filters. I have a couple of possible plans. I don't have any problems with setting up a tripod and doing long exposures, so that's definitely an option. I might also pick up an older used body for cheap and do the conversion so I have an IR camera. Chances are I will get a body and do the conversion, but that's a little ways off yet. So I'll just get a filter or two in the short term and setup the tripod whenever I feel like getting an IR shot. :D
 

BackdoorArts

Senior Member
March 30, 2014 -

I'll tell you this, what I don't know about flash photography is a lot. But dammit, give me constant light in the studio and I can come up with something.

20140330-D80_8517-Edit.jpg
 

BackdoorArts

Senior Member
Had a black backdrop, but there were stems. Content Aware Fill takes care of that rather quickly.

I have no issues with flash on the camera, it's off-camera flash that still has me befuzzled.
 
Top