You are using an out of date browser. It may not display this or other websites correctly.
You should upgrade or use an alternative browser.
You should upgrade or use an alternative browser.
Jake's Backdoor Hippie-palooza, 2014 Edition
- Thread starter BackdoorArts
- Start date
nikonpup
Senior Member
home depot could produce a challenge winner.2014-075:
stepped away from the chess set and into home depot.
closest i've come thus far to getting something to "tile" - and i didn't mean to be punny
View attachment 78096
just before i rearranged them into their precise latitude and longitude.
View attachment 78097
i was on the fence about this post...
View attachment 78098
(insert witty pun about brushing it off here)...
View attachment 78099
2014-076:
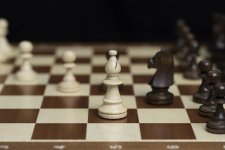
Checkmate
View attachment 78112
A lot going on in this one, and I may need to rethink and re-tweak before putting it in the monthly deal, but I wanted to get this up early as I'm going to be out of pocket for a bit.
If for some reason you don't see pics from me for a couple days, fear not - I'll be shooting, but may not get to import them right away.
This is just plain good, maybe even really good, above average at least!
BackdoorArts
Senior Member
This is just plain good, maybe even really good, above average at least!
Given that above average was precisely what I was shooting for, I believe there's a Tullamore Dew and a Guinness with my name on it!!
BackdoorArts
Senior Member
^^^ or two if we ever get to meet!
I need to check into stacking.
Any chance of getting 96 hour days?
Absolutely, provided you're willing to opt for 2 day weeks.
2014-076:
Checkmate
Not if King takes Queen that doesn't seem protected...
BackdoorArts
Senior Member
Not if King takes Queen that doesn't seem protected...But a great shot it is!
That's what happens when you have to reset the pieces!! I had it too close to the edge of the board and moved them all. I made damn sure everything was set the first time, but squirreled it up when I shifted everything and got rid of a bishop because it was too far out of shot.
Dammit, Marcel, you always ruin my chess shots!! LOL
BackdoorArts
Senior Member
2014-077:
Quick trip to FL to help my Mom out and attend a wedding on the other side of the state. We dropped in to see if the Ft. Myers Bald Eagles were around on our way in from the airport, but the young'un was in the nest and the parents out and about. On my way to the car I thought, "Better squeeze something off, just in case", and I'm glad I did. So, here you have an abysmally composed photo of a Canon shooter with a lot of wildlife gear, with the eagle's nest in the tree in the background. A photo that would never see the light of day if not for this year-long effort.

And while it wouldn't have counted towards a "photo from March 18", this is one that I did on the plane flying in. Single image, sliced and diced into about 14 layers at one point. So while I didn't "take it" I did "make it" yesterday.

Quick trip to FL to help my Mom out and attend a wedding on the other side of the state. We dropped in to see if the Ft. Myers Bald Eagles were around on our way in from the airport, but the young'un was in the nest and the parents out and about. On my way to the car I thought, "Better squeeze something off, just in case", and I'm glad I did. So, here you have an abysmally composed photo of a Canon shooter with a lot of wildlife gear, with the eagle's nest in the tree in the background. A photo that would never see the light of day if not for this year-long effort.
And while it wouldn't have counted towards a "photo from March 18", this is one that I did on the plane flying in. Single image, sliced and diced into about 14 layers at one point. So while I didn't "take it" I did "make it" yesterday.
Last edited:
BackdoorArts
Senior Member
And for the curious wondering, "14 layers?!", here's the original photo...

and the process with layer names...
Layer 1 (background) - Background
Layer 2 (new background) - Replicate backround (non-destructive edit), adjust light and use Smart Fill to remove the numbers.
Layer 3 (pure Bishop) - Use the Quick Selection tool to select the Bishop into its own layer
Layer 4 (movement) - Replicate Layer 3 and apply Motion Blur at an angle approximating its move on a diagonal. Reposition so that the movement ends at the bishop.
Layers 5-8 (more movement) - Replicate Layer 4 to intensify the blur (original was very faint). These are eventually combined into a single layer with Layer 4. After Layer 9 is created and the movement layers combined I used the Perspective Correction tool on this layer only to shrink the left side of the blur to match the resized Bishop. I then applied some contrast and brightness adjustments to the movement, and then a bit of Field Blur to soften the lines.
Layer 9 (original Bishop) - Replicate Layer 3. Move to starting square and use Transform to shrink the Bishop to look as if it was moved. Apply field blur to approximate Depth of Field. Layer opacity reduced to around 25%.
Layer 10 (Bishop overlay) - Replicated Layer 3 and reduce opacity to about 11% to enhance the lines of the piece obscured by the blur.
Layer 11-12 (moving Bishop) - Replicate Layer 10 twice and reposition along the path to show moments during movement. I ultimately did not use these.
Layer 13 (flatten composite) - Using Command-Option-Shift E I created a new layer of all the visible portions, which preserved the edits but allows me to apply global changes like vignettes, sharpening, etc.
Layer 14 - Replicate Layer 13, apply High Pass Filter, set the layer blend to Vivid Light, and reduce opacity to sharpen.
And there you have it. As it exists now, there are are only 4 visible layers preserved as edits (the new background, the movement, the original bishop and the bishop overlay), and 2 visible layers hiding that (the flattened composite and the high pass filter). Once complete, I did some minor tonal tweaking in LR before exporting.

and the process with layer names...
Layer 1 (background) - Background
Layer 2 (new background) - Replicate backround (non-destructive edit), adjust light and use Smart Fill to remove the numbers.
Layer 3 (pure Bishop) - Use the Quick Selection tool to select the Bishop into its own layer
Layer 4 (movement) - Replicate Layer 3 and apply Motion Blur at an angle approximating its move on a diagonal. Reposition so that the movement ends at the bishop.
Layers 5-8 (more movement) - Replicate Layer 4 to intensify the blur (original was very faint). These are eventually combined into a single layer with Layer 4. After Layer 9 is created and the movement layers combined I used the Perspective Correction tool on this layer only to shrink the left side of the blur to match the resized Bishop. I then applied some contrast and brightness adjustments to the movement, and then a bit of Field Blur to soften the lines.
Layer 9 (original Bishop) - Replicate Layer 3. Move to starting square and use Transform to shrink the Bishop to look as if it was moved. Apply field blur to approximate Depth of Field. Layer opacity reduced to around 25%.
Layer 10 (Bishop overlay) - Replicated Layer 3 and reduce opacity to about 11% to enhance the lines of the piece obscured by the blur.
Layer 11-12 (moving Bishop) - Replicate Layer 10 twice and reposition along the path to show moments during movement. I ultimately did not use these.
Layer 13 (flatten composite) - Using Command-Option-Shift E I created a new layer of all the visible portions, which preserved the edits but allows me to apply global changes like vignettes, sharpening, etc.
Layer 14 - Replicate Layer 13, apply High Pass Filter, set the layer blend to Vivid Light, and reduce opacity to sharpen.
And there you have it.
That's what happens when you have to reset the pieces!! I had it too close to the edge of the board and moved them all. I made damn sure everything was set the first time, but squirreled it up when I shifted everything and got rid of a bishop because it was too far out of shot.
Dammit, Marcel, you always ruin my chess shots!! LOL
If I keep on pulling you'll end up with one leg longer than the other. LOL!
BackdoorArts
Senior Member
2014-078:
Two things I love about visiting Florida (there aren't a ton of them)...
Sunrises...

...and breakfast at the Go-Go Diner in Ft. Myers


Two things I love about visiting Florida (there aren't a ton of them)...
Sunrises...
...and breakfast at the Go-Go Diner in Ft. Myers
BackdoorArts
Senior Member
That is some serious photoshop work! Awesome Jake. I would never have though of using motion blur..
I am going to the Adrian Sommeling workshop on Sunday, hope I'll learn enough to pass something on here.
Sent from Tapatalk
There's always something to learn. It's funny, but when you lay it out it seems like so much, but after you get the concepts it's like everything else - it becomes intuitive and when you want more of this or something like that you know where to go. In the last chess photo the two things that were new to me were the idea that selective motion blur can be moved to where you want it so it ends at a point rather than radiating from it, and that when something doesn't have quite the impact you want (i.e. the blur) you can replicate it and stack it to make it more pronounced.
Enjoy the workshop!!
BackdoorArts
Senior Member
Not exactly what I needed to see right now as I am starving and there is nothing to eat in the house!
Great shots though.
I've never been a big corned beef hash person, but I get cravings for this version when I'm home - and it's 1000 miles away - so I can relate.
BackdoorArts
Senior Member
2014-079:
Sunrise Palm

Infrared...

Sunrise Palm
Infrared...
