Newbie's (blackstar) Moon Shot questions and helps

hark

Administrator
Staff member
Super Mod
Contributor
Petapixel is a decent web site that gives valid information. Here is an article telling how to get Milky Way images using a crop sensor body with a kit lens.

https://petapixel.com/2019/05/01/how-to-shoot-milky-way-photos-with-a-crop-sensor-dslr-and-kit-lens/

You do need to be aware of the length of time for each image. Too long will create star trails. There are lenses for DX bodies that offer a 10mm to 12mm focal length (equivalent field of view to 14mm to 18mm on an FX body). But whether or not they would be good for Milky Way photos, I don't know. Anyway, seems like you are jumping into the Photo Pills app. Good luck with it! :encouragement:
 

Dawg Pics

Senior Member
D850 is the latest Pro-model (Nikon's term) full frame.
Full frame does a better job in low light.
Splurge on the Rokinon, you need as much light as you can get for astrophotography.
 

blackstar

Senior Member
Hi Cindy, Thanks for the info and link.

Hi Dawg, Thanks for correcting my wrong assumption. I am holding my hand (and $) from Rokinon now. Don't want to jump up too soon and by the way, it is clarified that an entry-level camera like D3500 can do a good, if not the best, job for astrophotography. I'll learn from here and upgrade anytime later.

Now I think I have gotten enough info to start and pretty much practice before me. It will be a busy and hard long time to dig out all I need to know and to practice and experiment for all the validation and preparation before the go time comes. Thank you everyone.
 

Moab Man

Senior Member
Thank you so much for the info, Moab. (And thank Cindy for the connection)

1. When you took those striking shots of the milky way, could you clearly see the milky way with your bare eyes at the scene or just the bright twinkling stars?

2. What's the camera and lens you used for those night-sky shots, especially ones with the milky way? I heard (or read) that only full-frame lenses can catch the milky way (and stars), and other lenses would only catch stars without the milky way. Is this true?

Thanks for the help and Happy Holiday to you and your family!

Answer 1: Yes, the Milkyway was visible to the eye clearly. However, the Milkyway is not always view-able. I like the program Stellarium.org (the website) to plan my night photography trips. I can plug in any give date/location/time to see what is available in the night sky. Works spectacularly.

Answer 2: Some already pointed out that you can hover over my image to see what was used. As to full framer versus crop. Yes, full frame does capture low light better. However, I have still captured spectacular images on my crop sensors as well.

Answer 3 (the question not asked): Milkyway photography REQUIRES editing. There is a lot that goes into creating that final image. Enhancing the color, reducing noise, contrast, darkening the dark lanes, etc. There is more learning for the edit than there is for learning the camera.

Answer 4 (another not asked): Quality of the night sky is everything. From going to the darkest skies you can find to having a night when the stars are NOT twinkling. Twinkling stars are disturbances in the atmosphere. The higher your altitude the better.

Hope this all helps.
 

blackstar

Senior Member
Hi Moab, Thank you for replying and answering my questions plus unasked.

I checked up the Stellarium site and found they have three versions of the program: web star map version (free), desktop Stellarium astronomy version (free), and mobile app ($10 and $3 versions). First, I like to install the desktop version, but the latest version (0.19.3) won't work with my mac 10.11 (require 10.12 and up). Do you know if 0.18 or 0.17 would work with mac 10.11? (** Ok, I got Stellarium 0.19.1 that requires mac 10.10 and up. :) ) Second, the web version shows the star map of my place (city). How do I direct it to show star maps at other places? Third, How big difference between the Stellarium mobile plus app ($10) and Stellarium mobile app ($3)? The plus version states it works without internet connection with reduced data set. Does the regular version work the same way?

You mentioned: "I have still captured spectacular images on my crop sensors as well" I assume you done that with high-end lenses though?

I pretty much planned and settled with Darktable, Gimp, and Gimp-startrail-compositor for my post-processing work. (they are all free :) ) I still have much studying and learning with these software programs ahead though.

Appreciate and wish you a Happy Holiday!
 
Last edited:

Moab Man

Senior Member
Hi Moab, Thank you for replying and answering my questions plus unasked.

I checked up the Stellarium site and found they have three versions of the program: web star map version (free), desktop Stellarium astronomy version (free), and mobile app ($10 and $3 versions). First, I like to install the desktop version, but the latest version (0.19.3) won't work with my mac 10.11 (require 10.12 and up). Do you know if 0.18 or 0.17 would work with mac 10.11? (** Ok, I got Stellarium 0.19.1 that requires mac 10.10 and up. :) ) Second, the web version shows the star map of my place (city). How do I direct it to show star maps at other places? Third, How big difference between the Stellarium mobile plus app ($10) and Stellarium mobile app ($3)? The plus version states it works without internet connection with reduced data set. Does the regular version work the same way?

You mentioned: "I have still captured spectacular images on my crop sensors as well" I assume you done that with high-end lenses though?

I pretty much planned and settled with Darktable, Gimp, and Gimp-startrail-compositor for my post-processing work. (they are all free :) ) I still have much studying and learning with these software programs ahead though.

Appreciate and wish you a Happy Holiday!

Sorry, I am not a Mac person. I use plain old Windows 64 bit Stellarium and I am of no use as to the varying versions. They didn't have all of that when I first downloaded the program.

On my crop sensor I was not using a high end lens, but a great lens none the less. It was the Tokina 11-16mm. It's a great lens and doesn't break the bank when you're getting started. They came out with a newer version, can't say which is better.
 

blackstar

Senior Member
Hi,

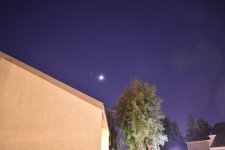
Finally, made a (city) night sky shot experiment. First notice and impression: light pollution was big, something wrong with the moon (suppose to be a new moon), stars unexpectantly and surprisingly showed up in images... need your comments.

2019-12-30 18.20.07s.jpeg

2019-12-30 18.23.05s.jpeg

2019-12-30 18.23.52s.jpeg
 

hark

Administrator
Staff member
Super Mod
Contributor
Do you have Active D Lighting turned on? If you are shooting jpegs and it's on, turn it off and try again.
 

blackstar

Senior Member
Thanks, Cindy.

I'll try that next time. For the experiment, I shot fine RAW & jpg in M mode. I still don't quite understand how "Active D Lighting" works with any shot and makes any effects (like broke)? From the Manual, it states: Active D-Lighting preserves details in highlights and shadows, creating photographs with natural contrast. Use for high contrast scenes, for example when photographing brightly lit outdoor scenery through a door or window or taking pictures of shaded subjects on a sunny day. Active D-Lighting is not recommended in mode M; in other modes, it is most effective when used with L (Matrix metering; 0 Metering). And there's the remark: "With some subjects, you may notice uneven shading, shadows around bright objects, or halos around dark objects." It is not clear this remark statement refer to when ADL is on or off. I suppose it's for ADL on and that the light reflections in my experimental images are the "halos" effect of ADL?

My main thought on the experimental shots is: considering the iso and speed I set, although higher iso and lower speed make the whole sky brighter (first image), stars are also brighter and sharper (if look carefully). I think the point is it's the right setting for the faraway stars and it can be post-processed to make the sky darker if desired.

I am still puzzled and not sure how a nature new moon showed up as a bright star in the images? Maybe too high iso? I think I had tried my best on focusing. Any one?
 

Dawg Pics

Senior Member
The moon: Probably a combo of overexposure and lack of sharp focus. Turns the crescent into a bright airy disc. Did the moon look sharp in the viewfinder? If so, then it probably just way over exposed from the long exposure. Shooting at the moon is like shooting at a light bulb.

Just want to add that I didn't look at the moon last night, but if there was any Earthshine on it where the dark side was still kind of lit up, then that will add to your exposure problem.

But, hey. That last image with the long exposure kind of made a secant from the airplane. Ha.
 
Last edited:

hark

Administrator
Staff member
Super Mod
Contributor
Thanks, Cindy.

I'll try that next time. For the experiment, I shot fine RAW & jpg in M mode. I still don't quite understand how "Active D Lighting" works with any shot and makes any effects (like broke)?

It makes a moon look fuzzy around the edges, and even with RAW images, Active-D lighting will affect the file. But if you had it turned off, then it's from something else. I remember posting a pic here years ago of the moon when Active-D lighting was on. Anyway, I hope you find your solution!
 

TwistedThrottle

Senior Member
If you are trying to shoot the moon- like to show texture on the surface, set the aperture to f8, iso 800 and 1/800 shutter speed. These are my base settings for the moon and typically play around from there.
If you are shooting stars, open the aperture up as much as possible, set the shutter to 10, 15 or maybe 20 seconds and the iso to 1600- 3200+. With these settings, the moon will reflect too much light into the lens and all detail is blown out, so its best left out of the frame.
The halos you are seeing in the bottom right side of your frame is called lens flare. Its from having a bright light source bounce the reflection off several layers of lenses inside your lens. Correct this by moving the light source further out of your frame.

Also, if you have the camera set to ADL, I dont think you can have it set to record in RAW as well. No bother, typically the areas that are too shaded for a typical shot can be brought back in lightroom. I rarely use ADL -unless your shooting a group of people at night in a doorway and want detail on both the light and dark side of the door out of camera. Its more of a JPG feature. The way to do that with RAW would be to shoot an under exposed image and then an over exposed image (or a combo of several at different exposures) and then use "image stacking" in Lightroom. That way, you keep all the data from the RAW files instead of a single baked image the camera thinks you want.
 

blackstar

Senior Member
@dawg, I didn't look in the viewfinder, just live view. But I am pretty sure now the moon problem is caused by high iso and long speed... and maybe ADL also, and it was a helicopter flying there...
@hark (Cindy), Oh, I have ADL on all the time since I got my D3500.. and I checked RAW images and they also have the same halos and bright shining moon :( Would you mind let me know which sub-forum and thread you posted your moon image with ADL on? I like to check it out. Tks
@TwistedThrottle, Thanks for the tip for moon shooting. Since the new moon was bit small and less bright, I set the exposure to the midway of shooting stars... and yet, this is just experimental shots under non-ideal conditions (city with lot light pollution and less bright stars), but still good experience and learning. As for the ADL effects, I am not very concerned as long as knowing how it gets there and how to avoid it (by away from those light sources) except if the moon problem is caused (alone or combined with other factors) by this ADL setting. AW, I set ADL to off since we started discussing ADL.

My next experiment may be taken at a neighborhood park keeping city light a further away and picking a night without moon. And try shooting with no or little ground scene.

Thank you, everybody and Happy New Year!
 

Moab Man

Senior Member
Because the moon is a reflector bouncing the light of the sun you will be closer to shooting a daylight shot than the settings of a night shot. The stars showed up because a sensor is more like a glue tape that is collecting light that you can't see until it becomes visible on the sensor. When I shoot the Moon I'm at 1/640 f/8 iso 250. But that is exposing for the moon. This is why the stars don't show up in an exposed for the moon shot.

W_500_2613.jpg
 

blackstar

Senior Member
Hi Moab,

Wow! I like your moon shot and the explanation. Just wondering when you took the shot, how big the moon in your bare eyes? Could you see (from bare eyes) all the details as in the photo? I only have another Nikon DX 70-300mm. Guess if I zoom into 250mm, I will get a moon only a quarter size as in your photo? That's a pity! Oh, well... :)
 

Moab Man

Senior Member
Hi Moab,

Wow! I like your moon shot and the explanation. Just wondering when you took the shot, how big the moon in your bare eyes? Could you see (from bare eyes) all the details as in the photo? I only have another Nikon DX 70-300mm. Guess if I zoom into 250mm, I will get a moon only a quarter size as in your photo? That's a pity! Oh, well... :)

The moon was no bigger or smaller than any other night. Hype around, it's the closest it will be means nothing. The distance is to far away to matter. As to all the detail, it's because I have cut down the light that washes out the detail you don't see. Cold winter nights, when the stars are not twinkling, are the best nights to shoot the moon. Twinkling of the stars is air disturbance disrupting lights path. Full moons are actually the worst to shoot, they show the least detail.
 
Top