resizing issue

dave42

Senior Member
Nikon D7100 18-140mm
iso 100
f5,6
1/500sec
90mm
.jpg
Large fine

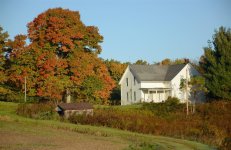
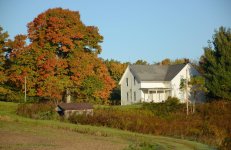
I took a pic of an old farm house with narrow board siding with the above details. The pic was fine, until I resized it with gimp. The one side of the house is all moire after resizing. I resized using a different software with better results, but still the effect is happening. It is the side of the house on the left. Again, the original pic is fine! Suggestions?

The first pic is the worst.. gimp . The second is with a different software.
utica 7 resized.jpgutica 7 resized 2.jpg
 
Last edited:

480sparky

Senior Member
Try resizing in multiple steps.

In other words, if your original is 5000 pixels and you want to reduce to 1000, reduce to 4000, then 3000, then 2000, then to 1000.

Sometimes using odd numbers helps. Say, 4110, then 2998, then 1987, then 1000.
 

dave42

Senior Member
I believe both are resized to 1614x1050.
I see what you're saying.. resize in steps! Cool! Thanks, I'll give it a try.
 

dave42

Senior Member
After looking on my hard drive, I found that the original was gone. But I found it still on my camera's card! After looking at the original, there is a slight bit of moire going on, but when in full size it doesn't really show. Running it through gimp and resizing just enhanced it. Crap. Resizing in steps didn't help. Again crap.

I guess I better pay attention to this next time, and use suggestions like on this page..
https://photographylife.com/how-to-avoid-moire

Dave
 

480sparky

Senior Member
If it's not apparent in the original, changing things in the field isn't going to help. The issue is when you resize.

Another trick I've used (rarely, but sometimes it does work) is to resize the canvas around the image, rotate the image (say, 45°), then resize. Rotate the image back and crop out the empty canvas.
 
Are you using any kind of sharpening on the photo when you resize it? Also are how do you have the camera set up for sharpening? What Number? In case you do not know what I am talking about here are the instructions for setting the sharpness in your camera.

If you are shooting JPG I would suggest that you use the Fine>>Large setting and also set your camera for better sharpness.


Go into your Menus and highlight the "Shooting" menu (the camera icon)

Drop down to "Picture Controls" and click right one time.

From here, highlight "Standard" and then click right one time.

From this settings menu, increase the "Sharpness" setting to "7".

Drop down and increase the "Saturation" setting +1 notch on the slider.

Press "OK" to exit the menus and you're done.


dave42

Senior Member
Don, I have my camera set just as described in your post. In gimp I usually just adjust color, brightness, and contrast... and of course crop. I see a tool for sharpening, but I don't use it.

Another interesting thing, when I open the original file to view in Windows Photo Viewer it looks pretty good and when I click to full view it looks just fine. But when I adjust the size in WPV there is a spot in between that the side of the building gets really crazy. I have other angles of the same building and they are good. Must be just the angle the pic was shot at.
 
Top