I shot some senior portraits of 2 seniors at my church and I've got an idea for one of the photos. The guy has been called to preach and I'd like to superimpose an image of an opened Bible on one of his pictures. How do I do it? I use Lightroom 5 but I don't think I can do it with that with it. What software would do it best?
You are using an out of date browser. It may not display this or other websites correctly.
You should upgrade or use an alternative browser.
You should upgrade or use an alternative browser.
Overlaying an image on another
- Thread starter Toddw
- Start date
![DSC_7012[1].jpg](/forum/data/attachments/46/46586-1c006dc3adac4ccf879fcbd4ec4714e8.jpg)
Don Kuykendall_RIP
RIP :(
You can do it with PhotoShop but that is expensive and there is a fairly steep learning curve. Also it is difficult to just take any two photos and put them together. Normally you would have planned and shot the photo with it in mind to begin with.
I've never used it, but a lot of people use GIMP as a free alternative to photoshop. GIMP - The GNU Image Manipulation Program
john*thomas
Senior Member

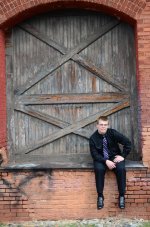
Show off... Exactly like that. How did you do it? That's exactly what I was liking to do. That looks great. I'd also like to take a color photo of his sister and convert it to black and white but leave her red shoes red. Will Lightroom do that? Thanks for all the help. I appreciate all the knowledge a novice like myself gains from all of you.
Sent from my KFTT using Tapatalk 2
Sent from my KFTT using Tapatalk 2
john*thomas
Senior Member
It takes hundreds of dollars in software and many hours of trial and error OR check your private messages.
BTW.....I don't see what camera you have. Many of them will do the red shoe thing right in the camera.
BTW.....I don't see what camera you have. Many of them will do the red shoe thing right in the camera.
Last edited:
This might help with the shoes:
Controlling Selective Color Changes in Lightroom | The Complete Picture with Julieanne Kost | Adobe TV
Controlling Selective Color Changes in Lightroom | The Complete Picture with Julieanne Kost | Adobe TV
BackdoorArts
Senior Member
It takes hundreds of dollars in software and many hours of trial and error OR check your private messages.
BTW.....I don't see what camera you have. Many of them will do the red shoe thing right in the camera.
I don't know about "hundreds", but any version of Photoshop Elements will do it - at least from version 9 on up. You can do it either with layers and masks or using the clone stamp tool. I prefer layers. Very quickly (and feel free to hunt down tutorials to fill in the details):
1. Find the photos you want to use and open them both in PSE.
2. Go to the portrait photo, hit ctrl-J to make a duplicate layer of the entire image because you're going to need to it in a minute.
3. Go to the Bible photo and resize it in such a way that it's the size you want it to appear in the other photo. Select the entire photo (hit ctrl-A to select all) and copy it (ctrl-C)
4. Go back to the portrait photo and hit ctrl-V to paste the Bible photo into the portrait as a new layer. Use the Move Tool arrow to position the Bible where you want it relative to everything else. Don't worry if there's extra stuff.
5. In the Layers palate on the right, drag the box for the duplicate portrait layer (likely called "Background Copy") up above the newly pasted layer of the Bible. This will cause the bible to disappear.
6. Go to the Layers menu and add a layer mask using the Reveal All option. Nothing will change, but you will now have a white box next to the layer.
7. Making sure that the white box is highlighted and not the photo in the top layer, select the brush tool. Change the brush so that the edges are soft (hold the shift button down and hit the left bracket ('[') key to soften the edge or the right to harden it), and the size is about 1/8 the size of the area you want to reveal.
8. In the bottom left of the toolbar, change the two colors so the current color is black and the background color is white.
9. Now, on the photo, use the paint brush to paint in the Bible. What you are doing is painting Black into the layer mask, which allows the layer beneath to show through. Keep painting until you reveal all that you want. If you reveal too much, use the color swap button to swap foreground and background colors (switch the black and white) and paint white back in.
10. If you want the edges to be softer and transition a little better, once you've gotten everything painted in, switch to white, and then change the opacity of the brush in the tool options to something like 20% and paint over the edges to soften the effect.
It will take some time and practice, but once you get used to it you'll be able to go fairly quickly.
j btw.....i don't see what camera you have. Many of them will do the red shoe thing right in the camera.[/quote said:d7000
john*thomas
Senior Member
d7000
So, did you get it figured out?
BackdoorArts
Senior Member
I believe you can only do selective color like that in-camera if the shoes are the only thing in red.