For those who use Photoshop, when do you convert your layer(s) to smart objects? Every time you make adjustments in Photoshop? I know there is a way to link images together and apply changes to all of them at the same time (which I'm not interested in doing right now). But the idea that the edits are non-destructive is appealing as is the fact that you can go back and change edits that were made in the past. Looking for pros and cons.
You are using an out of date browser. It may not display this or other websites correctly.
You should upgrade or use an alternative browser.
You should upgrade or use an alternative browser.
Smart Objects: when to convert?
- Thread starter hark
- Start date
Horoscope Fish
Senior Member
Primarily I use a Smart Layer when using ACR as a Filter from within Photoshop. The only other time I can think of is when I need to pull in/work with vector graphics (usually Adobe Illustrator files) from within Photoshop. If that's the case I go ahead and convert right away; but that's at work. I "get" smart objects pretty well, I just don't find them all that helpful in my day-to-day photographic processing.For those who use Photoshop, when do you convert your layer(s) to smart objects? Every time you make adjustments in Photoshop? I know there is a way to link images together and apply changes to all of them at the same time (which I'm not interested in doing right now). But the idea that the edits are non-destructive is appealing as is the fact that you can go back and change edits that were made in the past. Looking for pros and cons.
Primarily I use a Smart Layer when using ACR as a Filter from within Photoshop. The only other time I can think of is when I need to pull in/work with vector graphics (usually Adobe Illustrator files) from within Photoshop. If that's the case I go ahead and convert right away; but that's at work. I "get" smart objects pretty well, I just don't find them all that helpful in my day-to-day photographic processing.
Thanks, Fish. I've been watching a few videos on Smart Objects but I have a question I haven't been able to find answers for. Can smart objects have layer masks applied? Due to the name layer mask, I'm guessing not. I haven't used masks much so am still learning how to do them. In a couple of the videos, they show how the Gaussian blur can be added to the entire smart object then adjusted later on. But if only a part of the image has a Gaussian blur, can that be done via a Smart Object and layer mask?
I do use the Gaussian blur a lot but not as a mask or separate layer. Can you tell I'm still trying to wrap my head around layer masks and smart objects....
Horoscope Fish
Senior Member
I wasn't sure if this could be done or not, so I just tried it.Thanks, Fish. I've been watching a few videos on Smart Objects but I have a question I haven't been able to find answers for. Can smart objects have layer masks applied? Due to the name layer mask, I'm guessing not. I haven't used masks much so am still learning how to do them. In a couple of the videos, they show how the Gaussian blur can be added to the entire smart object then adjusted later on. But if only a part of the image has a Gaussian blur, can that be done via a Smart Object and layer mask?
I do use the Gaussian blur a lot but not as a mask or separate layer. Can you tell I'm still trying to wrap my head around layer masks and smart objects....
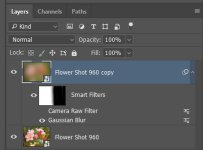
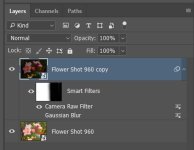
What I did was open a .JPG as a Smart Object in Photoshop. From there I duplicated the layer (Ctrl +J). The Copy Layer, it should be noted, opens as a Smart Object; meaning the Smartness carries over, which is nice. I then opened a Gaussian Blur Filter from the Filter Menu which automatically applied a White Mask. I was able to use this White Mask on the Copy Layer just like I would on a non-Smart Object layer. I was also able to employ Camera Raw as a Filter in conjunction with my Smart Object/Layer and Mask THAT layer and so forth and so on. From what I can tell there is absolutely no difference when using Filters or Masking a Smart Object/Layer as opposed to a non-Smart Object/Layer.
Now, I can't really see me needing to do this, personally, but it's good to know I can and I hope I've helped answer your question.
Some pics follow to help show what I did and how things look in PS:
.....
.....
Gaussian Blur Applied and Masked:
.....
.....
Detail of the Layers Panel:

.....
.....
ACR Adjustment (Layer Visible) with a Gaussian Blur (Layer Not Visible)
.....
.....
Detail of the Layers Panel:

.....
I wasn't sure if this could be done or not, so I just tried it.
What I did was open a .JPG as a Smart Object in Photoshop. From there I duplicated the layer (Ctrl +J). The Copy Layer, it should be noted, opens as a Smart Object; meaning the Smartness carries over, which is nice. I then opened a Gaussian Blur Filter from the Filter Menu which automatically applied a White Mask. I was able to use this White Mask on the Copy Layer just like I would on a non-Smart Object layer. I was also able to employ Camera Raw as a Filter in conjunction with my Smart Object/Layer and Mask THAT layer and so forth and so on. From what I can tell there is absolutely no difference when using Filters or Masking a Smart Object/Layer as opposed to a non-Smart Object/Layer.
Now, I can't really see me needing to do this, personally, but it's good to know I can and I hope I've helped answer your question.
Thank you for the info, Paul. After you posted this, I started to work on a photo only to find out a neighbor went into cardiac arrest. Sadly he didn't make it, and I haven't gone back to try it again. I need to learn how to apply the Gaussian Blur with a layer mask. I've simply been using the selection tool directly on the layer then applying the blur. Granted I can't go back and make any adjustments, but it threw me when I tried using a layer mask with the Gaussian Blur! BUT...I need to figure this out because I'd prefer being able to make changes down the road if necessary.
Thanks again! :encouragement:
Horoscope Fish
Senior Member
Hey Cindy... Certainly no need to apologize and condolences on the passing of your neighbor.Thank you for the info, Paul. After you posted this, I started to work on a photo only to find out a neighbor went into cardiac arrest. Sadly he didn't make it, and I haven't gone back to try it again. I need to learn how to apply the Gaussian Blur with a layer mask. I've simply been using the selection tool directly on the layer then applying the blur. Granted I can't go back and make any adjustments, but it threw me when I tried using a layer mask with the Gaussian Blur! BUT...I need to figure this out because I'd prefer being able to make changes down the road if necessary.
Thanks again! :encouragement:
As for you wanting to learn to Mask your Gaussian Blur filter, it's easy-peasy... Once you know how.
For me, Masking was One of Those Things that needed to "click", I needed that "ah HA!" moment and once that happened it was all downhill. I don't know if you want to have a conversation about how to do this or not, but I'll put out some information that might help. I think you're pretty savvy with PS in general so I'm going to make some basic assumptions about your knowledge of getting about in PS and how it works.
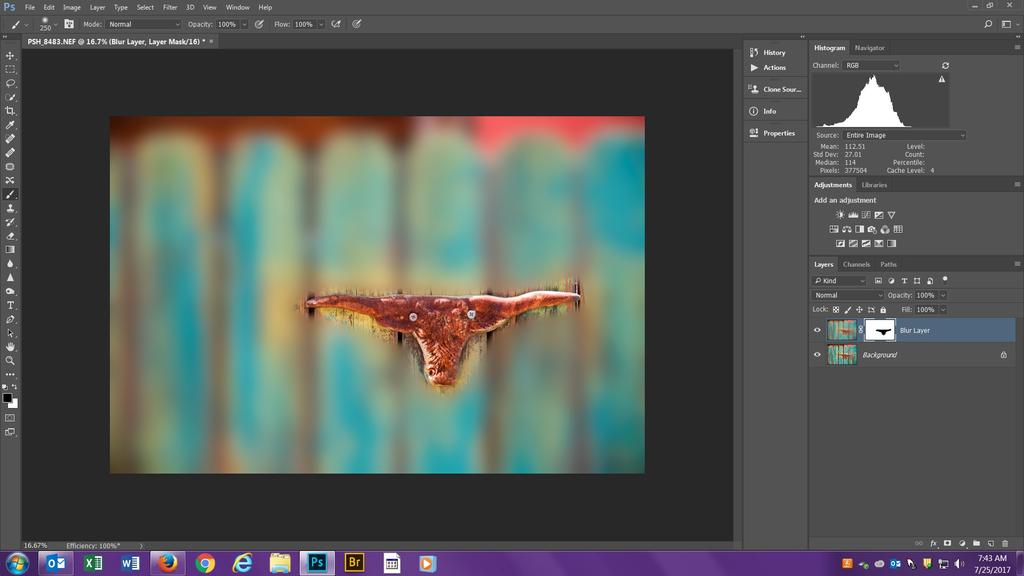
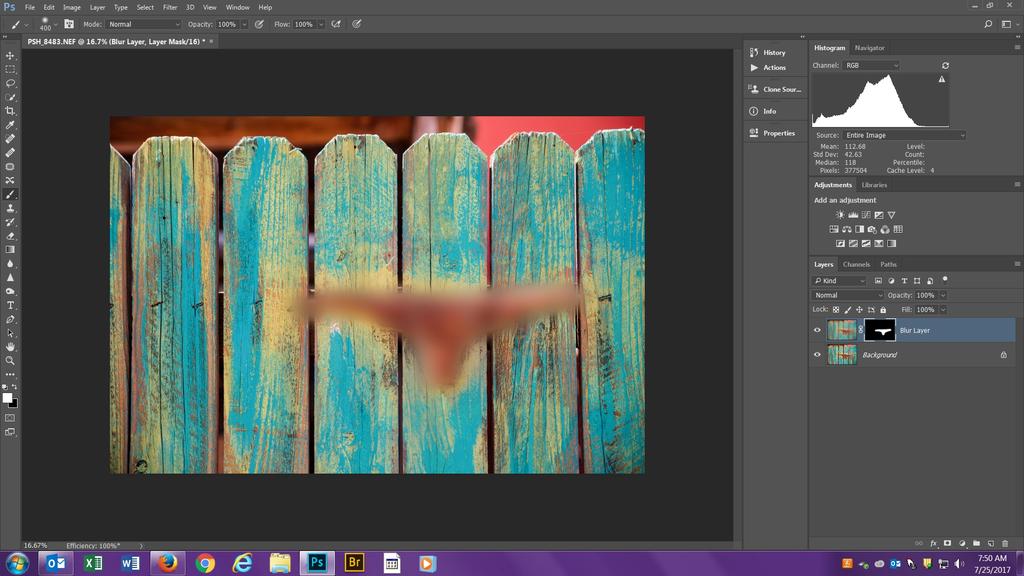
To Mask a G. Blur filter you're going to first duplicate your Background Layer and rename it something like "Blur Layer" (for example). On the Blur Layer you're going to apply your Gaussain Blur from the Filter menu with whatever parameters you want. This of course blurs the entire image but that's what you want. Once you've gotten your Blur on you're going to apply a Layer Mask to the Blur Layer by clicking on the "Add Layer Mask" icon at the bottom of the Layers Panel. The Mask, by default, will be white. At this point you're going to need to make a decision about HOW you're going to mask the G. Blur filter in this particular image because Masks are either White or Black. You've heard the saying, "White reveals and black conceals", right? Well that applies to Masking. A white mask will show your G. Blur filter effect while a black mask will conceal the G. Blur Filter you applied. It applies to the Pen tool as well and the Pen Tool you choose will always be the opposite color of the Layer Mask; so if you're going to use a White Layer Mask you're going to use a Black Pen Tool and vice versa; Black Layer Masks require a White Pen tool.
So, to reiterate, you're going to have to choose between one of two options:
1. Apply a White Layer Mask and use a Black Pen. In this case the White Layer Mask is showing the G. Blur effect (white reveals) and the Black Pen covers it up (black conceals).
2. Apply a Black Layer Mask and use a White Pen. In this case the Black Layer Mask is covering up the G. Blur effect (black conceals) and the White Pen uncovers it (white reveals).
2. Apply a Black Layer Mask and use a White Pen. In this case the Black Layer Mask is covering up the G. Blur effect (black conceals) and the White Pen uncovers it (white reveals).
Examples:
.....
.....
Using a White Layer Mask and a Black Pen

.....
.....
Black Layer Mask Using a White Pen

..........
.....
Black Layer Mask Using a White Pen
.....
Hope that helps and my apologies if it's more than you wanted to know!
Last edited:
Hey Cindy... Certainly no need to apologize and condolences on the passing of your neighbor.
As for you wanting to learn to Mask your Gaussian Blur filter, it's easy-peasy... Once you know how.
For me, Masking was One of Those Things that needed to "click", I needed that "ah HA!" moment and once that happened it was all downhill. I don't know if you want to have a conversation about how to do this or not, but I'll put out some information that might help. I think you're pretty savvy with PS in general so I'm going to make some basic assumptions about your knowledge of getting about in PS and how it works.
To Mask a G. Blur filter you're going to first duplicate your Background Layer and rename it something like "Blur Layer" (for example). On the Blur Layer you're going to apply your Gaussain Blur from the Filter menu with whatever parameters you want. This of course blurs the entire image but that's what you want. Once you've gotten your Blur on you're going to apply a Layer Mask to the Blur Layer by clicking on the "Add Layer Mask" icon at the bottom of the Layers Panel. The Mask, by default, will be white. At this point you're going to need to make a decision about HOW you're going to mask the G. Blur filter in this particular image because Masks are either White or Black. You've heard the saying, "White reveals and black conceals", right? Well that applies to Masking. A white mask will show your G. Blur filter effect while a black mask will conceal the G. Blur Filter you applied. It applies to the Pen tool as well and the Pen Tool you choose will always be the opposite color of the Layer Mask; so if you're going to use a White Layer Mask you're going to use a Black Pen Tool and vice versa; Black Layer Masks require a White Pen tool.
So, to reiterate, you're going to have to choose between one of two options:1. Apply a White Layer Mask and use a Black Pen. In this case the White Layer Mask is showing the G. Blur effect (white reveals) and the Black Pen covers it up (black conceals).
2. Apply a Black Layer Mask and use a White Pen. In this case the Black Layer Mask is covering up the G. Blur effect (black conceals) and the White Pen uncovers it (white reveals).
Examples:
.....
.....
Using a White Layer Mask and a Black Pen.....
View attachment 262868
.....
.....
Black Layer Mask Using a White Pen
View attachment 262869
.....
Hope that helps and my apologies if it's more than you wanted to know!
Thanks for the detailed info, Paul! I've been off the forum since my last post. I will give this a try and see how it goes. It's very much appreciated! :heart:
