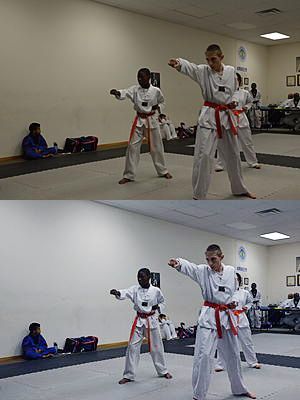
You said you had Adobe Levels, which is a great tool. For exposure, lower the White Point (at 255) to be where the graph data begins, at about 170. That brightens it, same as more exposure in camera would have done (but with more noise that more camera exposure could have removed). Technically, that says, "I want this new spot at 170 to become 255, and to be as bright as it is possible to be".)
Then, if you want it even brighter, then second, also lower the MID Point (center slider) from 1.0 to maybe 1.3 - adjusted by eye to preference (this is gamma, but it brightens low and middle range without clipping high end). These are Standard tools, everyone ought to be intimate with these.
Then for White Balance, Levels has three Eyedropper tools, Black, White, and the center tool is GRAY. It is your White Balance tool (if in Levels - ACR has its own similar ways). Select that center Gray eyedropper, and then click something in the image that should be actual White. I would suggest the white uniforms, in a fairly bright spot on them. That removes any color cast there, to make that clicked spot be actually white. It also removes the same color cast from the entire image. Clicking different spots can give slightly different results, but the white uniform is a good bet.
Or, you can click the walls, which will make that clicked spot be white (or neutral gray, no color cast), but I fear they were not white or gray to begin with. Looks like they ought to be more beige or a bit yellow, but if you want it really white, that would do it (but I think the uniforms will have a slight blue cast then).
There are often a few options to try.
See
White Balance Correction, with or without Raw