You are using an out of date browser. It may not display this or other websites correctly.
You should upgrade or use an alternative browser.
You should upgrade or use an alternative browser.
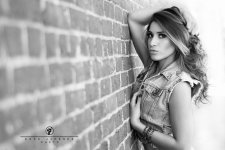
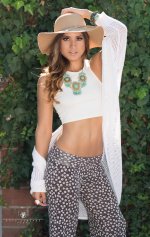
First NIK edit.
- Thread starter ewick
- Start date
Don Kuykendall_RIP
RIP :(
tell us what you did in NIK on each of these photos.
BackdoorArts
Senior Member
Nice photos, and well done with the processing. When I see posts with titles like "First Nik Shots" I brace myself, because I know from personal experience it's easy to fall into the "Wow, that's a cool filter" pit. So, given that another Nik user like Don had to ask what you did in Nik with each, you know you used them properly - to enhance the shot you envisioned and not just to use a filter for the filter's sake. Nicely done.
As you explore Silver Efex Pro, make sure you expand the sliders for Brightness, Contrast and Structure. Mine did not expand on their own initially and I didn't realize there were fine tuning sliders under them for a month while I was using it, so I just don't want you to miss out (it's not that I'm seeing something that you should have used). They are what make that tool so superior to the other B&W conversion tools out there.
As you explore Silver Efex Pro, make sure you expand the sliders for Brightness, Contrast and Structure. Mine did not expand on their own initially and I didn't realize there were fine tuning sliders under them for a month while I was using it, so I just don't want you to miss out (it's not that I'm seeing something that you should have used). They are what make that tool so superior to the other B&W conversion tools out there.
BackdoorArts
Senior Member
Nice - I like the first one best, is the second a little hot?
Are saying this because of the pose or that the whites look a little washed out?
The thing is, if you right-click on the bottom and open it at full resolution you can make out the details in the white sweater. That said, you could probably tone down the highlights a touch if you wanted more details. there. It all depends on how white you want your whites.
When I open the file, it appears there was a flash on camera left. I think you are right on with the toning down of the highlights comment, that might do it (for my personal taste that is). Just my $.02, I do like the images overall.Are saying this because of the pose or that the whites look a little washed out?
The thing is, if you right-click on the bottom and open it at full resolution you can make out the details in the white sweater. That said, you could probably tone down the highlights a touch if you wanted more details. there. It all depends on how white you want your whites.
tell us what you did in NIK on each of these photos.
On the B&W image I started with the raw sharpen and picked one of the silver efex filters and adjusted the sliders to my liking. I also played around with some of the other stuff, like I said I just got the NIK software so Honestly I don't remember my exact work flow. I just played around with it. For the second image I went into color efex and tweaked the back ground. both images were sharpened with the out sharpener and I did some dodging and burning in Photoshop. I apologize for not being able to tell you my exact work flow.
I see something called "recipes" what are they and how do I get them or make them?
Nice photos, and well done with the processing. When I see posts with titles like "First Nik Shots" I brace myself, because I know from personal experience it's easy to fall into the "Wow, that's a cool filter" pit. So, given that another Nik user like Don had to ask what you did in Nik with each, you know you used them properly - to enhance the shot you envisioned and not just to use a filter for the filter's sake. Nicely done.
As you explore Silver Efex Pro, make sure you expand the sliders for Brightness, Contrast and Structure. Mine did not expand on their own initially and I didn't realize there were fine tuning sliders under them for a month while I was using it, so I just don't want you to miss out (it's not that I'm seeing something that you should have used). They are what make that tool so superior to the other B&W conversion tools out there.
Yes< I did adjust the sliders to my liking. Im still exploring all NIK has to offer and 80% of the edit was done with NIK. I did use PS to dodge and burn as mentioned to DON but other than that I tried to mostly do it with NIK. Like I asked DON what is recipes and how do I get them or make them?
Don Kuykendall_RIP
RIP :(
I don't use recipes so I really can't help you there. I would assume that they are custom preset that you have set up. The two thing I use most are Viveza and Define. In Viveza the best thing I ever learned is using the Control points to target the corrections. Target the to busy background and turn down the structure. For the important areas turn up the structure. You can also adjust the brightness, contrast and a lot of other things in just the area of the control point. You can set as many control points as you want in a photo and adjust each one differently. You can also select multiple control points and control them at the same time. This is useful for things like the sky or grass etc. When I figured this out thanks to Dave it changed the way I did post processing. It also cut down on burning and dodging in PS and does a much better job of it.
Define is just used for decreasing noise and can be targeted just like Viveza
Define is just used for decreasing noise and can be targeted just like Viveza
Vixen
Senior Member
The recipes are sets of varying processing types that you can use either as they stand, or to get a p[articular look that you can the fine tune. If you find you are using a particular set of processes often, you can save them as a recipe. Helps cut down on time & work & saves you having to remember just "how you got that nice look last time".
There are a number of quite good recipes already set in the varying Nik processing products.
There are a number of quite good recipes already set in the varying Nik processing products.
BackdoorArts
Senior Member
Yes< I did adjust the sliders to my liking. Im still exploring all NIK has to offer and 80% of the edit was done with NIK. I did use PS to dodge and burn as mentioned to DON but other than that I tried to mostly do it with NIK. Like I asked DON what is recipes and how do I get them or make them?
I'm also not big into recipes. I have a couple of theirs that I will use as starting points in Silver Efex, usually Fine Art or one of the High Structure ones when I just don't go from scratch. From there, my first step is to go to the colored filter section, boost the power to 100% and slide the color slider through the range to see if there's something in there that brings out aspects of the photo any better than a straight desaturation. If so, I tweak the amount and then adjust. I'll save a recipe if I have a series of photos that I want the same treatment on, but I rarely, if ever, go back to it when I'm done.
Like you and Don, I still rely on some native Photoshop and Lightroom tools, like burn and dodge in PS and the Hue. Saturation and Luminance sliders in LR (I need to get more into Channels in PS, but that takes time I haven't found yet).


