As Shot, As Processed and How Could It Improve

Lawrence

Senior Member
Okay this is a series of photos I shot this afternoon (I will do one at a time)

First off will be the exif data then the reason for the shot, what I was trying to do etc.

Then I will post the original untouched off camera jpeg followed by my processing.

Please be as critical as you want. The more input the merrier.

The first photo was as I set off I found this "M and M packet" on the ground with three escaped inmates.
I liked the colours and also thought that when I was a kid I would never have wasted chocolates! Spoilt children of today.

EXIF
ISO 100, f/6.3 1/1600 WB Full Sun, landscape Normal ADL

Purpose: To check settings before start of walk.

As shot - no editing.

M and M.JPG

Post editing
M and M lol.jpg

tell me your inner thoughts ...
 

Lawrence

Senior Member
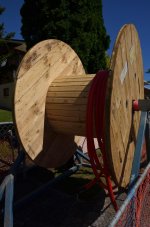
This second photo was taken because I saw a few potential challenges here.
Firstly with the bright sun and deep shadows
Secondly the confined space (I didn't like the orange fencing around the drum)
EXIF Data:
Aperture setting. ISO 100 f/6.3 1/2000 LS ADL Normal

Purpose: To capture what ever detail in the shadow there was. I now realise that increasing the ADL would have helped.

As shot
Optic Fibre Internet Cable drum.JPG


Processed

Fibre Optic Cable Drum LOL.jpg


I promise that they do get better in terms of subject material.
The first two were really just test shots.

EDIT Sorry about the thumbnail
 

Attachments

  • Optic Fibre Internet Cable drum.jpg
    Optic Fibre Internet Cable drum.jpg
    95.7 KB · Views: 290

dramtastic

Senior Member
Good idea and anyone who posts in this section is braver than I am. But, seems to be a little out of focus(the packet), so I'm not sure where the focus point is. There is a lot of yellow in the footpath?, so I guess you increased the yellow PP to make the packet 'POP' this had the effect that it doesn't have enough contrast between ground and package for mine. There is a distracting piece of grass/twig next to the red M&M. Wouldn't be a problem if there was more of it in the shot but it's the only piece of grass/twig in the picture.
I've seen some of the other stuff you've already posted with your new lens and it's very nice Lawrence. I think you need to not be so hard on yourself. I take a thousand plus shots a week and where 40% might be useable, just, maybe 5% are postable.
 

Lawrence

Senior Member
LOL I am not too fussed about posting and learning.

This little parcel was lying at the start of someone's driveway and I had visions of little Johnny or Mary yelling out "That old man is stealing my chocolates!" so the picture was shot as is with nothing touched. The distracting twig looks like a toothpick and I think part of whatever game the kid was playing at the time he/she abandoned it.

Thanks for the comment (and kind words) - much appreciated.
 

Lawrence

Senior Member
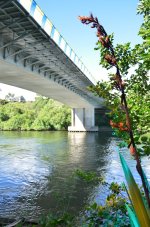
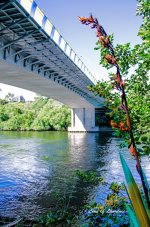
This shot is very disappointing. Because I liked what Iwas trying to do and I liked the colour contrasts.

I was trying to get the red plant to the right to frame the side of the bridge but I wanted it to be in very sharp focus even if it meant the rest of the image was slightly blurred.
Epic fail!
There was nothing I could do about the green shrub behind which is a distraction.
The weird blue coloured leaf in the foreground is the result of the sun shining through the blue railing of the bridge


EXIF:
Setting Manual 1/160 f/4.0 ISO 100 18mm Landscape ADL Hi

As shot

Flax and bridge.JPG

Processed

Flax and Bridge lol.jpg
 

wud

Senior Member
This shot is very disappointing. Because I liked what Iwas trying to do and I liked the colour contrasts.

I was trying to get the red plant to the right to frame the side of the bridge but I wanted it to be in very sharp focus even if it meant the rest of the image was slightly blurred.
Epic fail!
There was nothing I could do about the green shrub behind which is a distraction.
The weird blue coloured leaf in the foreground is the result of the sun shining through the blue railing of the bridge


EXIF:
Setting Manual 1/160 f/4.0 ISO 100 18mm Landscape ADL Hi

As shot

View attachment 62629

Processed

View attachment 62630

First image looks a bit overdone in pp, to me. Second is well done with pp, but the image itself doesn't really do anything for me.

This third i like a lot :) Beautiful composition and well done, both straight out of camera and edited!


Sent from my iPhone using Tapatalk
 

BackdoorArts

Senior Member
I liked the colours and also thought that when I was a kid I would never have wasted chocolates! Spoilt children of today.

EXIF
ISO 100, f/6.3 1/1600 WB Full Sun, landscape Normal ADL

Purpose: To check settings before start of walk.

As shot - no editing.

View attachment 62624

Post editing
View attachment 62625

tell me your inner thoughts ...

I like what you tried to do with the colors, making them pop. Unfortunately, in bringing out the yellow in the package you also overcooked the dirt. This is one of those times where the subject matter requires you to do some selective editing and not just play with the universal settings. If you're using Lightroom you can use the brush tool to either adjust the package and candies, or to tame the background after the universal edits. In Photoshop you can use layer masks to selectively adjust or reduce the opacity of edits on the background. I used control points in Viveza to simply desaturate, which makes the focal points pop a little more.

M&M.jpg

And while I'm not a huge fan of it, this is one of those times where selective color can be effective.

M&M2.jpg

These are very quick and dirty tweaks to give you an idea of what I mean.
 
Last edited:

RockyNH_RIP

Senior Member
Okay this is a series of photos I shot this afternoon (I will do one at a time)

First off will be the exif data then the reason for the shot, what I was trying to do etc.

Then I will post the original untouched off camera jpeg followed by my processing.

Please be as critical as you want. The more input the merrier.

The first photo was as I set off I found this "M and M packet" on the ground with three escaped inmates.
I liked the colours and also thought that when I was a kid I would never have wasted chocolates! Spoilt children of today.

EXIF
ISO 100, f/6.3 1/1600 WB Full Sun, landscape Normal ADL

Purpose: To check settings before start of walk.

As shot - no editing.


Post editing


tell me your inner thoughts ...


I pretty much agree with Dramtastic on his comments... you surely could have gone to something like f11 on this shot (based on 1/1600) This looks like one of those that "appears" to be an opportunity but maybe not a real good one when done... (happens to me every day! ) :)

Pat in NH
 

wud

Senior Member
EXIF:
Setting Manual 1/160 f/4.0 ISO 100 18mm Landscape ADL Hi

Processed

View attachment 62630

Actually, a small suggestion. I think f/8 or so would have been better, as my eyes follow the line of the bridge, but the ending point is (due to the aperture) a little to blurred (or maybe not blurred enough, if you would rather have more focus on the flower in front). I do find my eyes looking at the flower in this composition, and I think it works well.
 

Lawrence

Senior Member
I like what you tried to do with the colors, making them pop. Unfortunately, in bringing out the yellow in the package you also overcooked the dirt. This is one of those times where the subject matter requires you to do some selective editing and not just play with the universal settings. If you're using Lightroom you can use the brush tool to either adjust the package and candies, or to tame the background after the universal edits. In Photoshop you can use layer masks to selectively adjust or reduce the opacity of edits on the background. I used control points in Viveza to simply desaturate, which makes the focal points pop a little more.

View attachment 62633

And while I'm not a huge fan of it, this is one of those times where selective color can be effective.

View attachment 62635

These are very quick and dirty tweaks to give you an idea of what I mean.

I am using Elements 11 and don't know how to do that.
 
Last edited by a moderator:

Lawrence

Senior Member
Thanks for the great feedback.

A question based on Wud's comment.

How does one know that f/8.0 would give the better depth of field?
I have seen the DOF charts and everything but short of hauling manuals and books around how do you know what setting will do what to the DOF with the different lenses?

Possibly from experience but I cannot imagine me in 2 months time remembering that a similar shot was shot at f/4.0 and that 8.0 would have been better … the mind boggles
 

Lawrence

Senior Member
EXIF
Aperture mode
f/6.3 1/1600 spot metering and single point focus
Landscape, normal ADL
105 mm

Intent was to get good bokeh

As shot

Purple.JPG


Post Processing (novice elements 11 user)

Purple LOL.jpg
 

BackdoorArts

Senior Member
I amusing Elements 11 and don't know how to do that.

Same as with Photoshop. For your image I just added a Hue/Saturation adjustment layer, desaturated and then used the layer mask to paint back in package and candies. Note the black areas in the white layer mask box in the upper right of this screen shot from PSE 11 - they "mask" the effect of the Hue/Saturation layer and allow the layer behind it to show through.

Screen Shot 2013-12-15 at 2.43.03 PM.jpg


If you are not familiar with layer masks then learn how to use them. They are a powerful way of doing so many different things, from selective adjustments to making composite images. They can be a little daunting at first, but once you learn them they'll be with you forever, and everything you learn in Elements will extend on to Photoshop should you ever upgrade.
 
Last edited:

Lawrence

Senior Member
Some subjects are just appealing.
I saw this grubby pipe feeding into the river and immediately liked the dark ominous look of it which I tried to capture.
There are so many versions you can do in PP and all are interesting (to me anyway)

EXIF
Single point, Shutter mode, 1/30, f/13, ISO 200, 85 mm, Exp Compensation -0.7 (don't ask me why?), Landscape and High ADL

As Shot.

inlet.JPG


PP - 1 version

Inlet LOL.jpg


PP Vers 2

Inlet LOL2.jpg
 

wud

Senior Member
Thanks for the great feedback.


A question based on Wud's comment.


How does one know that f/8.0 would give the better depth of field?
I have seen the DOF charts and everything but short of hauling manuals and books around how do you know what setting will do what to the DOF with the different lenses?


Possibly from experience but I cannot imagine me in 2 months time remembering that a similar shot was shot at f/4.0 and that 8.0 would have been better … the mind boggles


Look at these images I tested the 50mm with, on the blue flowers you can see which aperture I used.
For f/16, most of the image are more or less sharp (not completely, as I focused on the flowers in front of me). For f/1.4, most are blurred out, except the thin line (dof) where my focus were:


http://nikonites.com/prime/13385-they-said-sigma-better-than-nikkor-50mm-2.html#post148044


When learning how the different apertures effected my images, what I did was taking several shots of the same but with different apertures. Just to see the differences it made in the same compositions. Not every possible aperture, just a few for a period. I can really suggest this (just remember to change your shutter, when you change aperture).
 
Last edited:

Lawrence

Senior Member
Look at these images I tested the 50mm with, on the blue flowers you can see which aperture I used.
For f/16, most of the image are more or less sharp (not completely, as I focused on the flowers in front of me). For f/1.4, most are blurred out, except the thin line (dof) where my focus were:


http://nikonites.com/prime/13385-they-said-sigma-better-than-nikkor-50mm-2.html#post148044


When learning how the different apertures effected my images, what I did was taking several shots of the same but with different apertures. Just to see the differences it made in the same compositions. Not every possible aperture, just a few for a period. I can really suggest this (just remember to change your shutter, when you change aperture).

Fantastic Wud. Thanks for that and I will definitely be doing this.

I guess my original question is how do you know when it isn't obvious through the viewfinder?

Experience and making a mental note each time even if it doesn't stick at first it probably will at some time.
 

wud

Senior Member
Fantastic Wud. Thanks for that and I will definitely be doing this.

I guess my original question is how do you know when it isn't obvious through the viewfinder?

Experience and making a mental note each time even if it doesn't stick at first it probably will at some time.

Look through your images. I always, always do this. To see if focus point is the right place, if you got blown out highlight etc. And if its the image you went for (I do know its easier to see on computer). I do it after every "serie" I do - for instance yesterday, I did some portraits, every 5th minut we took a break and I zapped quick through my images. Some we did again at the same spot, as I didn't get the expression I was hoping for, some where good so we moved on.

In time you'll get an idea about what you want in your settings, when looking at a scenario. I set iso first - as low as possible, then aperture. Do I want an overall sharp image or am I focussing on something specific? For landscapes and architecture, I mostly use f/8 or more, as I want the lines sharp and clear. The more you shoot and afterwards peep at your settings while going through the images on computer, the better you get an idea about the image you want, before taking the shot.
 
Top