Blown out reds?

TonyD315

Senior Member
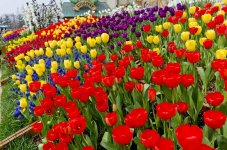
I took this picture yesterday and edited it in Lightroom just now...I really had to work with it to get back a lot of the detail in the reds...it was shot at ISO 100, f/5, and 1/400 sec...I'm thinking it was because of the f/5 and maybe I should have shot it at a 8 or 11?

usflowers.jpg
 

wornish

Senior Member
Would have been a very nice shot but the reds are blown as you say.
How was the metering set - spot,centre weighted or matrix thats what probably caused the issue.
also did you use the RAW file or jpg from the camera.
 

Dave_W

The Dude
I have a tough time with real vivid colors, too. I haven't yet found a work around short of desaturating that particular color in LR

Sent from my SCH-I535 using Tapatalk
 

TonyD315

Senior Member
The metering was set to Matrix. That's what I shoot in 99% of the time. I'm sure I have to go back and reread spot and center weighted. The photo was shot in RAW, then edited in LR. After I adjusted the WB, I increased the clarity a little and darkened the red...I also increased the exposure to +85, but I'm thinking I could maybe go back and cut that in half...
 

Dave_W

The Dude
I don't believe it will make a difference but you should try anyway. My belief is that its a sensor issue more than an exposure one. That said, I'm sure you could meter for that flower in particular and everything else will be drab by comparison. But if you do find the answer, I'd sure be interested in knowing it.

Sent from my SCH-I535 using Tapatalk
 

TonyD315

Senior Member
I don't believe it will make a difference but you should try anyway. My belief is that its a sensor issue more than an exposure one. That said, I'm sure you could meter for that flower in particular and everything else will be drab by comparison. But if you do find the answer, I'd sure be interested in knowing it.

Sent from my SCH-I535 using Tapatalk

I actually have a private lesson set up next week, mostly for tips on shooting my brother's engagement photos. But if I have time I want to run some of the ones I've taken by them and see what he or she says...I'll add this one to the list.
 

BackdoorArts

Senior Member
Reds always seem to blow out first among various colors. I suspect its placement at one end of the visible spectrum is part of it as I would expect sensors to be tested most at the edges - much as Dave said when he pointed to a sensor shortcoming.

Rather than desaturate I tend to pull back highlights first and then add back color as needed in Lightroom.

One thing you may want to start doing in situations like this is to use the RGB Histograms in your camera during image review with the Highlight function turned on. It will show you where you have light information blown out, and if it's color specific you'll see a hard line on the right side of the Red histogram (or whatever specific color is blown out), and flashing where you've lost the details.

If you haven't deleted the image off the card, set your image review options to include this and flip through to that screen and see if it's showing you it's blown out. If it's not, and you have access to either Photoshop or Elements, take the image into there for your light adjustments and do a levels adjustment on the red channel alone varying only the midpoint. If the red channel is blowing out, set your exposure compensation to -0.7 EV and then look to brighten the parts of the photo that aren't blown out. It's easier to fix that than it is to find details where you don't have any.
 

TonyD315

Senior Member
Reds always seem to blow out first among various colors. I suspect its placement at one end of the visible spectrum is part of it as I would expect sensors to be tested most at the edges - much as Dave said when he pointed to a sensor shortcoming.

Rather than desaturate I tend to pull back highlights first and then add back color as needed in Lightroom.

One thing you may want to start doing in situations like this is to use the RGB Histograms in your camera during image review with the Highlight function turned on. It will show you where you have light information blown out, and if it's color specific you'll see a hard line on the right side of the Red histogram (or whatever specific color is blown out), and flashing where you've lost the details.

If you haven't deleted the image off the card, set your image review options to include this and flip through to that screen and see if it's showing you it's blown out. If it's not, and you have access to either Photoshop or Elements, take the image into there for your light adjustments and do a levels adjustment on the red channel alone varying only the midpoint. If the red channel is blowing out, set your exposure compensation to -0.7 EV and then look to brighten the parts of the photo that aren't blown out. It's easier to fix that than it is to find details where you don't have any.

Thanks for that. I am going to look into that when I get home.


Sent from my iPhone using Tapatalk
 

MeSess

Senior Member
I'm having the same problem and it only happens for reds and yellows. According to the tips that I came across online this is happening because your camera is overexposing these colors. The best way around it is to shoot in light that isn't as harsh. Ideally overcast days or cloudy days where the light isn't direct. If you're shooting in direct sunlight the reds will almost always be blown out. A way around this during direct sunlight times is to use something to shade or reflect some of the light from directly hitting the flowers.

I can't figure out how to save the details without using those tips. Some people suggest that you focus and meter on something green first and then capture the flowers so that the color is exposed properly. I have no idea how to do that though.
 

Horoscope Fish

Senior Member
Some people suggest that you focus and meter on something green first and then capture the flowers so that the color is exposed properly. I have no idea how to do that though.
While that method would work this situation is, in my opinion, exactly why the digital gods gave us histograms. I also think it would be easier to use the Exposure Compensation button to correct exposure rather than trying to meter and re-compose. Simply adjust exposure by -1/3EV or so using the EC button and check your histogram.

If you're not seeing your histograms you need to go to Playback in the menus then into Playback Display Options and check "ON" the options for "RGB histogram" and "Overview". Be sure to press "OK" to keep the settings. Now review a shot on the LCD and then click "UP" on the four-way selector button until you find your histogram. Adjust exposure accordingly.

Voila!

...
 
Last edited:

MeSess

Senior Member
While that would work, this situation is what histograms are for. I think it would be easier to use the Exposure Compensation button and simply drop the exposure back by -1/3ev or so. If you're not seeing your histograms you need to go to Playback menu then into the Playback Display Options and then check "ON" the options for "RGB histogram" and "Overview". Be sure to press "OK" to keep the settings. Now review a shot on the LCD and then click "UP" on the four-way selector button until you find your histogram. Adjust exposure accordingly.

...

How do you adjust exposure accordingly when the camera is only over exposing one of the 3 colors? Are you suggesting under exposing the entire image by -1/3 and then trying to correct the exposure for Green and Blue in post processing?
 

gqtuazon

Gear Head
I have a tough time with real vivid colors, too. I haven't yet found a work around short of desaturating that particular color in LR

Sent from my SCH-I535 using Tapatalk

I use Adobe CS5. Using the RAW file, on the HSL/Grayscale tab, I slide and adjust the "RED" slider to the left (-50) in this case) to adjust the overblown / over saturated color.

Original or default settings.

Seoul April 2014 119.jpg

Below is the adjusted red channel.

Seoul April 2014 119a.jpg
 

Horoscope Fish

Senior Member
How do you adjust exposure accordingly when the camera is only over exposing one of the 3 colors? Are you suggesting under exposing the entire image by -1/3 and then trying to correct the exposure for Green and Blue in post processing?
Well the suggested method of metering off the grass is just an old trick to simulate an 18% grey card. What I'm suggesting will get you to the same place it's just the modern equivalent and, to me anyway, seems simpler since I don't have to recompose. And yes, since we can't adjust exposure for R, G or B separately I'm suggesting you expose for the highlights and then adjust individual channels in post.

...
 

Dave_W

The Dude
I use Adobe CS5. Using the RAW file, on the HSL/Grayscale tab, I slide and adjust the "RED" slider to the left (-50) in this case) to adjust the overblown / over saturated color.

Original or default settings.

View attachment 85146

Below is the adjusted red channel.

View attachment 85147

You can also use the drip point(?) and set it directly on the color you want to desaturate (or saturate) and it will detect the various colors within that spot and move them lower (or higher) as a group.

Sent from my SCH-I535 using Tapatalk
 

hark

Administrator
Staff member
Super Mod
Well the suggested method of metering off the grass is just an old trick to simulate an 18% grey card. What I'm suggesting will get you to the same place it's just the modern equivalent and, to me anyway, seems simpler since I don't have to recompose. And yes, since we can't adjust exposure for R, G or B separately I'm suggesting you expose for the highlights and then adjust individual channels in post.

...

I've also heard about the old trick of metering off the grass providing it is lit with the same amount of light as the subject. It can be very useful.
 

WayneF

Senior Member
How do you adjust exposure accordingly when the camera is only over exposing one of the 3 colors? Are you suggesting under exposing the entire image by -1/3 and then trying to correct the exposure for Green and Blue in post processing?

There is a big trick. That trick is to learn to expect this. It will happen, about every time (bright red in sunlight).
It is mostly due to white balance. Daylight and Cloudy WB (high temp numbers) do their job by boosting red and reducing blue. So this happens on bright red subjects. The only answer is to expect it, then handle it.
Whereas, Incandescent WB (low temp numbers) do it by boosting blue and reducing red.
Slide the temperature slider back and forth, and see the red and blue peaks shift in opposite directions. This is how it works. Understand that. If you do not have a temperature slider, then look the the last picture at page bottom here: White Balance Correction, with or without Raw

Any Bright Red subjects in daylight ought to sound the alarm "LOOK AT THE COTTEN PICKING HISTOGRAM". A few situations automatically make photographers think specific thoughts when they first walk up to a scene (called experience). This is one of those.

But do NOT look at the single graph of histogram, it is totally useless for any purpose.
Instead look at the three RGB histograms to see the real data.
Two types of Histograms explains this difference, but the single histogram graph will be totally useless for this or any purpose. The three RGB channel histogram will make it be obvious.

It is very easy. You take a picture, and look at the RGB histogram. Then you repeat and simply do what the histogram shows needs to be done, so that you do not clip any channel. Expect bright red in sunlight to be clipped. Yes, reduce exposure, as much as is seen important. You likely already about know in advance the next time this comes up.
 
Last edited:

MeSess

Senior Member
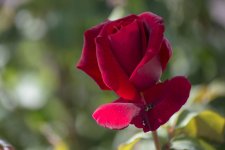
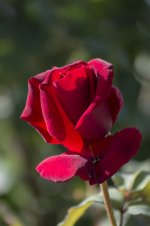
Ok so I went and tried to take pictures of this red rose in front of my house and I essentially did what you guys' suggested and underexposed the image but I didn't use the exposure compensation I just used the exposure meter in the viewfinder. Here are some examples of what I got. This is after post processing and adjusting for the underexposure.

_DSC0682 copy.jpg_DSC0683 copy.jpg
 

WayneF

Senior Member
FWIW, the red is still clipped on the rose - just the lower bright leaf on the first, but more all over on the second.

If you have an Adobe editor, here is something good to learn...

In Elements or Photoshop, in the Levels tool (CTRL L), hold down the ALT key on keyboard (I think Option key on a Mac),
and while holding, slide the White Point slider slightly down. The image preview will go black, and any pixels shown are being clipped at that setting of White Point. This identifies WHICH pixels are being clipped.

In Lightroom or Adobe Raw, hold ALT and move the Exposure slider slightly UP, same thing (same tool).

And of course, the camera RGB histogram could show clipping exists too, while still in the field and another chance is still possible.

Sometimes, a little clipping is not a bad thing, it can increase contrast. This tool allows you to judge how much, and specifically which pixels, and if those areas were important to lost color or lost detail. A blown out sky for example, may not actually hurt anything important.
 
Last edited:

MeSess

Senior Member
FWIW, the red is still clipped on the rose - just the lower bright leaf on the first, but more all over on the second.

If you have an Adobe editor, here is something good to learn...

In Elements or Photoshop, in the Levels tool (CTRL L), hold down the ALT key on keyboard (I think Option key on a Mac),
and while holding, slide the White Point slider slightly down. The image preview will go black, and any pixels shown are being clipped at that setting of White Point. This identifies WHICH pixels are being clipped.

In Lightroom or Adobe Raw, hold ALT and move the Exposure slider slightly UP, same thing (same tool).

Sometimes, a little clipping is not a bad thing, it can increase contrast. This tool allows you to judge how much, and specifically which pixels, and if those areas were important to lost color or lost detail. A blown out sky for example, may not actually hurt anything important.

Can you explain what exactly I'm supposed to see when I do this? Did you try this with my pictures or would you need the originals? I barely slid the farthest right bar on the little graph while holding option and saw a few pixels that were showing but that was it. That was for both pictures. I would take a screenshot of what I see but it reverts back when I let go of the keys.
 

WayneF

Senior Member
Can you explain what exactly I'm supposed to see when I do this? Did you try this with my pictures or would you need the originals? I barely slid the farthest right bar on the little graph while holding option and saw a few pixels that were showing but that was it. That was for both pictures. I would take a screenshot of what I see but it reverts back when I let go of the keys.


I cannot show a screen view of this effect.... I suppose a movie camera could capture it, but a screen capture only captures the Levels tool. A screen capture movie tool probably gets it OK.

On the top image (which is less seriously clipped)... Hold down ALT or OPTION key and while holding, then slightly touch the Levels White Point slider (you do have to move it, but only the slightest amount), and the preview image goes all black, except ONLY the bright lower red leaf is shown. The full lower bright leaf, and several more pixels higher above it.

That is saying those pixels are being clipped at the, say 254 position of the slider, which says those pixels you can see are brighter than the 254 (or whatever value). Which if 254, those pixels are clipped (perhaps just one channel, red here).

Yes, I just Copied and Pasted (clipboad) your two images to my editor, and used the levels tool there.

Also try it on an image that is NOT CLIPPED, and you will see you have to slide the slider very much lower, much less than 254 probably, to see any pixels other than black. This threshold (of seeing them appear in the black) is then telling you the pixel value of those pixels that appear then.

The regular color Eyedropper can also tell you this. That bright lower leaf is about color (255, 0, 74), which is clipped in the red channel. But this Levels tool is real handy when critically adjusting exposure or white point. You can see what you are actually doing.
 
Last edited:
Top