New posting by Nasim MansurovHow to Quickly Test Your DSLR for Autofocus Issues
[h=1]How to Quickly Test Your DSLR for Autofocus Issues[/h]
[COLOR=#967D61 !important][/COLOR]
[h=3]1) What You Will Need[/h]For this test, you will need the following:
[h=3]2) Set Up[/h]The setup process is pretty straightforward, as explained in detail below:
[h=3]5) Analyze the Data[/h]Now that we have a sharp reference image, along with a bunch of other images, it is time to analyze the data. Import your images into your computer with whatever post-processing tool you use. Open up the very first image and make sure that it looks sharp in the center. Here is a crop of my reference shot that I captured with the Nikon 24mm f/1.8G lens:
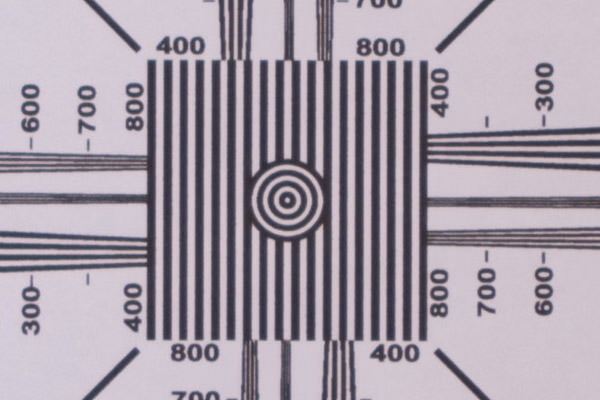
The image looks good and sharp. Please note that this is a RAW image without any kind of sharpening applied to it.
Now, take a look at the other 3-4 images you captured after this one. Do they look more or less the same? Or do they all look out of focus? Here is a second shot that I captured, which clearly indicates a focus problem:
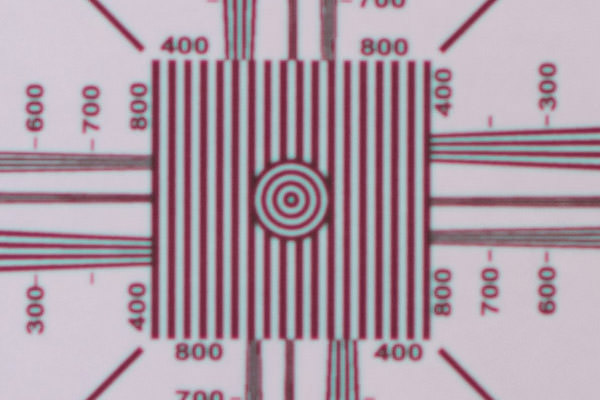
As you can see, the image not only looks out of focus, but we are also seeing some aberration problems in the image as well (a pretty normal thing to see when an image is out of focus). All three shots were very similar, which clearly indicates a focus problem either on the lens or the camera body.
It is critical to view images at 100% view and go back and forth between the reference image and the other shots to compare. If things look out of focus, repeat the whole thing again to confirm that you are indeed seeing a focus problem. You should either be getting consistently good results, or consistently bad results. If the results are consistently good and images look good shot to shot, then you do not have a focus issue. You can stop doing tests at this point and breathe – you are in good shape. If you are getting consistently bad results, then the next step is to find out whether it is your lens or the camera body that has an autofocus problem.
[h=3]6) Is it the camera or the lens?[/h]As I have already pointed out, it is best to test multiple lenses when assessing the autofocus accuracy of your camera. If you only have one lens to test, then it would be impossible to tell whether the lens or the camera have alignment issues. Sometimes it could be both. If you have 3-4 different lenses, perform the above test on all lenses you have and see what you get. If all lenses show very similar results, then your camera is most likely to blame for AF issues. Still, it will be hard to pinpoint the exact source of the problem, because it all depends on how badly calibrated your lenses were before you started the test.
I have been shooting with a number of different Nikon DSLRs during the last 6 years and none of them had a focus problem with most of my lenses. I tested 2 samples of the Nikon D800 and both were perfect, with no signs of focus problems. However, the Nikon D800E that I recently received clearly has a misaligned phase detect sensor, because none of my lenses can accurately focus with it. Dialing -20 in AF Fine Tune seems to be fine with some lenses, but clearly not enough for others, so the camera has a severe case of backfocus. Hence, I was able to isolate the problem to the camera. Interestingly, I also recently added another Nikon 14-24mm f/2.8G lens, which has a really bad front focus problem. When I use it on my Nikon D700, the focus is completely off and I have to dial +20 to get anything in reasonable focus. Guess what – when I mount it on the Nikon D800E, it focuses perfectly, because the focusing misalignment on both pretty much cancel each other out. So you have to be careful when trying to determine the source of the problem.
[h=3]7) What to do if there is a focus issue[/h]So what do you do if you find a focus issue with your camera? Most people would take their camera or lens back to the place where they bought it from. While the return policy is created for this purpose, I would actually recommend NOT to send it back to the seller. Why? First, the seller will simply send the camera back to the manufacturer as a “defective” unit. Most of the time there is not even a note that explains why the customer returned it. The manufacturer receives the unit, re-assesses it in a lab, and if it cannot find anything wrong with the camera (which it won’t in case of AF alignment issues), it will put it back on the market as a “refurbished” item. A returned item can never be sold as new again. So by sending it back to the seller, you are not notifying the manufacturer of the source of the problem. In addition, there is no guarantee that the replacement you receive will be in any way better. I know some people keep exchanging their purchase until they get a “good” sample. Well, some do it 5-6 times and never get a good one! I don’t think you would want to wait for weeks to get the issue resolved, when it could be a matter of days for the manufacturer to address the problem. Also, by sending the item back to the seller, you are increasing the seller’s costs, since they put so much time and money to deal with defective products. It certainly also creates a lot of frustration for the seller to deal with these issues and they are obviously not to blame for manufacturer’s defects or QA issues.
So the best thing to do is to send it to the manufacturer for repair. All manufacturers have support service centers that specifically deal with these issues and defects. Plus, this is the best way to force the manufacturer to improve its QA process. If more complaints come in to the service centers, the manufacturer could tighten up their QA thresholds to cut down its escalating costs.
Here is my recommended approach to handle this particular issue:
[h=1]How to Quickly Test Your DSLR for Autofocus Issues[/h]
jul
1
201
1
201
[COLOR=#967D61 !important][/COLOR]
Below is the easiest and quickest way to test if your DSLR has an autofocus issue, along with a recommendation on what to do if there is a problem. This test can be used to detect front focus or back focus issues with a particular lens or a camera body. I will be using the Nikon D800E as a reference camera for this article, but any modern DSLR with Live View capability can be used for the same test (even entry-level DSLRs such as the Nikon D3200 have a Live View mode). Why would you want to test your camera for autofocus issues? Because if your camera or your lenses are defective or have a calibration problem, then you will not be able to obtain critically sharp images.[h=3]1) What You Will Need[/h]For this test, you will need the following:
- Any DSLR with Live View mode capability such as the Nikon D7000.
- At least one lens, but preferably 2-3 lenses if you want to isolate the problem to the camera or your lenses.
- A good stable tripod.
- A flat vertical surface in a very brightly lit area. For example, your garage door or a wall inside your home that is adjacent to a very large window will do fine.
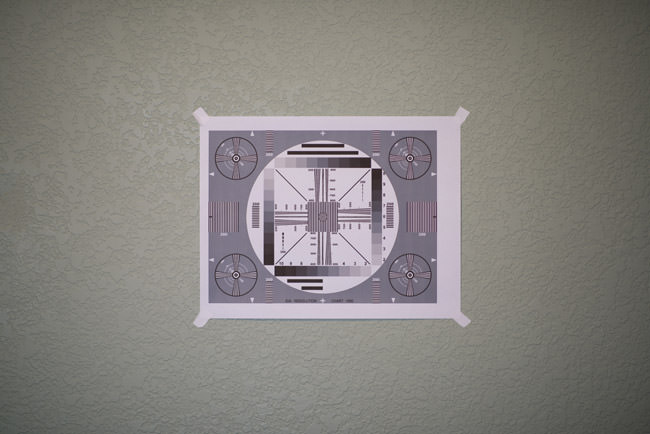
- Print out either this Siemens Star Focus Chart or this Focus Test Chart on regular letter size paper. You can print it on a laser printer or inkjet (doesn’t really matter). Make sure to print on regular paper, not anything glossy like photo paper.
- Scotch tape or some other adhesive material to keep the focus chart on the wall.
[h=3]2) Set Up[/h]The setup process is pretty straightforward, as explained in detail below:
- Pick a spot on your wall where you will hang the focus chart. The wall must be vertical and straight. You want the focus chart to be right across from the camera, so do not hang it too high or too low.
- Once the focus chart is up, set up the camera on your tripod and make sure that the camera is placed parallel to the focus chart. Make sure that the camera is not tilted left/right/up/down – it must be parallel to the wall. To check if your level is good, look from the side and make sure that the lens is pointing directly at the center of the focus chart. Here is how I placed my setup:
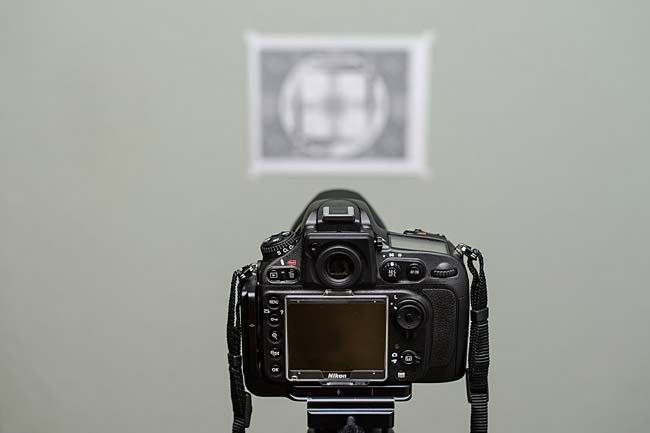
Please note that I captured the image above the camera to show where the focus chart is relative to the camera. The focus chart is located right across from the camera. - The distance between the camera and the wall depends on the focal length of the lens you are testing. If you are using a 50mm f/1.4 lens, then the distance between the camera and the test chart should be approximately 5 to 7 feet (1.5-2 meters). If you are using a wide-angle lens, then stand closer and if you are using a telephoto lens stand further away. The goal is to stand close enough to be able to have a shallow depth of field. The chart should take about 1/3-1/4 the size of the entire image, as shown below:
- You are all set, now it is time to take some pictures
- Switch your camera to full Manual Mode.
- Set your lens aperture to maximum aperture. For example, if you have a Nikon 50mm f/1.8G lens, set your aperture to f/1.8.
- Use the exposure meter inside the camera to determine the optimal shutter speed. Take sample shots and make sure that you can see the chart clearly. Ideally, your shutter speed should be pretty fast at something like 1/500 of a second. If you are getting really slow shutter speeds like 1/10, then it means that you do not have sufficient ambient light. Either take the setup outside and do it in bright light, or add more light to illuminate the focus chart. If the amount of ambient light is insufficient, your test will be flawed. It is extremely important to make sure that you are doing this in a well-lit environment, since the Phase Detect sensor on the camera needs plenty of light.
- Make sure that AF Fine Tune/AF Micro Adjustment is turned OFF if your camera has it. On the Nikon D800, for example, you go to Setup Menu->AF fine tune->AF fine tune (On/Off)->OFF.
- Set the focus point to the center focus point. The center focus point is always a cross-type sensor, so it is the most accurate in your camera.
- Turn off any sort of lens corrections in your camera (vignetting, distortion, chromatic aberration, etc.). You do not want anything to potentially influence the test results.
- Set the camera to AF-S/Single Servo mode.
- While this test should work for both JPEG and RAW images, cameras add extra sharpening, colors, etc to JPEG images. Therefore, I would recommend to capture test data in RAW format.
- Set your camera Live View mode to “Tripod” (if you have such a setting).
- If your camera has a Mirror Lock Up feature and you have a remote camera release, you can use those to prevent camera shake (can be very useful if your shutter speed is slow).
- First, you will capture the focus chart in Live View mode. This will be your “reference” shot. Once you turn Live View mode on, zoom in to the center of the focus chart and either half-press the shutter or press the AF-ON button on the back of the camera to force it to focus the lens. Go ahead and press the shutter button now and capture the image. Now analyze the image at 100% view and make sure that it is tack sharp in the center where the focus point is. If it looks sharp, you did everything right. If it looks blurry, then your camera did not acquire focus properly in live view mode. Repeat until you get a sharp image. Only keep one image that is sharp and delete the rest.
- The second image will be captured without Live View. Turn off Live View mode. Now look through the viewfinder and rotate the focus ring on the lens until the focus chart looks completely out of focus. We want to force the camera to reacquire focus. Now half-press the shutter button or press the AF-ON on the back of the camera to acquire focus and wait until you see a green mark inside the viewfinder or the camera beeps (if you have beep turned on), confirming that focus is acquired. Take a shot. Again, rack the focus by rotating the focus ring until everything is out of focus and repeat the process. Ideally, you should capture at least 3 shots this way, since you need to eliminate any possibility of a potential autofocus error.
[h=3]5) Analyze the Data[/h]Now that we have a sharp reference image, along with a bunch of other images, it is time to analyze the data. Import your images into your computer with whatever post-processing tool you use. Open up the very first image and make sure that it looks sharp in the center. Here is a crop of my reference shot that I captured with the Nikon 24mm f/1.8G lens:
The image looks good and sharp. Please note that this is a RAW image without any kind of sharpening applied to it.
Now, take a look at the other 3-4 images you captured after this one. Do they look more or less the same? Or do they all look out of focus? Here is a second shot that I captured, which clearly indicates a focus problem:
As you can see, the image not only looks out of focus, but we are also seeing some aberration problems in the image as well (a pretty normal thing to see when an image is out of focus). All three shots were very similar, which clearly indicates a focus problem either on the lens or the camera body.
It is critical to view images at 100% view and go back and forth between the reference image and the other shots to compare. If things look out of focus, repeat the whole thing again to confirm that you are indeed seeing a focus problem. You should either be getting consistently good results, or consistently bad results. If the results are consistently good and images look good shot to shot, then you do not have a focus issue. You can stop doing tests at this point and breathe – you are in good shape. If you are getting consistently bad results, then the next step is to find out whether it is your lens or the camera body that has an autofocus problem.
[h=3]6) Is it the camera or the lens?[/h]As I have already pointed out, it is best to test multiple lenses when assessing the autofocus accuracy of your camera. If you only have one lens to test, then it would be impossible to tell whether the lens or the camera have alignment issues. Sometimes it could be both. If you have 3-4 different lenses, perform the above test on all lenses you have and see what you get. If all lenses show very similar results, then your camera is most likely to blame for AF issues. Still, it will be hard to pinpoint the exact source of the problem, because it all depends on how badly calibrated your lenses were before you started the test.
I have been shooting with a number of different Nikon DSLRs during the last 6 years and none of them had a focus problem with most of my lenses. I tested 2 samples of the Nikon D800 and both were perfect, with no signs of focus problems. However, the Nikon D800E that I recently received clearly has a misaligned phase detect sensor, because none of my lenses can accurately focus with it. Dialing -20 in AF Fine Tune seems to be fine with some lenses, but clearly not enough for others, so the camera has a severe case of backfocus. Hence, I was able to isolate the problem to the camera. Interestingly, I also recently added another Nikon 14-24mm f/2.8G lens, which has a really bad front focus problem. When I use it on my Nikon D700, the focus is completely off and I have to dial +20 to get anything in reasonable focus. Guess what – when I mount it on the Nikon D800E, it focuses perfectly, because the focusing misalignment on both pretty much cancel each other out. So you have to be careful when trying to determine the source of the problem.
[h=3]7) What to do if there is a focus issue[/h]So what do you do if you find a focus issue with your camera? Most people would take their camera or lens back to the place where they bought it from. While the return policy is created for this purpose, I would actually recommend NOT to send it back to the seller. Why? First, the seller will simply send the camera back to the manufacturer as a “defective” unit. Most of the time there is not even a note that explains why the customer returned it. The manufacturer receives the unit, re-assesses it in a lab, and if it cannot find anything wrong with the camera (which it won’t in case of AF alignment issues), it will put it back on the market as a “refurbished” item. A returned item can never be sold as new again. So by sending it back to the seller, you are not notifying the manufacturer of the source of the problem. In addition, there is no guarantee that the replacement you receive will be in any way better. I know some people keep exchanging their purchase until they get a “good” sample. Well, some do it 5-6 times and never get a good one! I don’t think you would want to wait for weeks to get the issue resolved, when it could be a matter of days for the manufacturer to address the problem. Also, by sending the item back to the seller, you are increasing the seller’s costs, since they put so much time and money to deal with defective products. It certainly also creates a lot of frustration for the seller to deal with these issues and they are obviously not to blame for manufacturer’s defects or QA issues.
So the best thing to do is to send it to the manufacturer for repair. All manufacturers have support service centers that specifically deal with these issues and defects. Plus, this is the best way to force the manufacturer to improve its QA process. If more complaints come in to the service centers, the manufacturer could tighten up their QA thresholds to cut down its escalating costs.
Here is my recommended approach to handle this particular issue:
- Retain all sample images you have taken with the camera.
- Call the manufacturer’s service support number and explain in detail that you are having an autofocus problem with your camera. Provide the image samples to the support personnel and if they question your testing methodology, provide the URL to this article.
- Make sure to send both the camera and at least one lens for focus calibration. If you only have one camera and one lens then send both. If you have multiple lenses, send one or two lenses you had least problems with before you bought the camera. Absolutely make sure to point out that you have no problems with lenses on other cameras, so that they do not try to calibrate your lenses instead of the camera.
- Insist on making them pay for shipping and insurance if the product is under warranty. If the support person refuses to provide a paid shipping label, escalate the problem to the support manager. Why should you be paying for shipping a defective product in first place?