I Need Help Removing "Racoon Eyes"

Horoscope Fish

Senior Member
I know the best solution is prevention, so thank you in advance for that suggestion but the moment has now passed.

If anyone has any helpful suggestions for removing Racoon Eye's, I'd appreciate it. I have access to Lightroom and Photoshop and NIK Tools, though my Lightroom skills are next-to non-existent. What I have been using so far is the Adjustment Brush in Adobe Camera RAW to bring down the exposure. I'm getting so-so results with this and I find myself thinking there has to be a better way... Is the Adjustment Brush my best tool? If so, is it better to zoom in to, say, 300% and adjust at the pixel level or is it better use a really BIG adjustment selection in conjunction with the Brush tool and mask, say, the whole head? Totally open to any suggestions...

I have several shots of a model with striking eye's and this is killing me!
....
 

Eyelight

Senior Member
If the predominate color is isolated to the problem areas, color replacer maybe??? Can you post a crop so to see xactly what we're dealing with?
 

Horoscope Fish

Senior Member
If the predominate color is isolated to the problem areas, color replacer maybe??? Can you post a crop so to see xactly what we're dealing with?
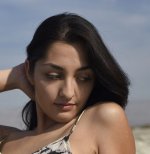
Not the best example but it gets the point across...
.....
Salton Sea.jpg
....
 
Last edited:

Englischdude

Senior Member
just googled it, now I know what you mean. in this case the racoon eyes is due to shadows not make-up, meaning the exposure needs to be balanced somehow. If it were me this would be a photoshop job, and quite a lengthy one. layer, mask, increase levels and try to merge the layers and balance exposure/color with a very soft brush.

now you have something to keep yourself busy during crappy weather.
 

Eyelight

Senior Member
Oooh. OK, hmm. Skip the color replacer. Not at all what I imagined.

This one tough because the eyelash on the left and it's shadow from the hair on the right.

I'd try cloning and healing to reduce the area on the left and maybe even darken the shadow on the right.
 

Englischdude

Senior Member
although, i dont see anything wrong with the photo to be honest, if she would have had the sun in her eyes she would have been squinting.
why is this pic bothering you Paul?
 

PapaST

Senior Member
It's pretty beyond me but what about using the Adjustment Brush in LR and knock down the Flow, Feather and Density. Paint the areas and then raise the exposure a tad, raise the shadows, lower contrast and clarity. And perhaps play around with the other settings a bit. Here was a quick go. I'm guessing PS would have more capabilities in this scenario. I gave it a go.

raccoon eyes.jpg
 

PapaST

Senior Member
eehh... now that I post my pic I realize I just lightened the entire area without really getting rid of raccoon eyes. Sorry... I tried. ;)
 

Eyelight

Senior Member
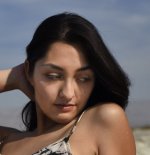
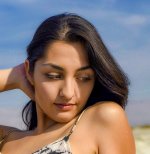
OK. Here we go. A combination of cloning and healing, with a few adjustments in LR in an attempt to lessen the impact of the shadows.

You can cheat on the left shadows because hard to tell precisely how the light would spill, but the right is too much of a line from the hair.

Nowhere near perfect, and another approach may be much better.

Salton Sea.jpg
 

Horoscope Fish

Senior Member
OK. Here we go. A combination of cloning and healing, with a few adjustments in LR in an attempt to lessen the impact of the shadows.

You can cheat on the left shadows because hard to tell precisely how the light would spill, but the right is too much of a line from the hair.

Nowhere near perfect, and another approach may be much better.

View attachment 134173
Nicely done! Could you be a little more specific on how you got there ^^^ ?

I'd like to follow along and try to duplicate your steps if it's not too much to ask.

TIA!
....
 

Eyelight

Senior Member
I used Elements because I havn't had CC long enough to get intimate.


Left side

  • Zoomed in on the area.

  • Started with the clone tool very small and anchored toward the nose and cloning toward the left and more or less trying to blend the eyelash shadows into the skin tone.
  • Kept moving left until the cloning was too light against the cheek shadow
  • Switched the anchor out to the cheek shadow and cloned shadow toward the light.
  • Last cloning was from the line between light and shadow 1/2 way up from the corner of the mouth and toward the ear. Whoops.. there's a clone mark.
  • I move the clone anchor constantly aiming for the least change in skin tone

Right side
  • I cloned some skin color from the left side to push the shadow line back a little
  • Cloned a little from the shadows to blend the light streaks.
  • Used the healing tool to smooth the area a little

Moved to LR
  • Exposure +.65
  • Highlights -76
  • Shadows +84
  • White Clipping +28
  • Black Clipping -71
  • Clarity -37
  • Vibrance +69
  • Blue Luminance Shift -24
  • Blue Saturation Shift +8
  • Aqua Saturation Shift +41

The last 3 trying to blue up the sky a little to distract slightly, if that makes sense.
 

Horoscope Fish

Senior Member
I used Elements because I havn't had CC long enough to get intimate.


Left side

  • Zoomed in on the area.

  • Started with the clone tool very small and anchored toward the nose and cloning toward the left and more or less trying to blend the eyelash shadows into the skin tone.
  • Kept moving left until the cloning was too light against the cheek shadow
  • Switched the anchor out to the cheek shadow and cloned shadow toward the light.
  • Last cloning was from the line between light and shadow 1/2 way up from the corner of the mouth and toward the ear. Whoops.. there's a clone mark.
  • I move the clone anchor constantly aiming for the least change in skin tone

Right side
  • I cloned some skin color from the left side to push the shadow line back a little
  • Cloned a little from the shadows to blend the light streaks.
  • Used the healing tool to smooth the area a little

Moved to LR
  • Exposure +.65
  • Highlights -76
  • Shadows +84
  • White Clipping +28
  • Black Clipping -71
  • Clarity -37
  • Vibrance +69
  • Blue Luminance Shift -24
  • Blue Saturation Shift +8
  • Aqua Saturation Shift +41

The last 3 trying to blue up the sky a little to distract slightly, if that makes sense.
Wow... Thank you! That was a lot more detail than I was expecting!

The picture in my post makes the skin tones look a lot worse than what I see in Photoshop but what you did is really rocking that shot. I'm going to have to experiment some now. Thank you, again, for that detailed write up.
....
 

Eyelight

Senior Member
Wow... Thank you! That was a lot more detail than I was expecting!

The picture in my post makes the skin tones look a lot worse than what I see in Photoshop but what you did is really rocking that shot. I'm going to have to experiment some now. Thank you, again, for that detailed write up.
....

I have to give credit to the model. I just diminished the distractions enough so that her beauty takes over and we end up with beach syndrome.
 

dickelfan

Senior Member
I had a picture like this recently. What I did was edit the picture in Photoshop. I made a new layer with the same picture and then used the healing brush to edit out the dark areas and even lines on the face. Now this makes it look slightly fake because there aren't any lines...but what you can do is to adjust it by lowering the opacity of the layer to where you can see a little bit of the original. It worked really well especially for the dark areas under the eyes. You can then take it back to lightroom and make adjustments.
 

Pretzel

Senior Member
GET A FLASH!


Sorry, had to do it, LOL

In all actuality, I struggled with this as well, for quite some time. Now I'm extra careful re: placement and/or I use my flash with the Fong on it. (only works closer in on those really bright days) Wish I would have had all the great advice in this thread back then!!

Now I'm thinking for an Alien Bee with umbrella, or somesuch, for those times when I just can't adjust to avoid the shadows. Something that can compete with sunlight. :)
 

Horoscope Fish

Senior Member
I had a picture like this recently. What I did was edit the picture in Photoshop. I made a new layer with the same picture and then used the healing brush to edit out the dark areas and even lines on the face. Now this makes it look slightly fake because there aren't any lines...but what you can do is to adjust it by lowering the opacity of the layer to where you can see a little bit of the original. It worked really well especially for the dark areas under the eyes. You can then take it back to lightroom and make adjustments.
Just so I'm sure I understand... You copied the original image onto a new layer (a la Ctrl+J), made the adjustments on this new layer with the Healing Brush and then lowered the opacity on the duplicate layer. Is that correct? If so, that's really easy... I'll have to try that.
....
 

dickelfan

Senior Member
yep....that is it. You can make whatever adjustments you want and then use the opacity slider to bring back some of the original. May not work in all situations but you'd be surprised at how it works.
 
Top