BackdoorArts
Senior Member
Do You Really Need HDR When Your Sensor Already Has High Dynamic Range?
Scott had posted a thread called "Why HDR?!" earlier this week with a really fine example of how HDR photography can really change what you see in a photograph. I am by no means an anti-HDR person, in fact I used to shoot an awful lot of it. But since getting my D600 and D800, I've found it almost unnecessary. The sensors in this current generation of Nikons are so good in terms of their dynamic range that, provided you have not blown out either end of your histogram on the initial exposure, you can quickly recover those areas of a shot that you once thought lost forever.
I'm going to post a fairly benign example showing a blown out sky, but the techniques and the ideas here can be used to balance the light in an otherwise unbalanced shot. I'm working in Photoshop, but the PS techniques translate directly to every version of Elements I've ever used.
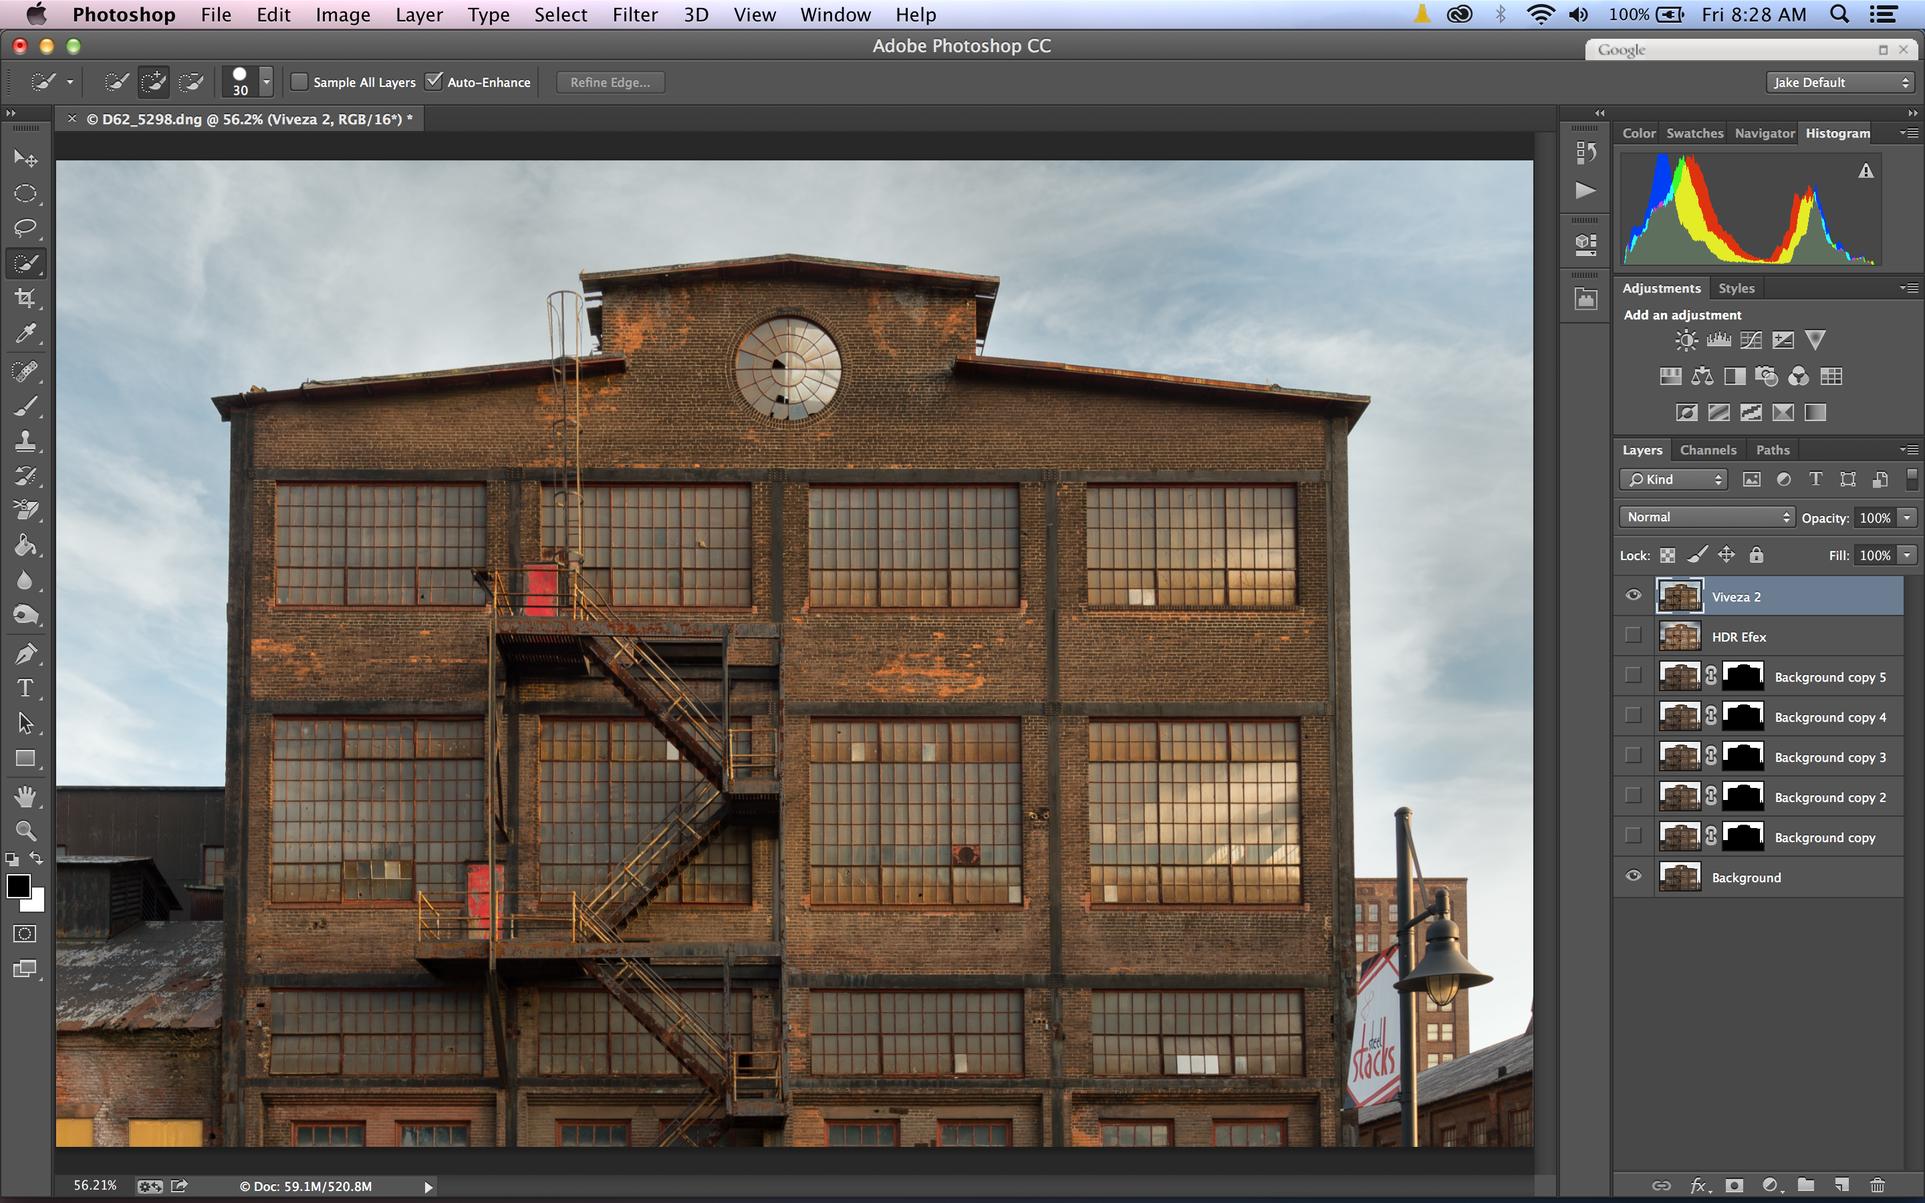
I'm using screen prints so you get a feel for what was done. Please note, in the PS screenshots, which layers are visible and which are not (look which layers have the EYE), since I did multiple adjustments in a single file before putting this together.
Original Photo
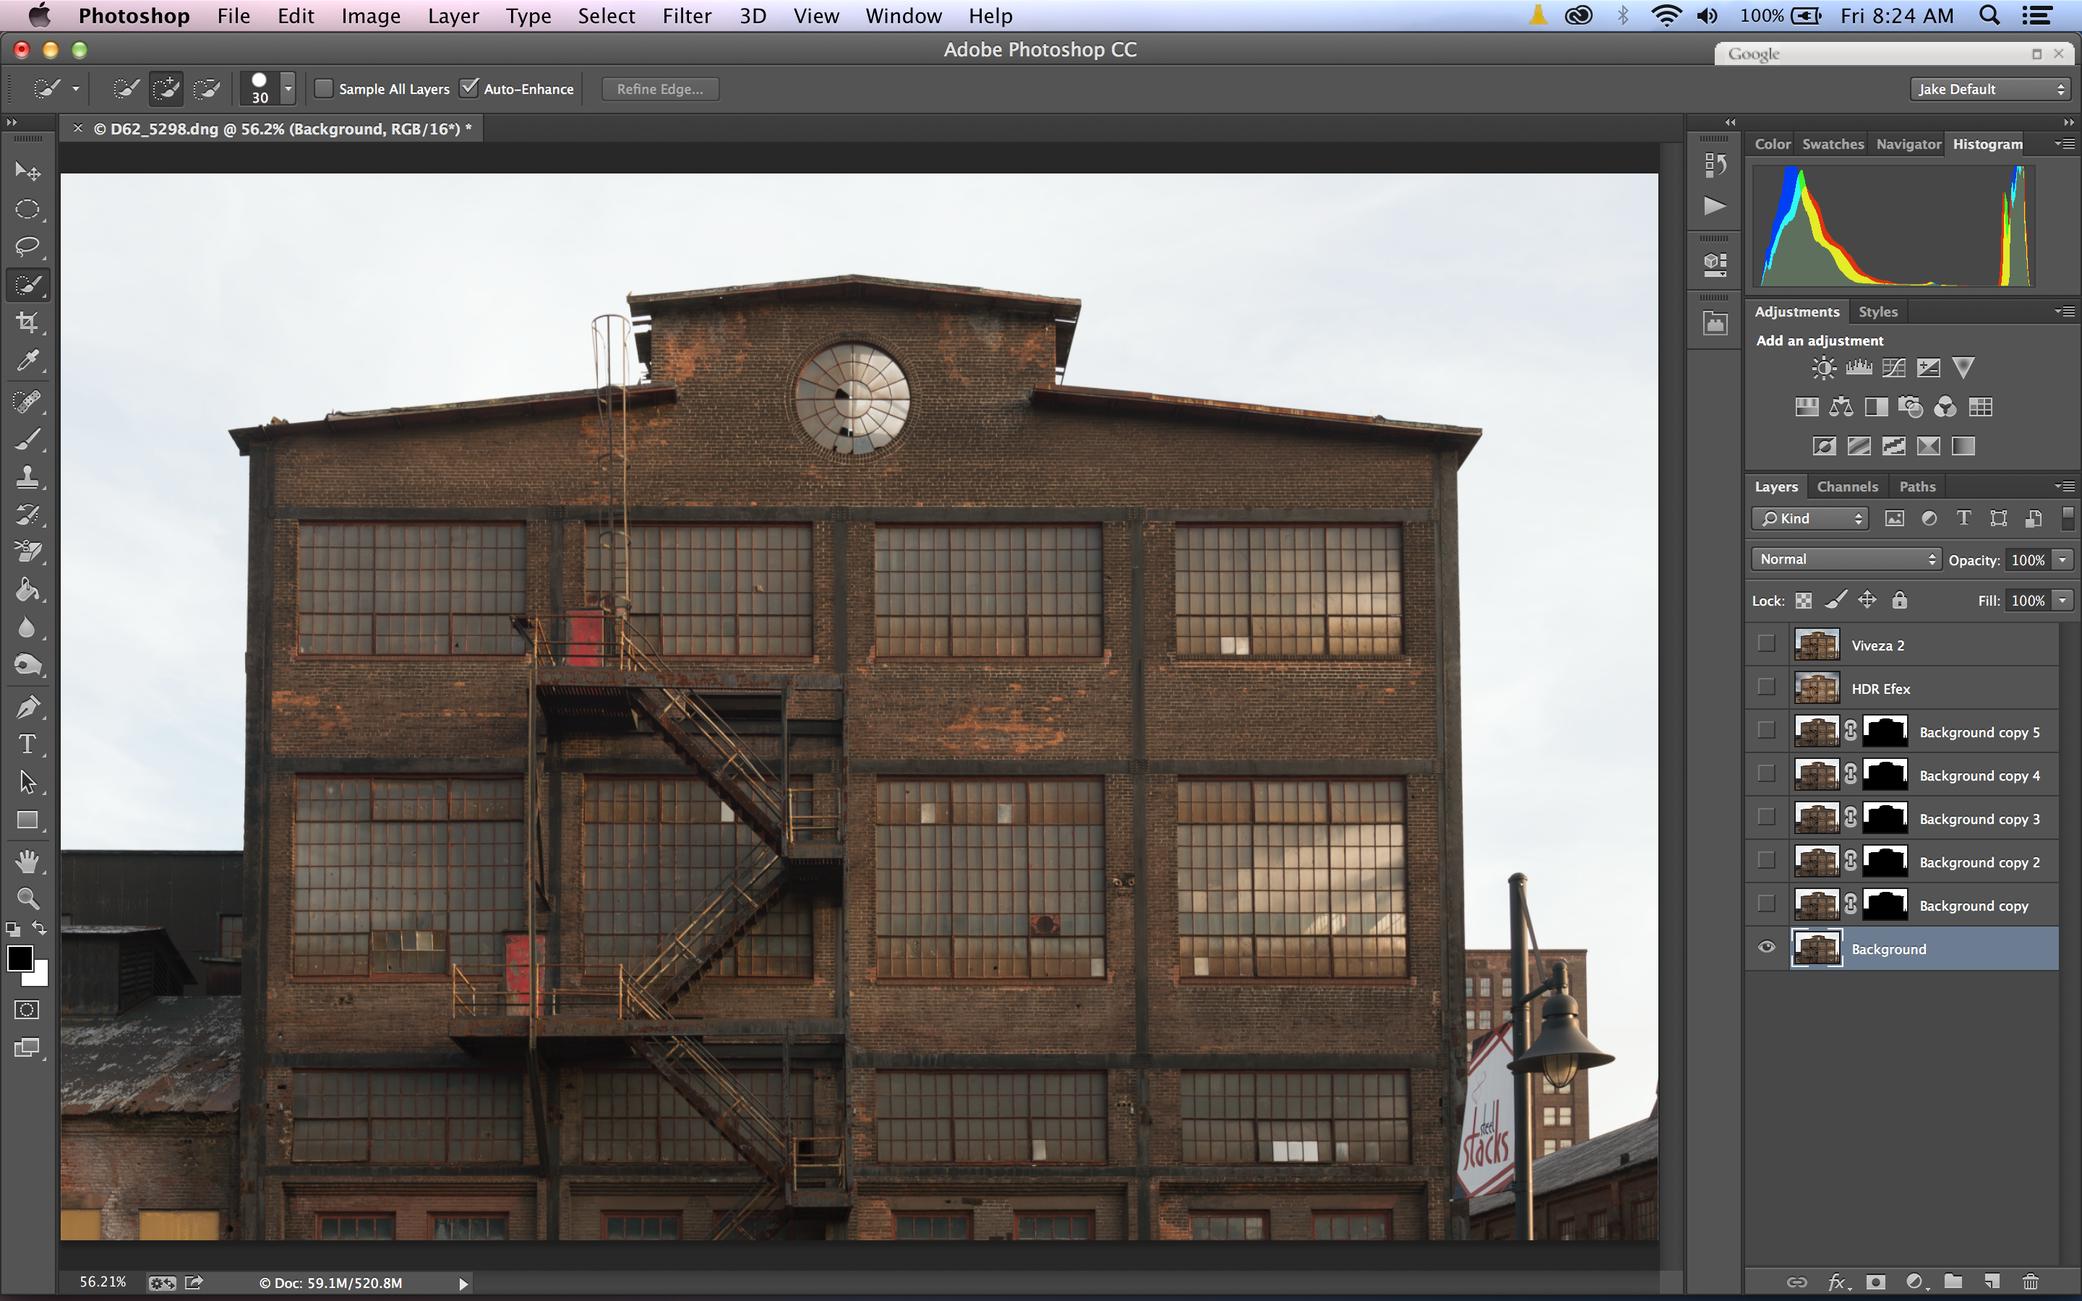
OK, so here's the original photo, straight out of the camera. If you look at the histogram you can see that while neither side is blown out, there's a huge gulf between the lights and the darks. What we want to do (and what HDR does) is balance that out.
Method 1 - Using Photoshop/Elements, Layer Blend Modes & Layer Masks
So, I'm OK with the exposure of the building, but the sky is blown out, and the reason I took it was because the sky was pretty nice as well. There are a set of layer blend modes that work to darken a photo based on the layer above it. While these are often used when applying textures, you can also use it to blend a photo with itself.
First, hit Control/Command-J to duplicate the Background layer. Now, I know I only want to darken the sky, so before anything else I want to create a layer mask to isolate only that part. Using the Quick Selection Tool, I painted around the sky (which is fairly easy in this photo) until the entire sky was selected. I then clicked on the Add Layer Mask button (the one that looks like the Japanese flag in the bottom right corner), which adds a mask based on the selection. Easy-peasy!!
Next, I change the Blend Mode in the Layer Palate from Normal to Multiply. This blend mode darkens the effected area by, literally, multiplying the light values together. As you can see, I now have more details in the sky.
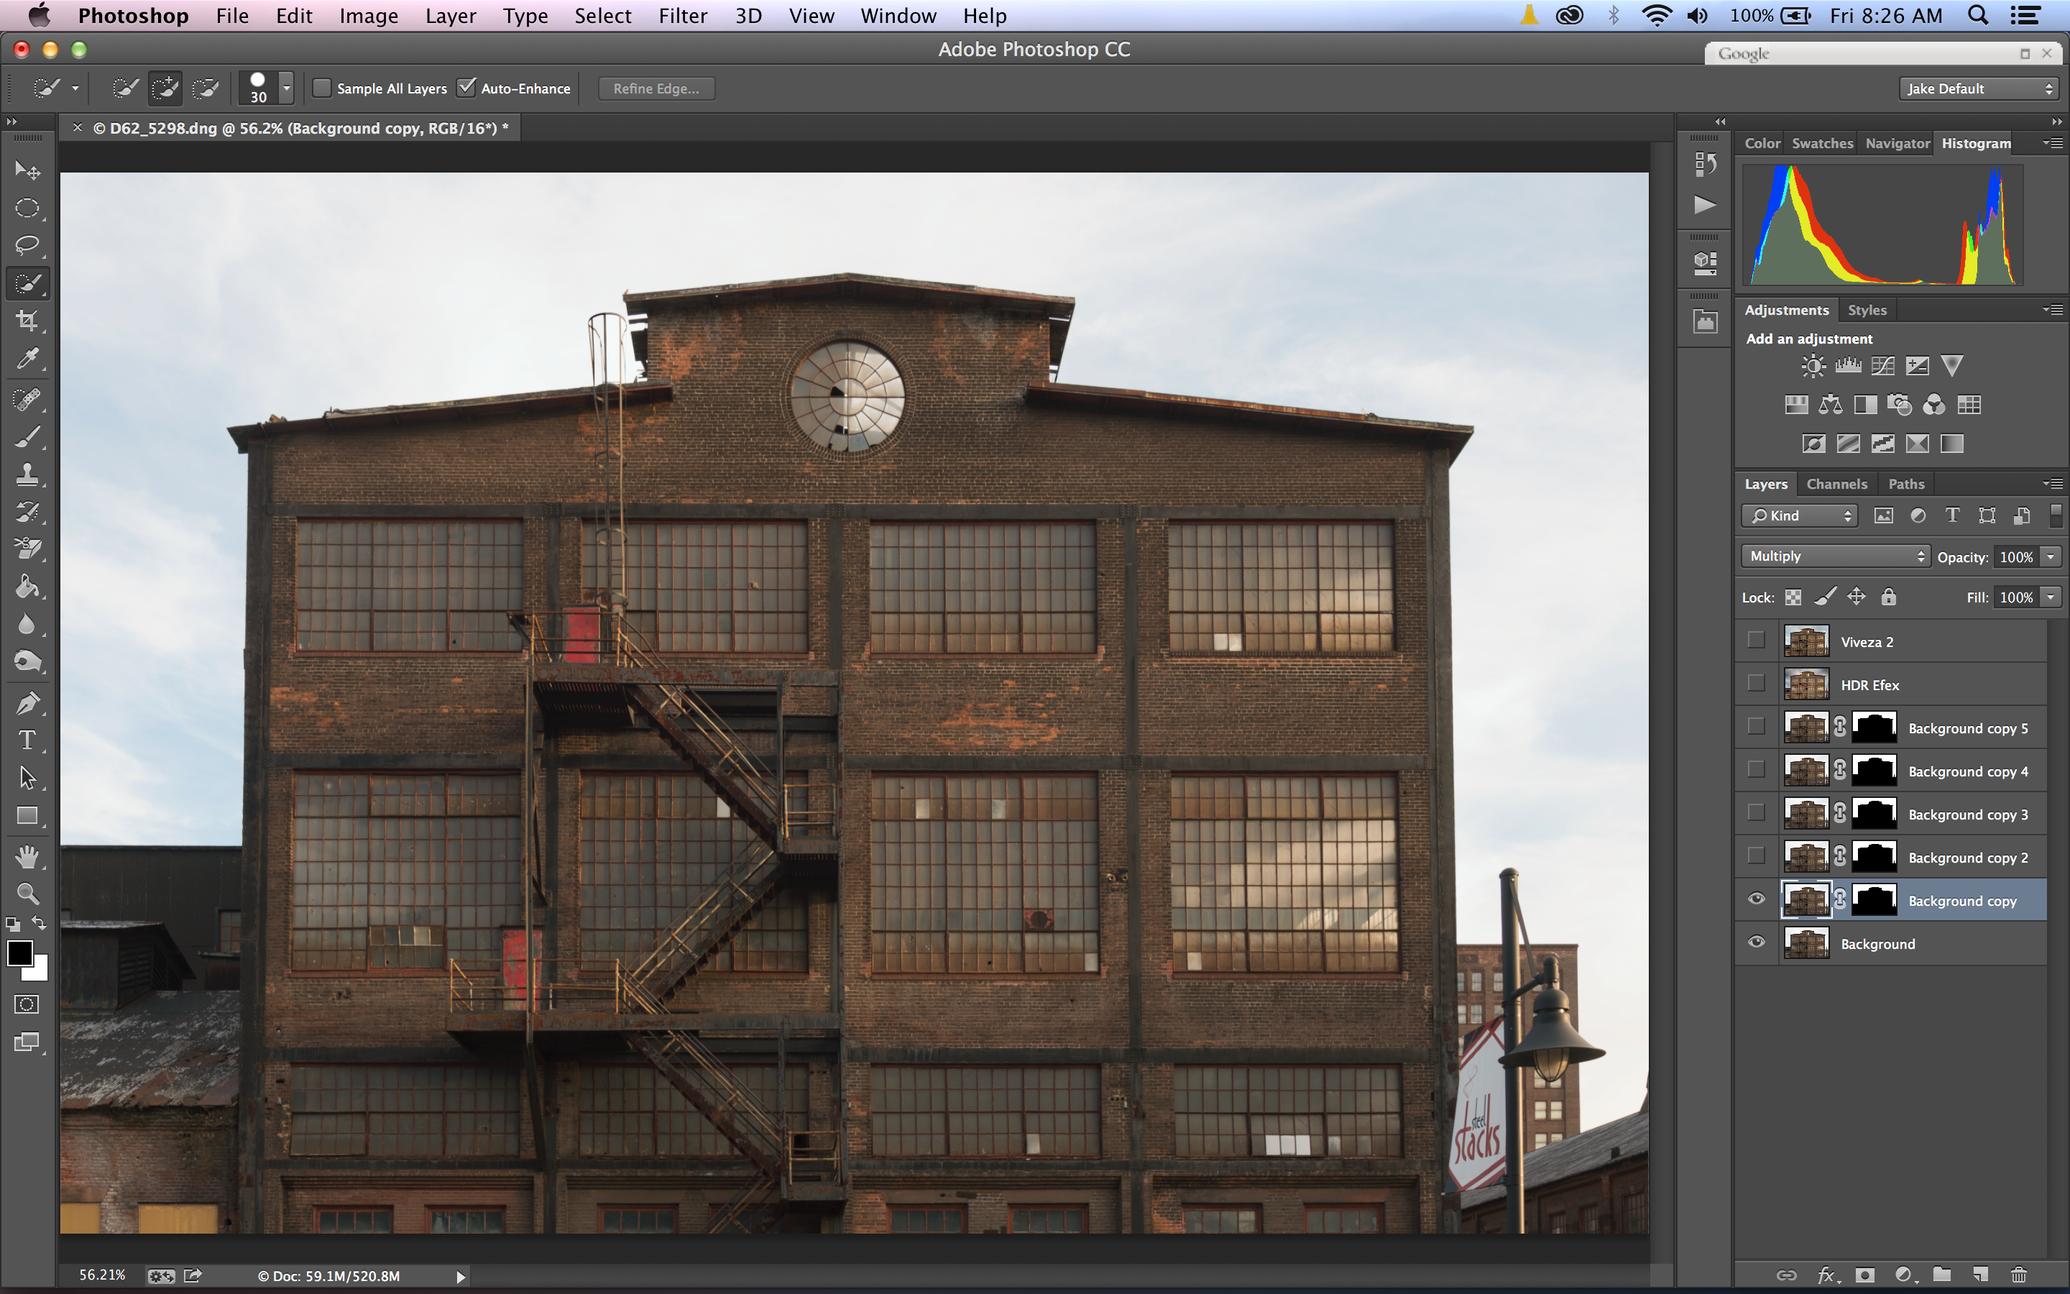
Notice how the right side of the Histogram has opened up a bit and started moving to the left. That's what I want. But I'm not done since the sky is still not as dark as I'd like. This is where it gets easy. I already have a layer that does what I want - I just want more. All I have to do it hit Control/Command-J with the new layer highlighted and it will replicate the layer, complete with the mask and blend mode intact. And I can keep doing this, watching just the sky darken until I get the effect I want. As you can see, it took 5 copies until I got the sky to where I wanted it.
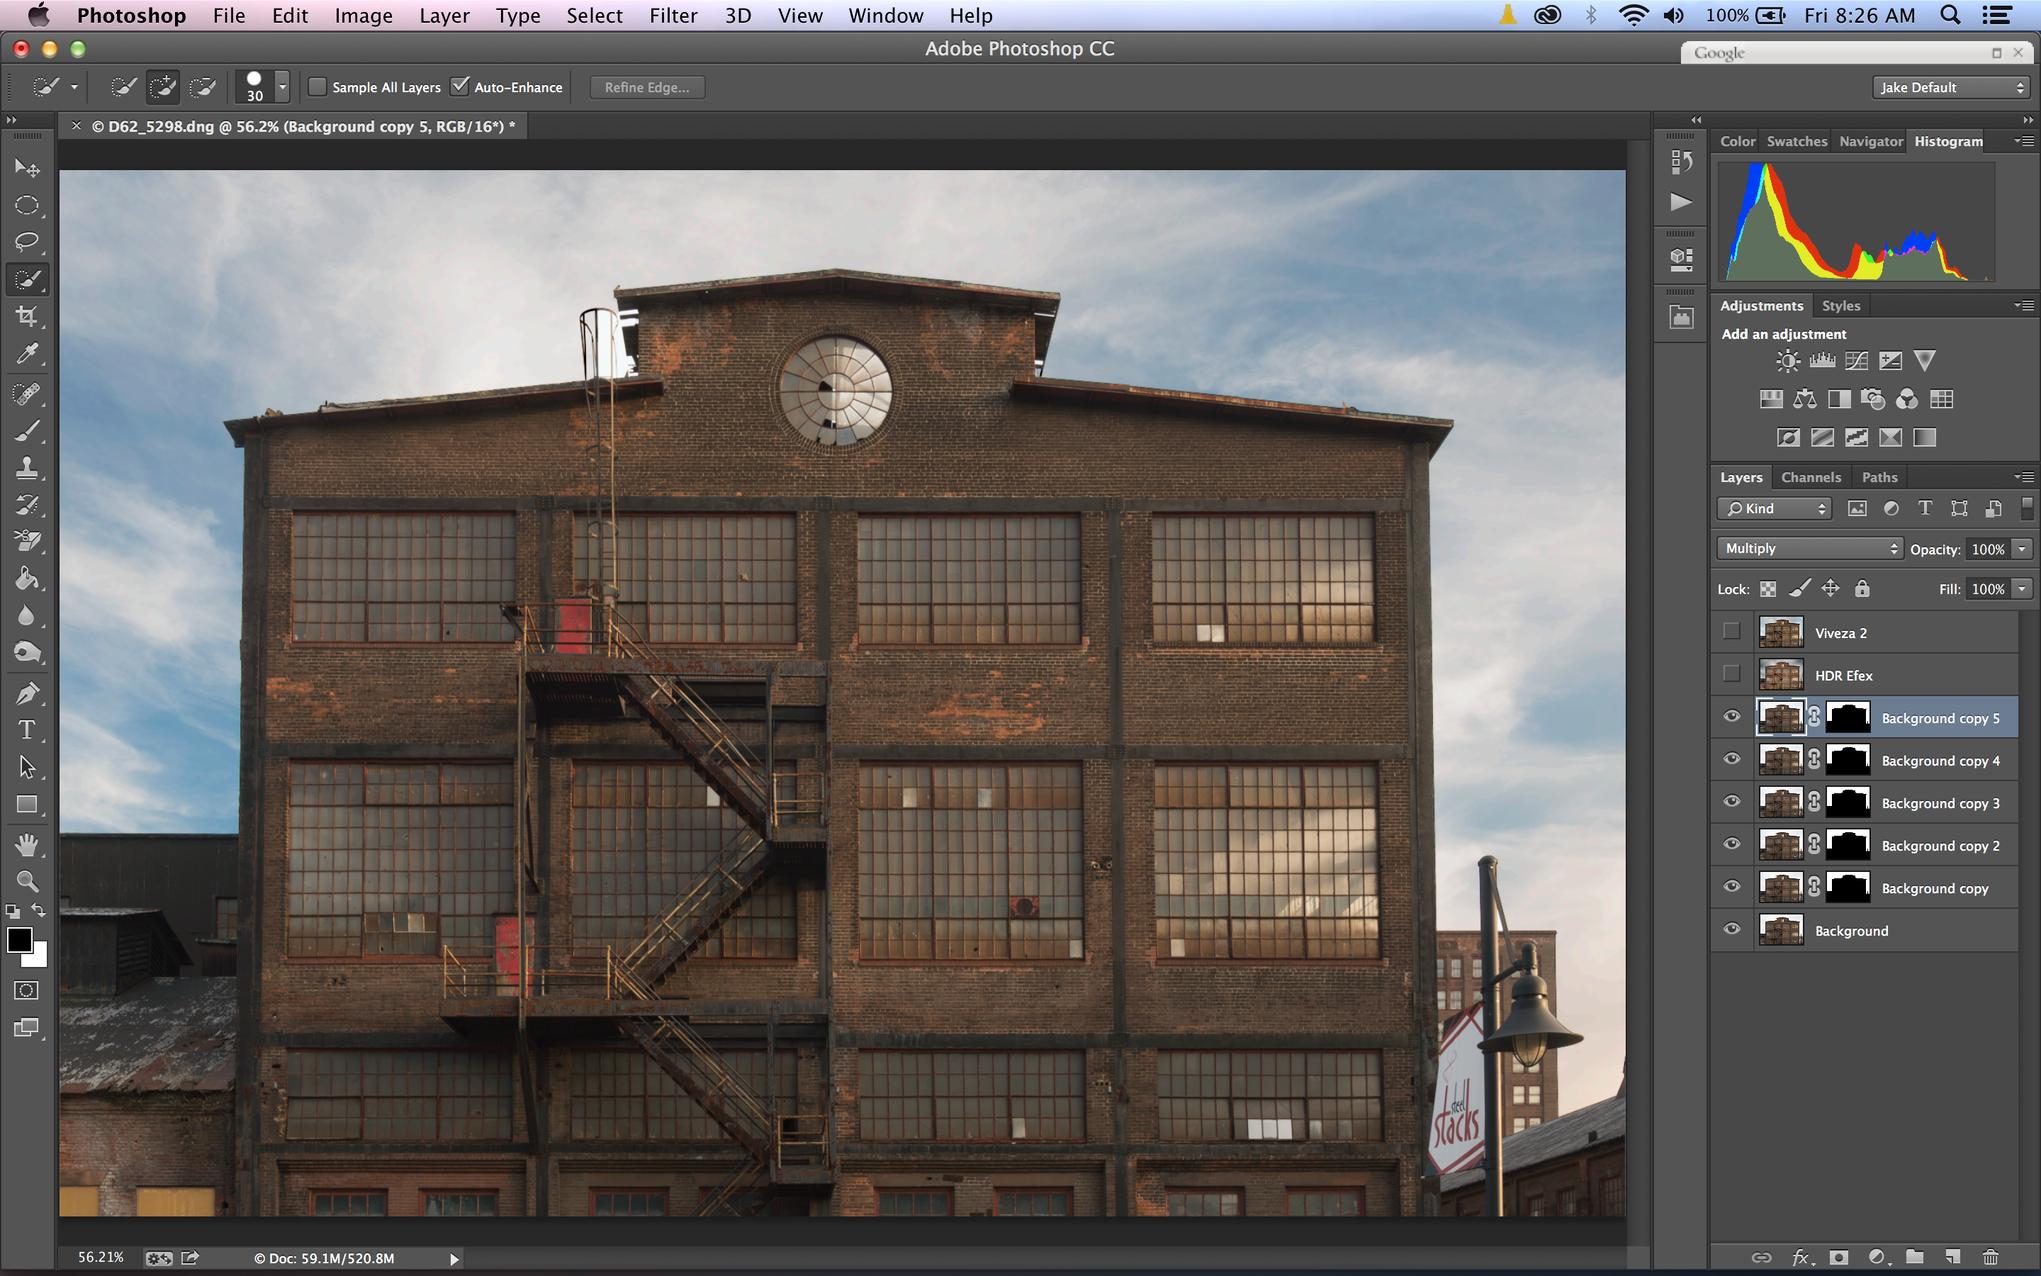
And looking at the Histogram, you can see that I've bridged the light gap - in fact, I've actually got room to the right now where I can brighten the overall image. This is by no means complete, but it's now a well exposed, balanced image from what used to be something I may have been disappointed in. From here, I would merge the visible images, either by flattening or creating a new layer from the visible layers, and then edit as normal.
Method 2 - Using HDR Software on a Single Image (i.e. Tone Mapping)
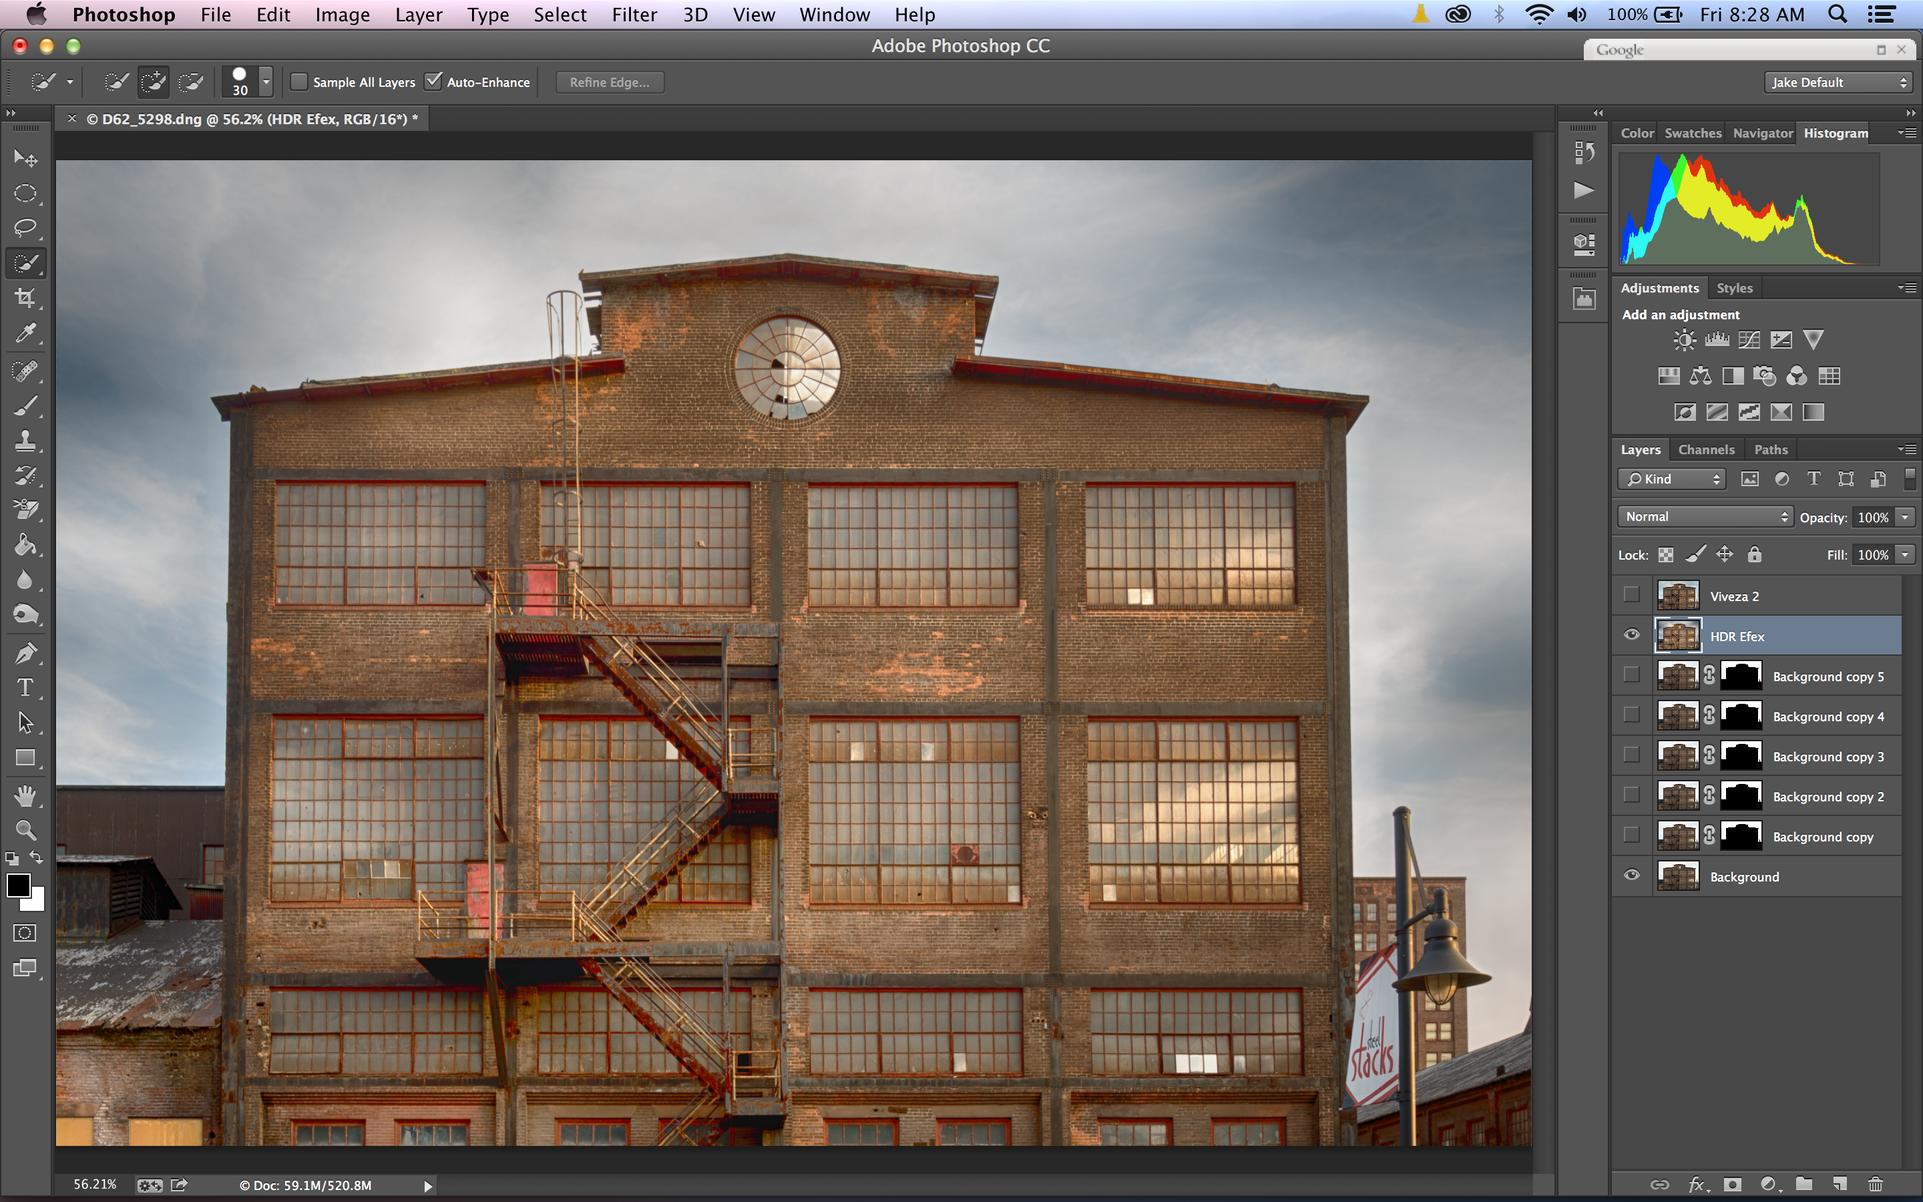
This one is sort of easy, but not always obvious. If you've got a single image, you can send that into your HDR Program of choice and use the tone mapping tools. These software packages dig into the light information contained in each pixel. When you use multiple images to create an HDR image what you're really doing is just giving the program more light information for each pixel by combining all the information across the images. But the truth is, with the dynamic range of these sensors there is a lot of information there that is probably going unused, or at least underused. So, when you ask the HDR program to reach in to the single image it's likely going to find what you're looking for without you every having to worry about making sure you have 3-9 images that must be ghost-reduced, etc.
This is a very quick and dirty trip of my original image into HDR Efex Pro 2 with only their "Deep 2" preset applied. Obviously I have much more to do with this, but again you can see that I now have a well balanced image to start my real work from.
Method 3 - Nik Viveza 2
If you've got it, the Nik Collection is a great set of tools, and Viveza 2 is a great first pass light adjustment for me. For an image like this, however, it's not as easy to use - but you can do it. What I did with the image below is to apply a single control point in the upper-right corner in the sky and use that to add structure and remove brightness from the sky, adjusting contrast and saturation as desired. Once I got it close, I replicated the control point across the sky in 4 additional places until I had the same effect everywhere. I then went back to the main adjustment panel and did some global tweaks to help get me where I wanted to go. Not the way I'd really want to handle this overall, but if I wound up with an image that was almost there, I wouldn't hesitate using Viveza 2 to fix the more problematic spots.
Method 4 - But What If I Only Have Lightroom?!
Because I know not everyone has Photoshop or Elements, let alone the Nik Collection (or anything else), it is possible for you to do this in Lightroom - but it's not nearly as easy. What you need to do is to use the Brush Tool to paint your adjustments in the sky. This isn't as easy since there are no edge protection tools in LR like there are in PS and PSE, but if you take your time you're golden.
Step 1 is to activate the Brush Tool and click on the Show Selected Mask Overlay button at the bottom. Then paint in the part of the image you want to manipulate before changing any of the parameters on the tool. This will require you adjusting the tool size several times. I like to use a slightly feathered edge of the tool and just go past the edges of what I want to change. Then uncheck the box, and begin to tweak the adjustment sliders to get what you want.
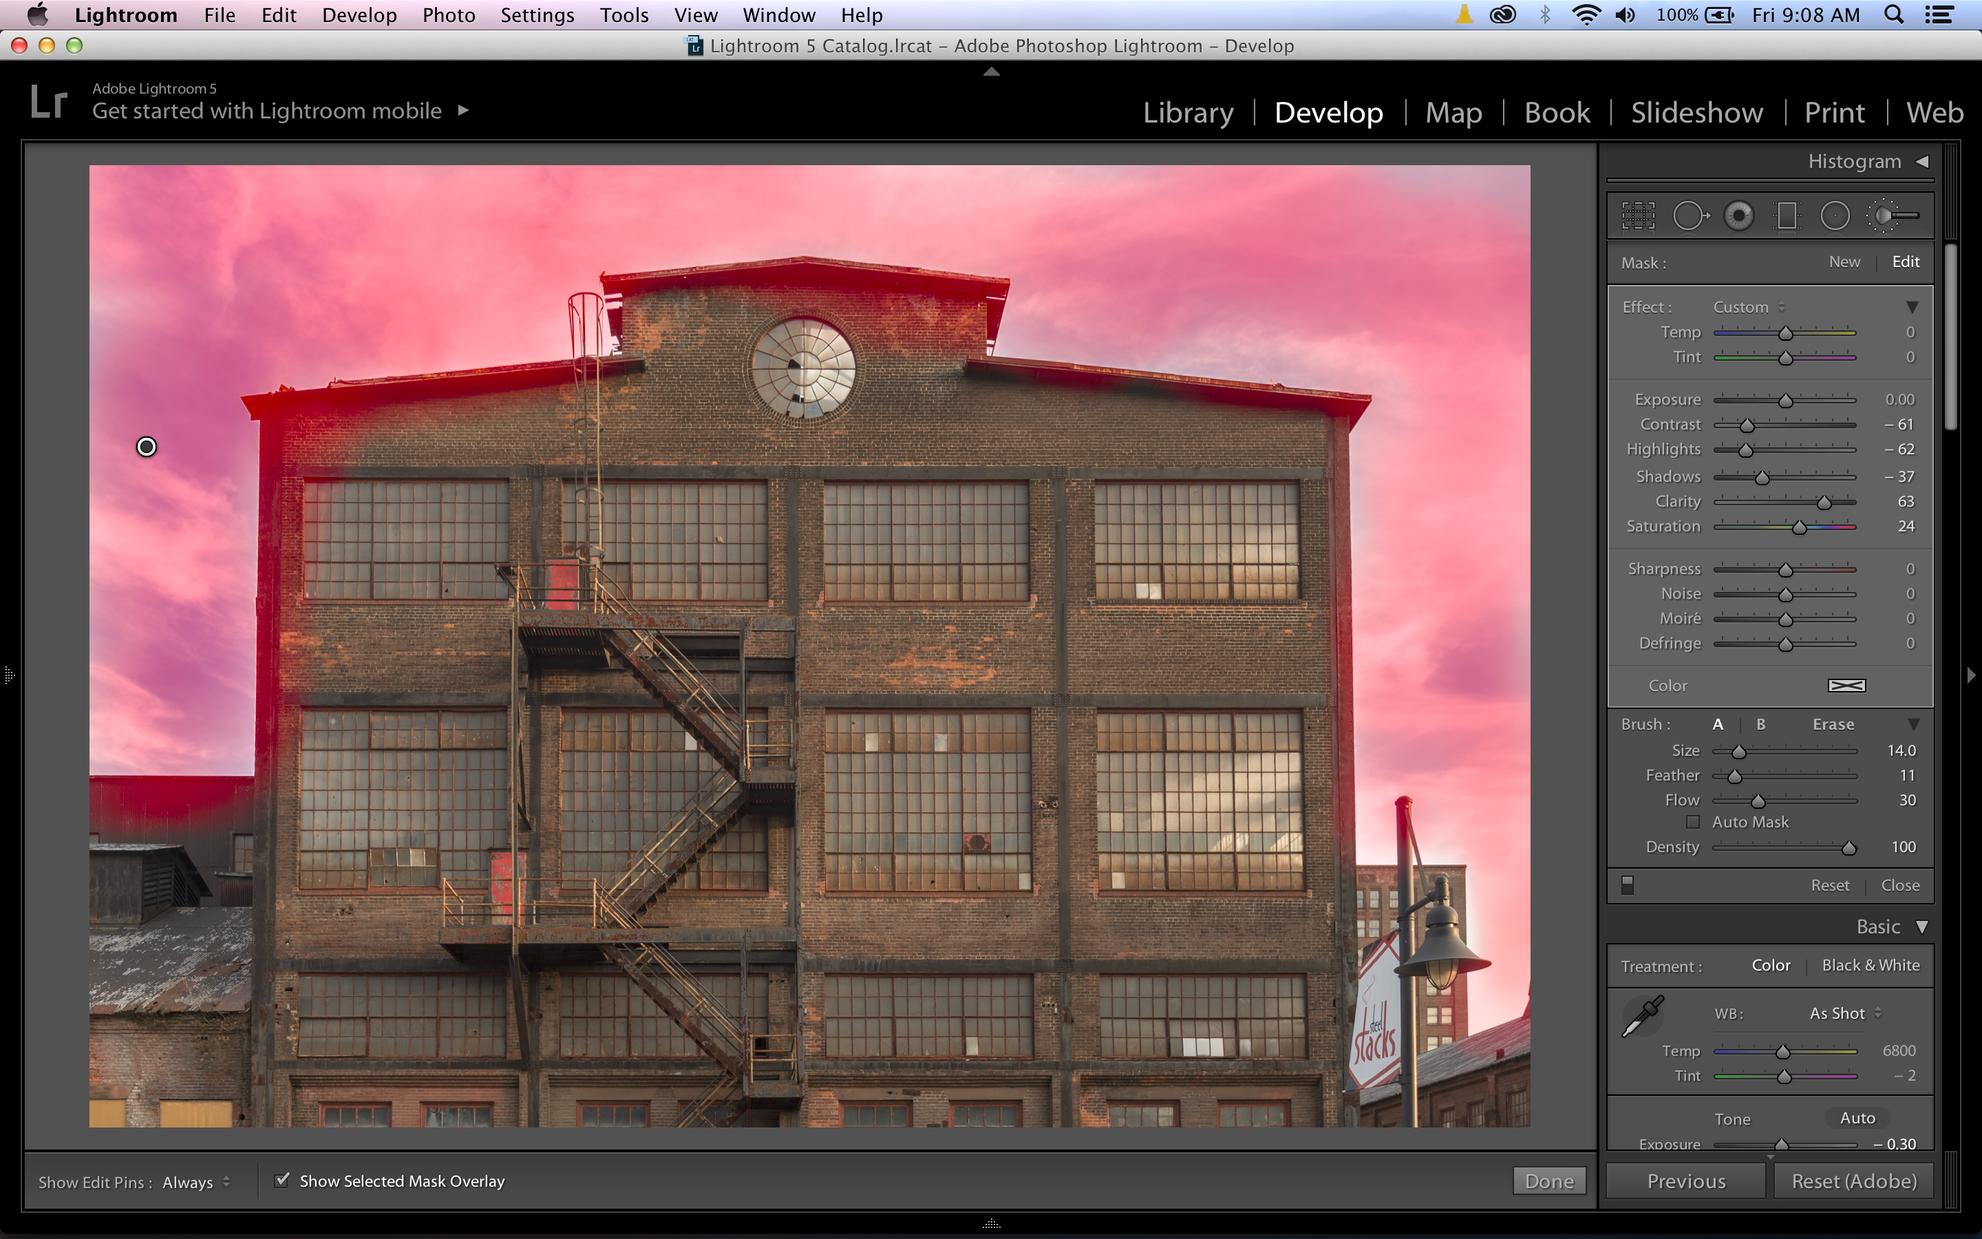
As in Photoshop, you're not going to be able to get all the way there in a single pass. The nice thing is that, like control points in Nik, you can replicate the Brush adjustment. Right-click on the Edit Pin in the image and choose Duplicate. This will put an identical second adjustment over top of the first. You can choose to tweak this one or simply leave it stand, and you can continue doing this as many times as you'd like until you achieve the desired effect.
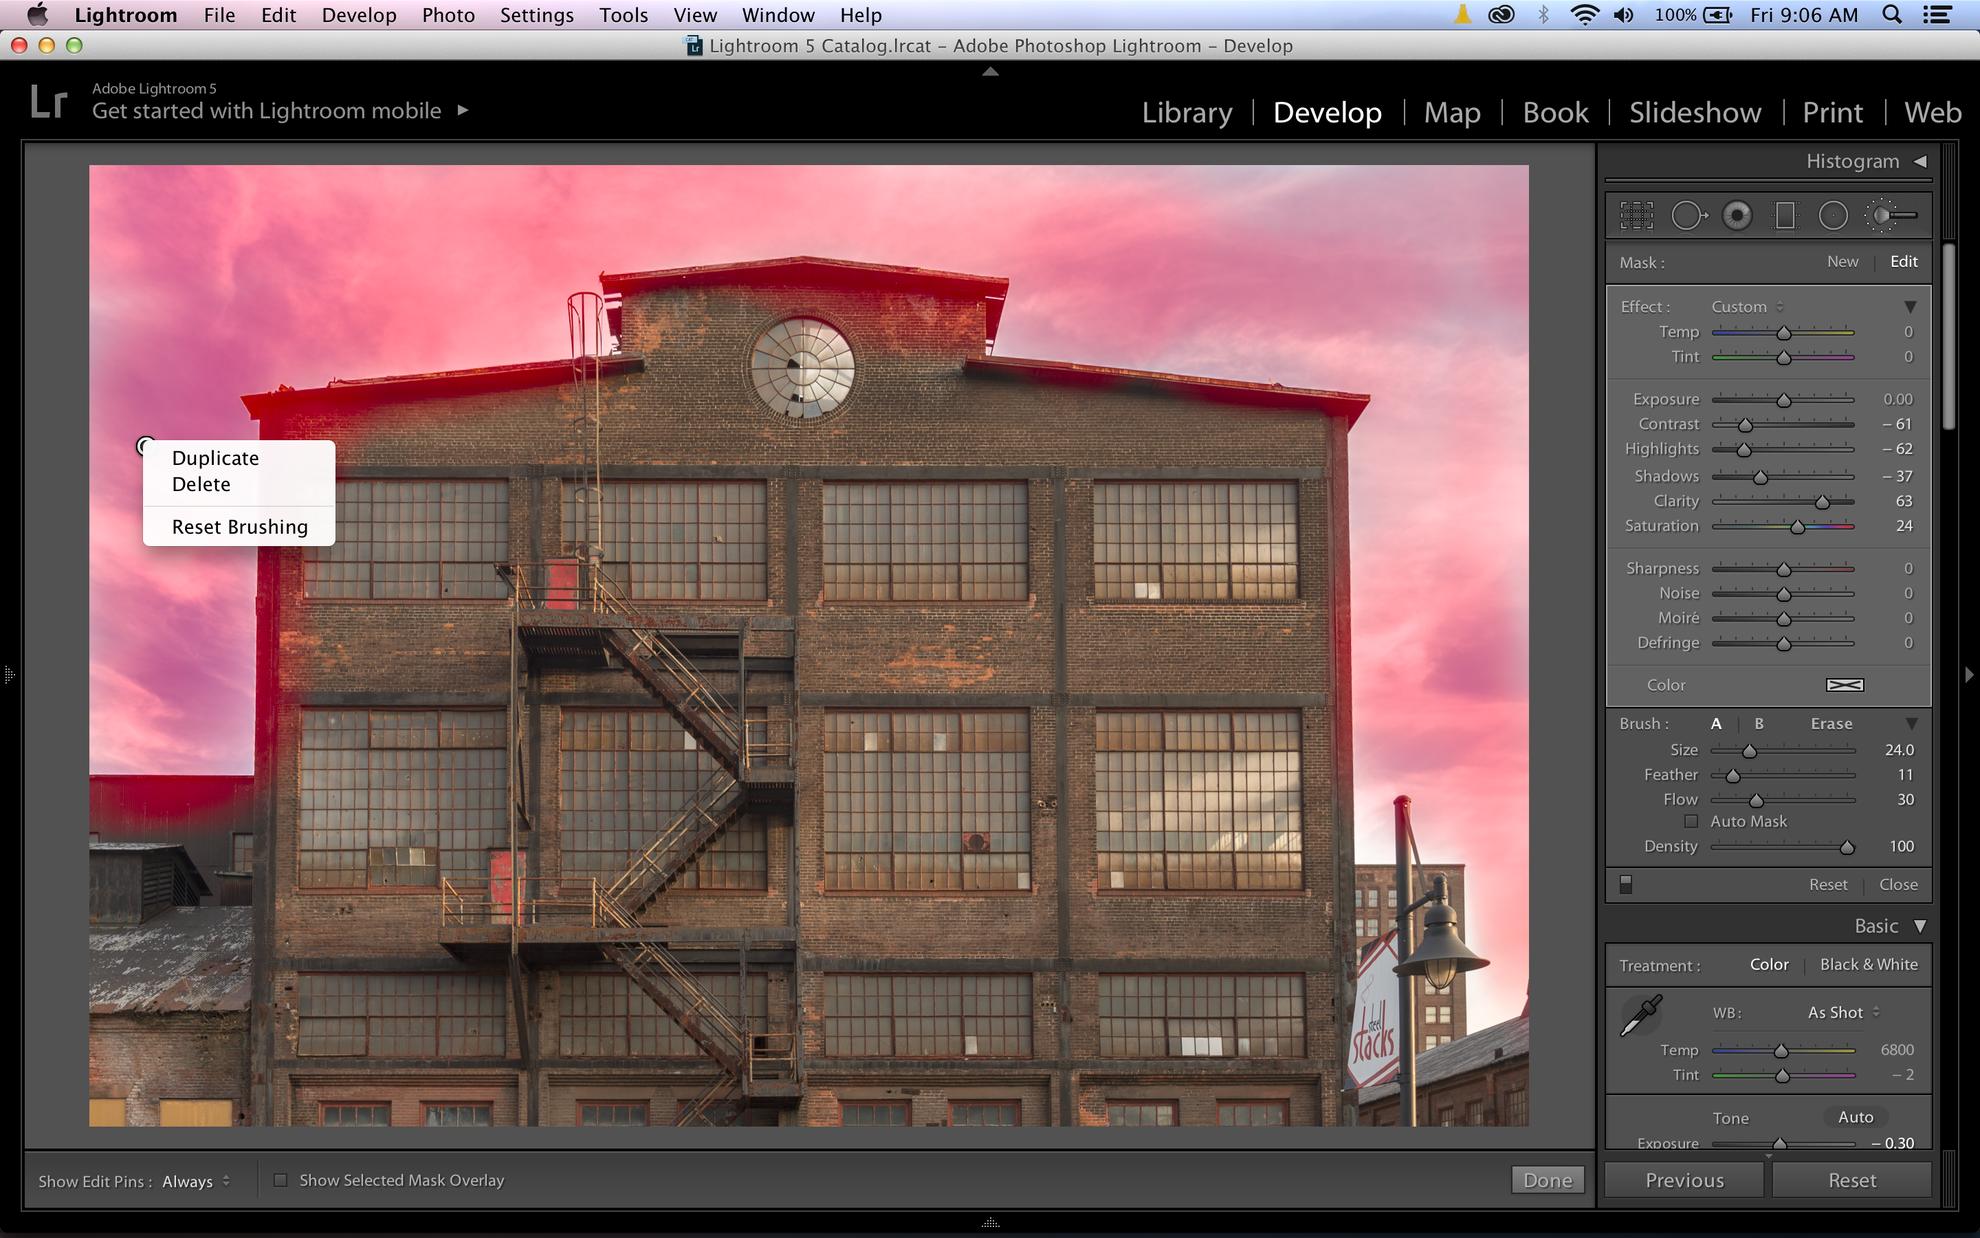
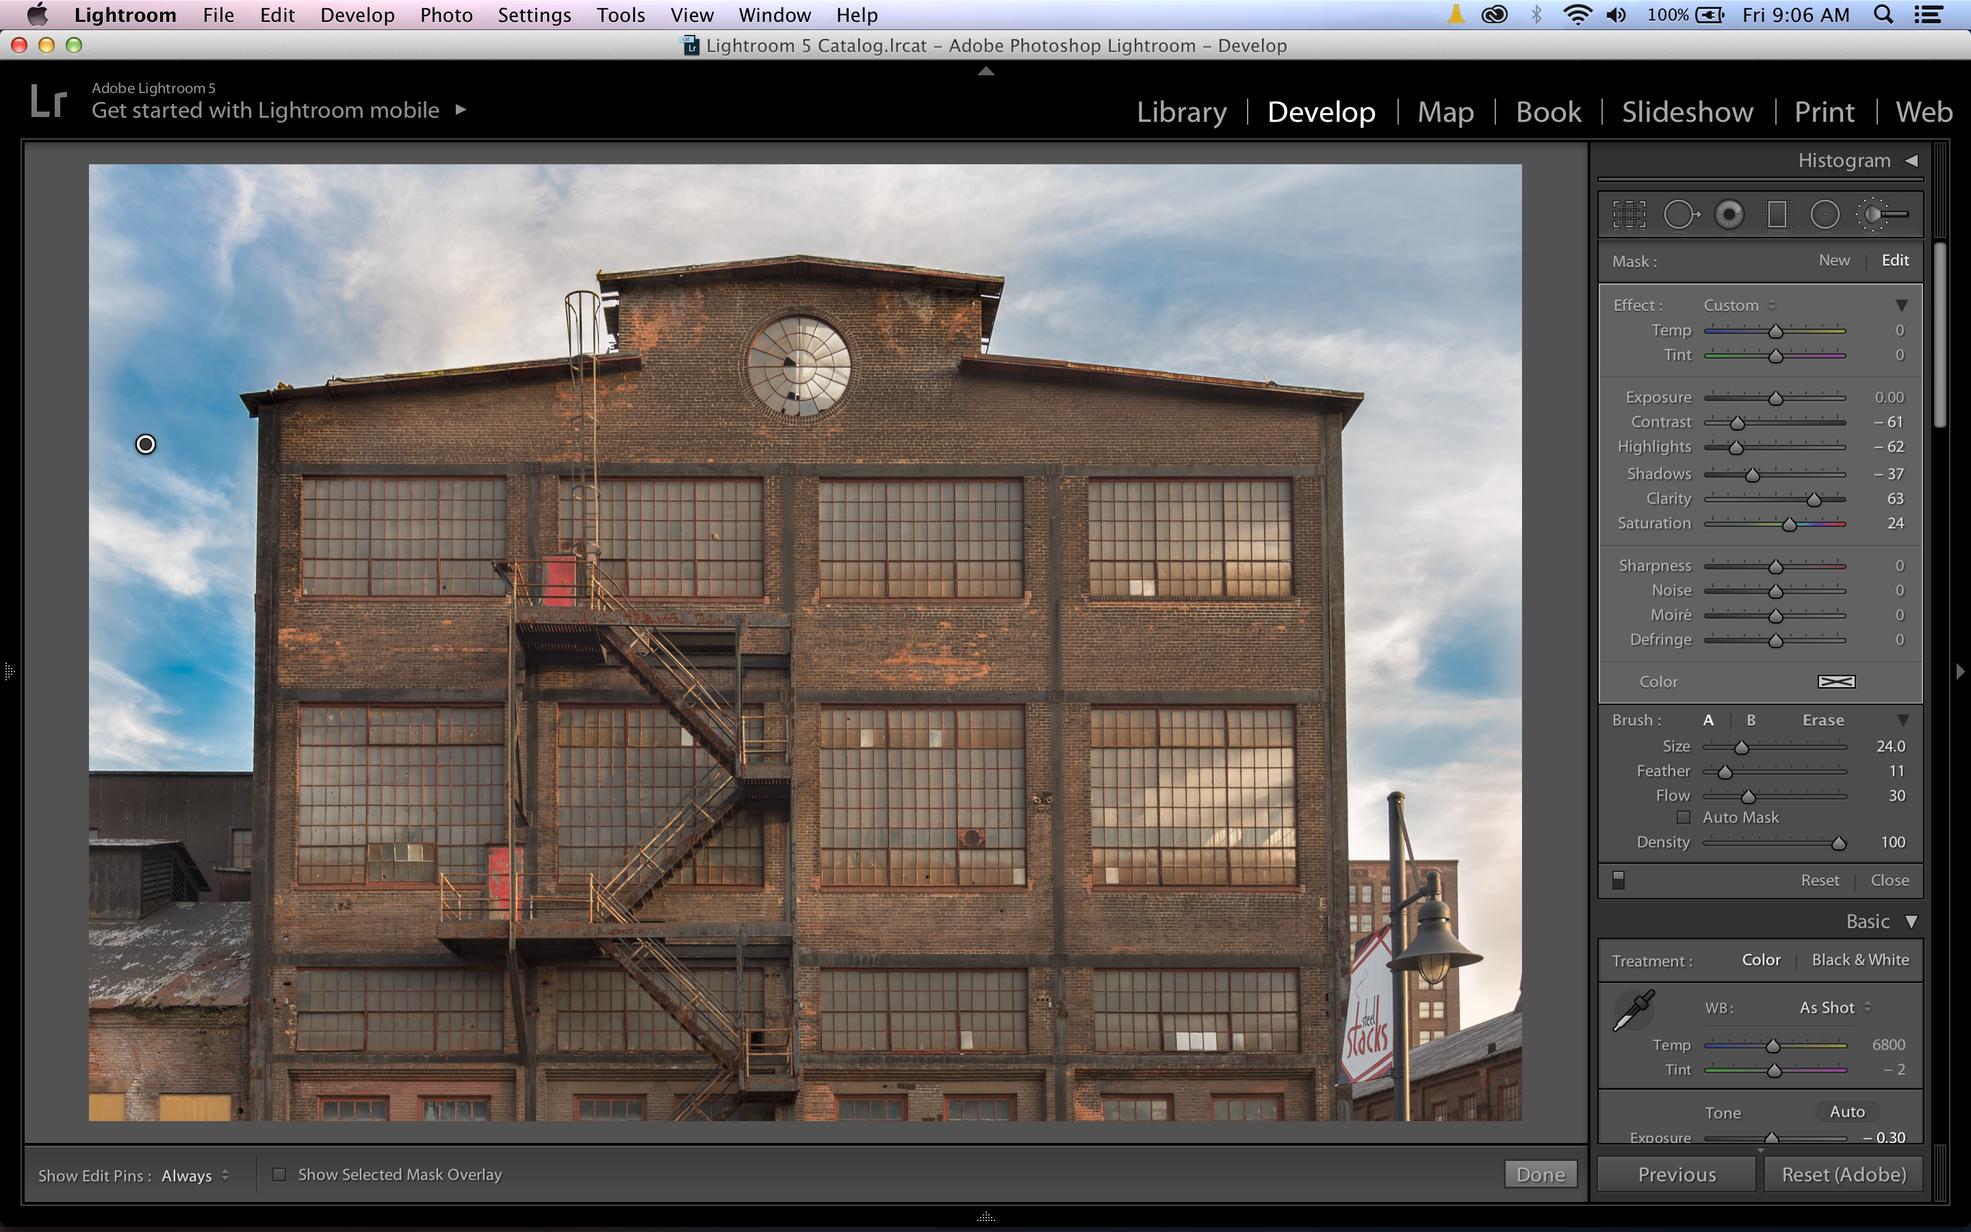
The only problem with this method is that I have found no way of selecting individual brushes once they are stacked, so you can only tweak the top brush (though that's usually enough).
In Conclusion
So while I'm by no means declaring the death of HDR, I do want to stress that it's not always necessary to stress over bracketed images when you're out shooting because what you're seeing in your camera doesn't capture what you're looking at with your eyes. When that happens (as always), make sure you have a properly exposed image by checking the histogram in-camera (as always) and you should be able to make a beautiful picture when you get home.
Scott had posted a thread called "Why HDR?!" earlier this week with a really fine example of how HDR photography can really change what you see in a photograph. I am by no means an anti-HDR person, in fact I used to shoot an awful lot of it. But since getting my D600 and D800, I've found it almost unnecessary. The sensors in this current generation of Nikons are so good in terms of their dynamic range that, provided you have not blown out either end of your histogram on the initial exposure, you can quickly recover those areas of a shot that you once thought lost forever.
I'm going to post a fairly benign example showing a blown out sky, but the techniques and the ideas here can be used to balance the light in an otherwise unbalanced shot. I'm working in Photoshop, but the PS techniques translate directly to every version of Elements I've ever used.
I'm using screen prints so you get a feel for what was done. Please note, in the PS screenshots, which layers are visible and which are not (look which layers have the EYE), since I did multiple adjustments in a single file before putting this together.
Original Photo
OK, so here's the original photo, straight out of the camera. If you look at the histogram you can see that while neither side is blown out, there's a huge gulf between the lights and the darks. What we want to do (and what HDR does) is balance that out.
Method 1 - Using Photoshop/Elements, Layer Blend Modes & Layer Masks
So, I'm OK with the exposure of the building, but the sky is blown out, and the reason I took it was because the sky was pretty nice as well. There are a set of layer blend modes that work to darken a photo based on the layer above it. While these are often used when applying textures, you can also use it to blend a photo with itself.
First, hit Control/Command-J to duplicate the Background layer. Now, I know I only want to darken the sky, so before anything else I want to create a layer mask to isolate only that part. Using the Quick Selection Tool, I painted around the sky (which is fairly easy in this photo) until the entire sky was selected. I then clicked on the Add Layer Mask button (the one that looks like the Japanese flag in the bottom right corner), which adds a mask based on the selection. Easy-peasy!!
Next, I change the Blend Mode in the Layer Palate from Normal to Multiply. This blend mode darkens the effected area by, literally, multiplying the light values together. As you can see, I now have more details in the sky.
Notice how the right side of the Histogram has opened up a bit and started moving to the left. That's what I want. But I'm not done since the sky is still not as dark as I'd like. This is where it gets easy. I already have a layer that does what I want - I just want more. All I have to do it hit Control/Command-J with the new layer highlighted and it will replicate the layer, complete with the mask and blend mode intact. And I can keep doing this, watching just the sky darken until I get the effect I want. As you can see, it took 5 copies until I got the sky to where I wanted it.
And looking at the Histogram, you can see that I've bridged the light gap - in fact, I've actually got room to the right now where I can brighten the overall image. This is by no means complete, but it's now a well exposed, balanced image from what used to be something I may have been disappointed in. From here, I would merge the visible images, either by flattening or creating a new layer from the visible layers, and then edit as normal.
Method 2 - Using HDR Software on a Single Image (i.e. Tone Mapping)
This one is sort of easy, but not always obvious. If you've got a single image, you can send that into your HDR Program of choice and use the tone mapping tools. These software packages dig into the light information contained in each pixel. When you use multiple images to create an HDR image what you're really doing is just giving the program more light information for each pixel by combining all the information across the images. But the truth is, with the dynamic range of these sensors there is a lot of information there that is probably going unused, or at least underused. So, when you ask the HDR program to reach in to the single image it's likely going to find what you're looking for without you every having to worry about making sure you have 3-9 images that must be ghost-reduced, etc.
This is a very quick and dirty trip of my original image into HDR Efex Pro 2 with only their "Deep 2" preset applied. Obviously I have much more to do with this, but again you can see that I now have a well balanced image to start my real work from.
Method 3 - Nik Viveza 2
If you've got it, the Nik Collection is a great set of tools, and Viveza 2 is a great first pass light adjustment for me. For an image like this, however, it's not as easy to use - but you can do it. What I did with the image below is to apply a single control point in the upper-right corner in the sky and use that to add structure and remove brightness from the sky, adjusting contrast and saturation as desired. Once I got it close, I replicated the control point across the sky in 4 additional places until I had the same effect everywhere. I then went back to the main adjustment panel and did some global tweaks to help get me where I wanted to go. Not the way I'd really want to handle this overall, but if I wound up with an image that was almost there, I wouldn't hesitate using Viveza 2 to fix the more problematic spots.
Method 4 - But What If I Only Have Lightroom?!
Because I know not everyone has Photoshop or Elements, let alone the Nik Collection (or anything else), it is possible for you to do this in Lightroom - but it's not nearly as easy. What you need to do is to use the Brush Tool to paint your adjustments in the sky. This isn't as easy since there are no edge protection tools in LR like there are in PS and PSE, but if you take your time you're golden.
Step 1 is to activate the Brush Tool and click on the Show Selected Mask Overlay button at the bottom. Then paint in the part of the image you want to manipulate before changing any of the parameters on the tool. This will require you adjusting the tool size several times. I like to use a slightly feathered edge of the tool and just go past the edges of what I want to change. Then uncheck the box, and begin to tweak the adjustment sliders to get what you want.
As in Photoshop, you're not going to be able to get all the way there in a single pass. The nice thing is that, like control points in Nik, you can replicate the Brush adjustment. Right-click on the Edit Pin in the image and choose Duplicate. This will put an identical second adjustment over top of the first. You can choose to tweak this one or simply leave it stand, and you can continue doing this as many times as you'd like until you achieve the desired effect.
The only problem with this method is that I have found no way of selecting individual brushes once they are stacked, so you can only tweak the top brush (though that's usually enough).
In Conclusion
So while I'm by no means declaring the death of HDR, I do want to stress that it's not always necessary to stress over bracketed images when you're out shooting because what you're seeing in your camera doesn't capture what you're looking at with your eyes. When that happens (as always), make sure you have a properly exposed image by checking the histogram in-camera (as always) and you should be able to make a beautiful picture when you get home.
Last edited:
