How Much is Too Much?

jp4294

Senior Member
Hi guys,
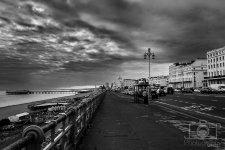
I have a shot that I took in Brighton, England and it was pretty bland so I tried to make it work in B&W but I'm not sure if I've over done it with the post processing. I personally think it looks alright but what do you guys think? Does it look a bit too surreal?
It was shot on a D3100 with the standard kit lens then edited in LR4 and Silver Efex.
Let me know what you think!

ISO 200
18mm
f/5.6
1/125 sec
BW-1.jpg
 

BackdoorArts

Senior Member
I like it. Might be a little over-structured, particularly in the bright section of the sky. Use the negative control points to back out sections that get too hot in Silver Efex. I burned in the sky a bit and then used Viveza to back out structure throughout and I find it a little less jarring. I like the contrast of the white buildings to everything. You might try and make the lamppost pop a bit if you can too.

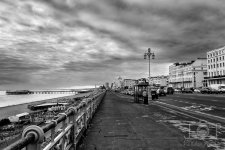
Here's a quick tweak, but I can't do a lot with the sky already cooked.

Did you use any of the colored filters? If not they might be able to get the scene to pop a bit more, but it's not too bad as is. I did what I could to pop the whites of the buildings. I also removed the tinting. The bluish hue didn't work for me.

Bristol.jpg

All that said, Don makes a point. I think there's not quite enough of the buildings to the right to say that it's about the contrast of the white to the sea and clouds, so it's just a nice scene with no real subject.
 

Flugelbinder

Senior Member
I know next to nothing about pp, but I know what I like and B&W is one of the things I just love. There's something about it that you can't feel in color... If you do know about pp, try to get the foreground a tad brighter. It's missing some detail. Other than that, great shot!
 

Pretzel

Senior Member
It's got a surreal feel to it, but there's nothing for the eye to "lock" on. The picture, and the PP are quite good though. Just a couple of small tweaks (like Backdoor Hippie discussed) would really push it into the WOW category, though.
 

fotojack

Senior Member
Yeah, exactly what Pretzel said. My initial reaction was Like....but then I started looking for something to focus on, a point of interest, as it were. The sky is nice and dramatic, but other than that.........
Overall, though, a nice shot.
 

jp4294

Senior Member
Thanks guys. I see what you mean that there isn't a proper subject. I love what you've done BackdoorHippie, I'll have to give that a go as well as lightening up the foreground. I'll post up my result in a bit!
 

jp4294

Senior Member
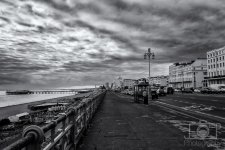
Ok I had another go at processing it and came up with this. I just lightened the foreground a bit and tried to make the sky a bit more blurred and less crazy. I still don't think it's 100% right though..?

Brighton Seafront-1.jpg
 

BackdoorArts

Senior Member
I like it a lot better.

Now if you can just Photoshop in an old couple walking hand in hand away from you, about 1/2 way between the front of the photo and the shelter, dressed on warm coats with her scarf flopping in the breeze...

:)

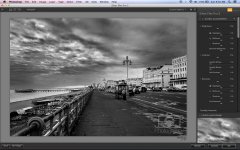
Are you using the fully detailed sliders in Silver Efex? I spent 3 months using it before I realized I could expand them...

Screen Shot 2014-01-05 at 9.30.50 AM.jpg

If not, hit those little arrow keys next to Brightness, Contrast and Structure. It allows you to play with the structure at each of the light levels, which will let you take some of the detail off the path while retaining the detail elsewhere. I also love how Dynamic Brightness and Fine Contrast adjustments play with the look of the images.

And if you did, congrats - you paid better attention during the tutorials. LOL
 
Last edited:

jp4294

Senior Member
Cheers Jake. I would kill to have an old couple holding hands in it and really I should've waited and a couple would've probably walked past but I was freezing as it was! I have tried using those little sliders but I normally only mess with the brightness and contrast dropdowns. I should have a fiddle with the structure ones to though. Do you find that converting it to B&W adds some noise? Then upping the structure makes it very noisy (compared to if I use the clarity slider in LR) or am I doing something wrong?
 

BackdoorArts

Senior Member
Cheers Jake. I would kill to have an old couple holding hands in it and really I should've waited and a couple would've probably walked past but I was freezing as it was! I have tried using those little sliders but I normally only mess with the brightness and contrast dropdowns. I should have a fiddle with the structure ones to though. Do you find that converting it to B&W adds some noise? Then upping the structure makes it very noisy (compared to if I use the clarity slider in LR) or am I doing something wrong?

I don't find the simple act of converting adds noise, no. But as you ratchet up contrast and structure the noise comes with it, and sometimes very quickly. I zoom in and will use negative control points a lot to soften the amount of global effect that goes into certain areas. And be very aware of how the preset you might start with sets the grain on the image as larger and harder grain settings will look a lot like noise. I also make sure I run images through Dfine 2.0 before putting them into any of the other tools to remove even the slightest noise that can get amplified - even shots taken at ISO 400 and below. Structure sliders will latch onto anything they can. That's why I love the individual structure sliders as I usually get noise in sections that I'm less concerned with structure and can fine tune it. Also, the Fine Structure slider alone can often give me the effect I'm looking for. In general, I'll bump the overall slider and then back down on the areas that went to far and push those that still need a little more. That holds true for Brightness and Contrast as well.
 

jp4294

Senior Member
That is a good idea to run it through Dfine. I always get so engrossed in one thing that I completely forget about all of the other programs in the collection. I'll definitely have to have more of a play around with it all! Thanks for that Jake.
 

BackdoorArts

Senior Member
That is a good idea to run it through Dfine. I always get so engrossed in one thing that I completely forget about all of the other programs in the collection. I'll definitely have to have more of a play around with it all! Thanks for that Jake.

It's good to have a designated workflow and then omit steps you don't want or need. For me it's...

1. Lightroom for basic adjustments - lens profile correction, cropping and straightening, basic light adjustment (tweak highlights, whites & blacks, apply gradient if needed, etc.)
2. Send to Photoshop, first step is to duplicate the background layer (ctrl-J) to preserve the original
3a. Fix any dust spots, remove "extras" like power lines, tree branches, etc.
3b. Hit ctrl-L and adjust light balance again (I usually hit Auto just to see what it does, hit ctrl-z to undo, and then go from there).
4. Call Dfine 2.0 for noise reduction
5. Do basic lighting tweaks in Viveza 2 (If lighting is a little "weird" I may now call HDR Efex Pro 2 and do some tone mapping.)
6. Apply and other filter programs: Color Efex Pro 4, Perfect Effects 8, Sliver Efex Pro 4, etc.
7. Take another look at noise and possibly call Dfine again. This time I may paint out background noise using a layer mask, varying opacity if applicable.
8. Do final color and light balancing using adjustment layers.
9. Save it back to Lightroom
10. Make color specific adjustments to Hue, Saturation and Luminance, tweak clarity and anything else tweak-worthy.

At this point I may go back to Photoshop and make additional adjustments if I'm not happy with something, otherwise I'll go back, flatten the image and resave (this changes nothing but file size).
 

Geoffc

Senior Member
It's good to have a designated workflow and then omit steps you don't want or need. For me it's...

1. Lightroom for basic adjustments - lens profile correction, cropping and straightening, basic light adjustment (tweak highlights, whites & blacks, apply gradient if needed, etc.)
2. Send to Photoshop, first step is to duplicate the background layer (ctrl-J) to preserve the original
3a. Fix any dust spots, remove "extras" like power lines, tree branches, etc.
3b. Hit ctrl-L and adjust light balance again (I usually hit Auto just to see what it does, hit ctrl-z to undo, and then go from there).
4. Call Dfine 2.0 for noise reduction
5. Do basic lighting tweaks in Viveza 2 (If lighting is a little "weird" I may now call HDR Efex Pro 2 and do some tone mapping.)
6. Apply and other filter programs: Color Efex Pro 4, Perfect Effects 8, Sliver Efex Pro 4, etc.
7. Take another look at noise and possibly call Dfine again. This time I may paint out background noise using a layer mask, varying opacity if applicable.
8. Do final color and light balancing using adjustment layers.
9. Save it back to Lightroom
10. Make color specific adjustments to Hue, Saturation and Luminance, tweak clarity and anything else tweak-worthy.

At this point I may go back to Photoshop and make additional adjustments if I'm not happy with something, otherwise I'll go back, flatten the image and resave (this changes nothing but file size).

Jake

I've recently adopted a similar workflow. I make sure LR is not doing sharpening or noise reduction first. The last thing which I think is missing is I have started resizing in photoshop for the output medium and the run the output sharpener. Do you sharpen differently?
 

BackdoorArts

Senior Member
Jake

I've recently adopted a similar workflow. I make sure LR is not doing sharpening or noise reduction first. The last thing which I think is missing is I have started resizing in photoshop for the output medium and the run the output sharpener. Do you sharpen differently?

I sharpen in Photoshop for print and export to Flickr and other online media, but not for here. This is a simple resizing from the Flickr version. Lazy, I know, but you guys just aren't that important. LOL

I do apply some sharpening as a matter of course in my post-processing if it's called for. For example, with the snowflake and bubble shots I applied sharpening in a couple different passes, a technique I learned in a snowflake tutorial.
 

jp4294

Senior Member
Cheers Jake, that shows how much I don't utilise when post processing! I'm going to have a go at using your workflow for a few photos and see how it goes and maybe adjust it a bit to suit me.
Is sharpening in PS significantly better than using the sharpness setting in LR? Of course, you get to control what gets sharpened how much but is the quality of the sharpening any better? Maybe less noise? I'm asking because I have no idea how to sharpen in PS but if it's worth it I'll definitely go and find some tutorials.
 
Top