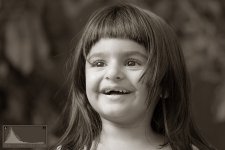
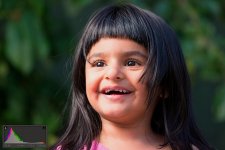
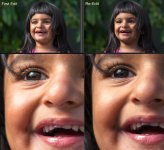
Help Me Understand - 2 Photos Of My Little Sister

gohan2091

Senior Member
Hello,

The following two photos are shot with a D7100 and a Sigma 105mm 2.8 Macro lens. I used a single SB-700 in an umbrella positioned at approx 45 degrees up and in front of my sister. A bit of post-processing has improved the photos but it's clear to me that my camera settings/exposure were not as they should be and some damage has been done. Here are the two photos unedited:
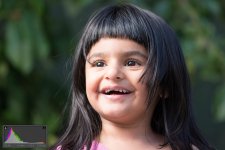
Sister 1 Original.jpg Sister 2 Original.jpg

and here they are after some Lightroom editing:
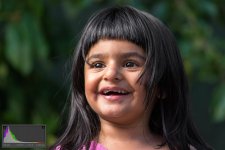
Sister 1 Edited.jpg Sister 2 Edited.jpg

My sisters face looks over-exposed yet the histogram shows the overall image to be towards underexposure. Why is this? Did I position the flashed umbrella too close to my sister/use too much flash power? I'm not sure what happened here and because I'm still learning, I'd like to hear from the experts :) I would be glad to send the DNG file if you'd like to have a play around with the image for the purpose of this thread.

Thanks
 

Marcel

Happily retired
Staff member
Super Mod
Maybe the umbrella was a little too close but it's still a great picture. Workable file even if you start with the jpeg that you uploaded.

Here's my take of one of them. Don't be afraid of B&W, it can make a picture better.

Sister 1 Original copy.jpg
 

gohan2091

Senior Member
Thanks Marcel. I am a fan of B&W but for this photo and for learning purposes, I wanted it in colour. I really want to know why this happened so I can avoid it in the future. I am new to off-camera flash and rarely use an umbrella but perhaps my first thought was right... the umbrella was too close. Your edit of my image is appreciated, however, I find it's a little flat.
 

WayneF

Senior Member
My sisters face looks over-exposed yet the histogram shows the overall image to be towards underexposure.

My notion is that it is too much exposure to be natural. There are dark tones in the histogram, but the brightest tones are on the face, which is too bright to be optimum.

And it seems like it has excessive contrast added too. The original seems like it must have seen substantial settings already.

If you are using Adobe something as an editor, on the original images, bring up Levels (CTRL L), which is your histogram. Now, while holding the ALT key down, grab the White Point at 255, and move it slightly lower, say to 240. Holding the ALT key changes the view, to then show you only the pixels which become clipped at 240. IOW, anything you can see now was brighter than 240.

This is NOT a suggested setting (it will make it worse instead). It is merely a suggested way to identify which tones are which pixels. Hit Cancel to end it.

If using Adobe Raw editor, then Exposure is the same as White Point, and hold Alt and increasing Exposure is the same as lowering White Point (both show clipping at the new setting).

Holding ALT and moving the Black Point works the same (in Raw, it is Blacks), to identify which tones are what. The large peak is the background, the face does not enter it until at least the midpoint.

My own notion is that the bright highlights on the human skin ought not be brighter than 240, if even quite that. But this is the entire face, all brighter than 240. And too much contrast from somewhere, IMO. My suspicion is that it was the contrast that affected it. Contrast reduces White Point and increases Black Point, and yours implies it has already been manipulated significantly. Contrast is usually helpful for B&W, but color does not tolerate so much.
 
Last edited:

BackdoorArts

Senior Member
Remember with histograms that they reflect the nature of the light in the photo, so while your histograms read on the dark side they are not necessarily underexposed since you don't have light that's getting cut off on the left side of the graph. As was said, there are a lot of darker colors in the photos, so the histogram is very much as I would expect it.

The rest of the critique regarding how to use the flash more effectively will add to aiding in future shots.
 

wud

Senior Member
I tried a quick edit - lowered the brightness, gave it a tiny bit of sharpen (not clarity, but sharpen) but not on her skin (you want kids skin to be soft), a tiiiiiny bit of contrast and then I moved the white balance a little up, so the image got a bit warmer:

Untitled-1.jpg
 

gohan2091

Senior Member
WayneF, The left side of her face is the only thing shown when lowering the white point to 240 but nothing is over 255, there is no clipping of the whites at all on the histogram. It may be true that I have gone overboard with the contrast on the edited image but what would cause the original to have too much contrast? Here is what I did when I took the photo. I exposed for the background, then underexposed by about a stop. I then used the umbrella flash as a fill. Did I use too much flash power? My hunch is I had the umbrella too close but I thought because I had not clipped the whites (no blinkers on DSLR review), everything would be fine.

From what I learnt in this thread, I have re-edited the photo and I believe I have improved the hightlights on the left side of the face while still keeping a good contrast (I like lots of contrast in my photos). I found the 'Lights' slider in the curves part of Adobe Lightroom to help most here. I lowered this by 75 and the harsh white on her face has been reduced greatly.

EDIT: Thanks wud for your reply. Your edit is interesting. I do agree with you that a kids skin should remain soft, although I do feel her skin in your edit is overly soft on her left side and the hightlights there don't contain much detail.
 

Attachments

  • Sister 3.jpg
    Sister 3.jpg
    133.8 KB · Views: 305
Last edited:

wud

Senior Member
I see you got the point, good :)

About metering, Im not sure I do stuff the right way, but I meter at the face as its more important for me to keep this right balanced, than the background.
 

crycocyon

Senior Member
What's your camera setting as far as picture control? Common options are "Standard", "Neutral", and "Vivid". It almost seems like your camera is set to "Vivid". You want to shoot in "Neutral" mode so there's no adjustment.
 

gohan2091

Senior Member
I use matrix metering and when I exposed for the background, there was no subject there, I did the background alone. crycocyon, my picture control is set to standard. I don't know if I can produce the edited result straight from the camera, I find it difficult to nail the exposures correctly. The histogram doesn't show clipping but when viewing on the PC, details are lost because of strong highlights.
 

WayneF

Senior Member
WayneF, The left side of her face is the only thing shown when lowering the white point to 240 but nothing is over 255, there is no clipping of the whites at all on the histogram.

That may be true of the Blue channel, but I see it rather different for red and green. Speaking of your first original picture. Red starts clipping face at about 253, and by 250 is her whole right side (camera left), and 240 picks up much of the rest. It is simply too much exposure. You can do this ALT business on the individual channels too. Your red channel is quite HOT.

It may be true that I have gone overboard with the contrast on the edited image but what would cause the original to have too much contrast?

Is it RAW or JPG? JPG can add a lot of camera settings. Contrast can be good for some inanimate objects, but human skin is not gaudy, and it looks better smooth. We cannot treat all pictures the same.

Here is what I did when I took the photo. I exposed for the background, then underexposed by about a stop. I then used the umbrella flash as a fill. Did I use too much flash power? My hunch is I had the umbrella too close but I thought because I had not clipped the whites (no blinkers on DSLR review), everything would be fine.

There are so many ifs and buts possible. :)

Blinkers.... are you looking at the individual RGB channels in camera, or only at the luminosity composite single histogram? You always need to look at the three RGB individual channel histograms. Regarding clipping, the single composite histogram is totally meaningless, see http://www.scantips.com/lights/lights/histograms.html

Was it Manual flash mode or commander TTL?

Underexposing ambient 1 stop can be good, but then if adding a full TTL "proper" exposure, these two exposures add (ambient and flash), to still be about 2/3 stop overexposed. TTL BL tries to "balance fill" by reducing the flash exposure to make this less significant (but it is never zero). We still have to watch it (including the three individual RGB histograms) and make sure it is not too much. You can always add -EV flash compensation if too much.

Umbrellas can't get too close, but they can be too much light from the flash. And shoot-through umbrellas typically have a center bright spot, they should be feathered (to aim maybe a foot in front of nose, instead of at the nose). Portraits, esp of pretty girls, like smooth lighting, moderation, not contrast and extremes.

If too much flash, then back off on the flash power or compensation.

We know that human faces are NOT bright white (not like a sheet of printer paper in scene is white), and so faces should NOT be very close to 255 (like maybe the printer paper should).
 

gohan2091

Senior Member
WayneF, I hadn't thought about separating the histogram into Red, Green and Blue channels. I use Lightroom to edit my photos so how do I split the histogram into the 3 channels of colour? Do you know? What can I do if my red channel is too hot? (Both when I am shooting and in post-production) Just lower the exposure? By the way, the link you posted appears to be broken.

I shoot in RAW, I don't ever shoot in JPEG. I think I was looking at the complete histogram on the back of the camera. I am starting to see that perhaps I should inspect each channel's histogram. I shall keep this in mind! I was using both the camera and flash in manual mode. At the time, I was unaware my D7100 could act as a commander TTL. I used the flash on my D7100 to trigger the SB-700 off camera and used a Aokatec A-N1 IR Panel so the pop-up flash didn't add to the exposure. The umbrella was configured as a shoot-through and I didn't know there was a hotspot at the centre, perhaps this would explain it.

I do appreciate your replies Wayne, you seem to be really knowledgeable!
 
Last edited:

WayneF

Senior Member
WayneF, I hadn't thought about separating the histogram into Red, Green and Blue channels. I use Lightroom to edit my photos so how do I split the histogram into the 3 channels of colour? Do you know? What can I do if my red channel is too hot? Just lower the exposure?

Sorry, I dont know about Lightroom, I use Photoshop instead. Photoshop Levels (and curve too) have a menu for RGB, or individual R or G or B channels. But the camera can show individual channels, and individual is the only choice that has any meaning in a camera.

The composite luminosity histogram is about gray scale levels, and would have meaning for a gray scale image. But for a color image, it is just a hypothetical numerical manipulation, and does NOT show real data.


I shoot in RAW, I don't ever shoot in JPEG. I think I was looking at the complete histogram on the back of the camera. I am starting to see that perhaps I should inspect each channel's histogram. I shall keep this in mind! I was using both the camera and flash in manual mode. At the time, I was unaware my D7100 could act as a commander TTL. I used the flash on my D7100 to trigger the SB-700 off camera and used a Aokatec A-N1 IR Panel so the pop-up flash didn't add to the exposure. The umbrella was configured as a shoot-through and I didn't know there was a hotspot at the centre, perhaps this would explain it.

Set up your umbrella in same way at same distance from a mostly white plain wall, and take a picture. Blank so you can see variations. Not too bright, though, don't burn it all out at 255, to be indistinguishable, but leave some meaningful data you can inspect for differences. TTL metering a white wall ought to come out about one stop down, which is good for this.

And try another similar picture with sister, but back off on the exposure some - try it once. Even the individual three channels should NOT be pegged at 255... Faces are not 255 white. Include a white shirt or white paper in the test scene (at same subject distance) to see the difference. :)
 
Last edited:

PapaST

Senior Member
To build off of what BackDoorHippie said... in LR you can use the crop tool to select JUST the person's face to see how the histogram looks on just the subjects face and exclude the rest of the photo.
 

gohan2091

Senior Member
So if a photo is hot in the red channel, when i alter the red channel with levels or curves, the exposure doesn't appear to change, it only alters the colour. Am I missing something? I believe my D7100 can show R,G and B histograms, although I think my D5100 cannot (I have to check)

Thanks for your experiment idea, I shall try it when I have time!

Thanks PapaST for the tip!
 

WayneF

Senior Member
So if a photo is hot in the red channel, when i alter the red channel with levels or curves, the exposure doesn't appear to change, it only alters the colour. Am I missing something? I believe my D7100 can show R,G and B histograms, although I think my D5100 cannot (I have to check)


Even if the red channel is overexposed, afterwards the only choice is to reduce all three equally, or else as you said, you change the color if you change them individually But if the red channel is clipped, it has already done that individually, and has already changed the color. Best is to avoid clipping in the camera, in any channel.

D5100 manual page 125 shows it also shows the three individual channels.
 
Top