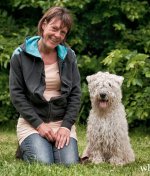
Critique/help needed (people portraits)

wud

Senior Member
Every once in a while, Im asked to do a picture with dog and owner together. This makes me panic a little bit, lol.

Do you have any idea how I could have made these pictures better? My own thought is, I need to ease up (down actually) with the aperture. But will I get it all sharp then?

And that maybe I should move further away, to separate them more from the background? Didn't have too much space to move around on, though.

Last idea, another lens. Maybe my 50mm.


All pictures done with 70-200mm f/2.8


f/4
1/1250
iso 400
focal length: 110mm
subject distance: 6 meters

nd3_4893_web.jpg


f/4
1/1600
iso 400
focal length: 98 mm
subject distance: 5 meters

(too much red, too dark, I know. I am posting this, to show that I tried to move them further away from the background than those on the first picture)

daf_dag_1_3895_web.jpg


f/4
1/250 (we were in the shade)
iso 200
focal length: 105mm
subject distance: 5 meters


daf_dag_1_3482_web.jpg
 
Last edited:

Rick M

Senior Member
In my opinion, more distance from the background is always a good thing. You could also shoot brackets next time 2.8, 3.5 and f4 to give you a better idea of what works best in this situation. I wouldn't use the 50mm unless you have a larger group to fit in.
 

Dave_W

The Dude
Image #1 - "Fill the Frame". Nice shot of a woman and a dog but it illustrates a common problem in portrait photography - the subject needs to fill the frame. Only ~20% of portrait photography involves the entire body, typically a portrait will be head, or head/shoulders, or waist up to head, etc. Often, the only time you get full body shots is when you're shooting to capture the wedding dress and when they do, they fill the frame with the subject. So unless the background is part of the overall story of your shot, filling the frame up with your subject should be the first thing that enters your mind when you go to compose a portrait. And unless a whole body shot is important, consider recomposing to a obtain a tighter shot.

nd3_4893_web-1.jpg

Image #2 - "Fill flash and or reflectors" - The high nature of the sun and the placement of your subject relative to this light results in a dark shadow across your subject and causing your image to be underexposed. Part of the problem is the matrix metering, it will try to average out the amount of light in any shot, which is great most of the time but in cases like this it fails. When you find your subject is in the shadows relative to the background you need to use a fill-flash or a reflector to bring light back in on your subject. The other alternative to fill-flash and reflectors is to recompose. Put the subject somewhere with more even light with less of a contrast and also remember to "Fill the Frame"

btw - if you find yourself in this predicament and you don't have a flash or reflector and you can't move and recompose, use HDR. HDR would not be my first choice but it works great in a pinch.

Image #3 - "Avoid Back-lit subjects" - Similar to Image #2, your subject is in the shadows while your background is bright and sunny. Because your subject is not partially in the sun and shadow, she shows up better than in Image #2 but she is still underexposed. A fill-flash or reflector would have done wonders for this shot. Also, don't forget to "Fill the Frame"

Image #2 and #3 both could have been avoided had you moved your subjects slightly one way or the other. The key is to identify these issues before you get to the computer stage. Here's a little list I have in my head when I'm doing portraits.

1- Fill the frame with the subject unless the background is part of the story
2- Avoid backlit compositions and when confronted with them, use fill-light or reflectors
3- Eyes are 70% of a good portrait. People often use fill-flash regardless of where they're shooting just to bring out the catch-lights in the eyes. If you can't see your subject's eyes, be sure there's a good reason for it. If there isn't, recompose the scene.
4- Never place the subject higher than the camera and have them to look down at you. This causes necks to look twice their normal size as well as making their face look fatter.
5- Try to position your subject so that the head is slightly turned relative to the body, this elongates the neck and removes wrinkles as well as lowers the shoulders. Lower shoulders give the appearance of a relaxed subject and the last thing you want is your subject to look tense and unnatural.
6- Always check their hands/fingers before taking the shot. Hands and fingers are so easy to overlook during the shoot but once you get to the computer they jump out screaming at you. Always, always always check the hands and fingers to make sure they look natural and relaxed, otherwise you'll end up with an almost great photo instead of a great photo.

There are a few more things to check for when doing portraits but these are perhaps my top 6. Hopefully this helps. ;)
 
Last edited:

Krs_2007

Senior Member
Image #1 - "Fill the Frame". Nice shot of a woman and a dog but it illustrates a common problem in portrait photography - the subject needs to fill the frame. Only ~20% of portrait photography involves the entire body, typically a portrait will be head, or head/shoulders, or waist up to head, etc. Often, the only time you get full body shots is when you're shooting to capture the wedding dress and when they do, they fill the frame with the subject. So unless the background is part of the overall story of your shot, filling the frame up with your subject should be the first thing that enters your mind when you go to compose a portrait. And unless a whole body shot is important, consider recomposing to a obtain a tighter shot.

View attachment 39442

Image #2 - "Fill flash and or reflectors" - The high nature of the sun and the placement of your subject relative to this light has cast a dark shadow on your subject and causing your to underexpose your image. Part of the problem is matrix metering, it will try to average out the amount of light in any shot, which is great most of the time but in cases like this it fails. When you find your subject is in the shadows relative to the background you need to use a fill-flash or a reflector to bring light back in on your subject. The other alternative to fill-flash and reflectors is to recompose. Put the subject somewhere with more even light with less of a contrast and also remember to "Fill the Frame"

btw - if you find yourself in this predicament and you don't have a flash or reflector and you can't move and recompose, use HDR. HDR would not be my first choice but it works great in a pinch.

Image #3 - "Avoid Back-lit subjects" - Similar to Image #2, your subject is in the shadows while your background is bright and sunny. Because your subject is not partially in the sun and shadow, she shows up better than in Image #2 but she is still underexposed. A fill-flash or reflector would have done wonders for this shot. Also, don't forget to "Fill the Frame"

Image #2 and #3 both could have been avoided had you moved your subjects slightly one way or the other. The key is to identify these issues before you get to the computer stage. Here's a little list I have in my head when I'm doing portraits.

1- Fill the frame with the subject unless the background is part of the story
2- Avoid backlit compositions and when confronted with them, use fill-light or reflectors
3- Eyes are 70% of a good portrait. People often use fill-flash regardless of where they're shooting just to bring out the catch-lights in the eyes. If you can't see your subject's eyes, be sure there's a good reason for it. If there isn't, recompose the scene.
4- Never place the subject higher than the camera and have them to look down at you. This causes necks to look twice their normal size as well as causes the subjects face to look much fatter.
5- Try to position your subject so that the head is slightly turned relative to the body, this elongates the neck and removes wrinkles as well as lowers the shoulders. Lower shoulders give the appearance of a relaxed subject and the last thing you want is your subject to look tense and unnatural.
6- Always check their hands/fingers before taking the shot. Hands and fingers are so easy to overlook during the shoot but once you get to the computer they jump out screaming at you. Always, always always check the hands and fingers to make sure they look natural and relaxed, otherwise you'll end up with an almost great photo instead of a great photo.

There are a few more things to check for when doing portraits but these are perhaps my top 6. Hopefully this helps. ;)

This should be a sticky, great advice. Subscribing so I don't loose track of it.


Kevin,

Sent from my iPad using Tapatalk HD
 

wud

Senior Member
There are a few more things to check for when doing portraits but these are perhaps my top 6. Hopefully this helps. ;)


Thanks a million! It helped very, very much. One picture I tried to place the person with the shaded background but even though I got the suncap on, picture got over-saturated due to the hard sun - but I should of course have tried several angles.

Super glad for your 6 points!

I think Ill make a "get a portrait for free" day, to practice this. I got a family of 4 who wants me to do a picture, but they got 2 small kids so I would like to be a little more prepared when doing it.


Have a look at this calculator, very handy since we don't have a depth of field preview or markings on most lenses.

I have looked at it several times, but its just not sticking in my head! So when Im out there, I dont remember the numbers and maybe Im not the best at measuring distances. Looking now, with my data from the pictures, I see my errors. Maybe it will stick someday.
 

MrF

Senior Member
I have looked at it several times, but its just not sticking in my head! So when Im out there, I dont remember the numbers and maybe Im not the best at measuring distances. Looking now, with my data from the pictures, I see my errors. Maybe it will stick someday.

If you have a smartphone, there are multiple DOF calculator apps that you can download. The one I have for my Android phone is just called "DOF Calculator" and I'm sure some iPhone users could chime in with what's available in the app store. I don't always use it, but if I'm looking to have no more DOF than I absolutely need for a shot, or trying to find the hyperfocal distance it's really handy.
 

wud

Senior Member
If you have a smartphone, there are multiple DOF calculator apps that you can download. The one I have for my Android phone is just called "DOF Calculator" and I'm sure some iPhone users could chime in with what's available in the app store. I don't always use it, but if I'm looking to have no more DOF than I absolutely need for a shot, or trying to find the hyperfocal distance it's really handy.

Ahh, nice. I got Nokia and dont have a lot of choices in apps, but I'll remember this, think I'll go for an Iphone at some point.


Still a pic from the weekend, so done wrong, but I tried to edit my way out of some of the errors (lighting in particular). Far from perfect, but better, I think?

ND3_5020 web.JPG
 

FastGlass

Senior Member
In all of these I think seeing the people and their pets embrace each other a little more wouldn't hurt. Show the love that exists. Just my .02
 

STM

Senior Member
Lighting is problematic for me in several of these, the second one especially. Fill flash is definitely needed. When I do fill flash outdoors, I shoot for a 20-25% contribution by the flash and no more. In my experience, this provides the best fill without looking like fill flash was used. That should always be your goal. I use a Sekonic L-358 flash meter to determine the ratios. As already mentioned, I suggest you use a greater distance between subject and background, so depth of field provides more separation between subject and surroundings.
 

ohkphoto

Snow White
The other thing you need to consider when including people in your portraits, is how you pose them. You will have to position them in a way that is flattering . . . for the larger subjects, you definitely don't want a straight-on shot like the last one . . . kind of dwarfs the dog.

​And I agree with fast glass . . . having some interaction between dog and owner would be much more appealing.
 

wud

Senior Member
In all of these I think seeing the people and their pets embrace each other a little more wouldn't hurt. Show the love that exists. Just my .02

You are very right, I panicked and did not think :eek:

This one wasn't planned, just happened and that is so much more the direction I wanna go towards:

anton-3170_copyfb.jpg


Lighting is problematic for me in several of these, the second one especially. Fill flash is definitely needed. When I do fill flash outdoors, I shoot for a 20-25% contribution by the flash and no more. In my experience, this provides the best fill without looking like fill flash was used. That should always be your goal. I use a Sekonic L-358 flash meter to determine the ratios. As already mentioned, I suggest you use a greater distance between subject and background, so depth of field provides more separation between subject and surroundings.

Ugh, yeah I read a lot about how well flash works with portraits outside, but I dont have one and right now I dont really have the money for buying. But I think the advice about placing the people against shady background could help some.

Greater distance is noted. Thanks :)

The other thing you need to consider when including people in your portraits, is how you pose them. You will have to position them in a way that is flattering . . . for the larger subjects, you definitely don't want a straight-on shot like the last one . . . kind of dwarfs the dog.

​And I agree with fast glass . . . having some interaction between dog and owner would be much more appealing.

You are all so right. Do you have a suggestion for a girl like the last one?? Would it be better if a large girl was photographed looking up? I think for this, I should have gotten her to pick up the dog and then done a head and shoulder portrait.
 

ohkphoto

Snow White
You are all so right. Do you have a suggestion for a girl like the last one?? Would it be better if a large girl was photographed looking up? I think for this, I should have gotten her to pick up the dog and then done a head and shoulder portrait.

Definitely closer in . . . if she's flexible enough have her "twist" from profile starting at the waist and ending up 3/4 view at the shoulders . . . think "S" curve, and holding the dog closer, maybe by her face.
 
Top