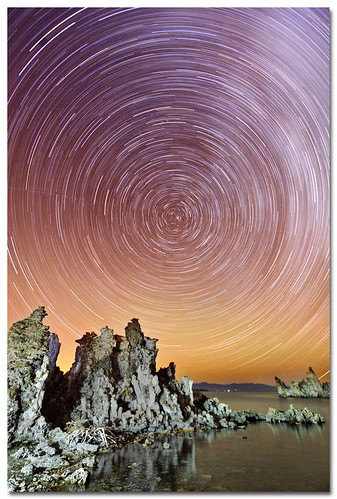
Star trails!!

thegaffney

Senior Member
Very excited I finally tried to get some star trails.

This was 32min at ISO 100 F/11 and 18mm on 18-200mm

The long exposure noise removal feature was off, and no noise removal was done on the computer

If you view the full size picture you can even make out the logos on the food exit sign in the bottom right, glad I did it at ISO 100

This was the longest 30 minutes of my life!

Now all I have to do is find a new scene

_DSC0132_testsm.jpg
 
Last edited:

thegaffney

Senior Member
Also regarding you post on my other night shot thread, for this one since I didn't need to have the shortest exposure, and I was purposely trying to see the stars moving, F/11 is good right? My thinking was that the lens is at it sharpest around f/11 than it would be at its largest f/3.5, and more of the closer objects would be in focus at the smaller aperture if I mis-focused slightly. Am I thinking correct?

Thanks for your input
 

Wahugg

Senior Member
For star trails, a smaller aperture of f/11 - f/5.8 works great. Why? For star trails, the exposure is anywhere from 20 minutes to over an hour. This allows the camera to absorb the light for a long time which allows the picture to look nice and bright for a night time photo. But this won't work for other pictures that are only 30 seconds or so. You can't cram 20 minutes worth of light into 30 seconds without changing ether your ISO or aperture. Increasing your ISO introduces more noise which is not desirable at all. Therefor we make the aperture as wide open as possible; f/1.4-f/2.8. Even f/3.5 is acceptable but is pushing the limit as to what is acceptable.

Yes, technically an aperture of f/11 will be sharper, but the sharpness is not noticeable in night shots. If someone tells you they can notice it, they are lying. The only three things that can affect night time sharpness are bad focusing, vibrations, or hazy/foggy/cloudy skies. Having an aperture open up to f/1.4 only helps you. It allows you to have a lower ISO (less noise) and a lower exposure time (allows you to take more shots for the same amount of time you would have been out there).

Hopefully this clears some things up!

-Wahugg

Edit: Here is an example that might help you understand the correlation of Aperture, ISO, and Time exposure.

Let’s say we have an 11 inch water pipe(aperture). It can move 30,000 gallons of water over 1 hour(exposure time)at 50PSI(ISO). All of a sudden the demand for water raised and now you have to move 30,000 gallons of water within 30 minutes. To do this you increased the PSI to 100. Well the pipe couldn’t handle that pressure so it blew up.

That scenario relates to trying to take a 30 second exposure with the same f/11 aperture. In order to get a picture at all, you would have to raise the ISO (PSI) to a level that would give too much noise (the blown pipe). If the pipe had been bigger, such as 22in, it might have been able to handle the extra pressure. Same thing with our apertures. If we make the aperture bigger, the picture will look better and have less noise.
 
Very excited I finally tried to get some star trails.

This was 32min at ISO 100 F/11 and 18mm on 18-200mm

The long exposure noise removal feature was off, and no noise removal was done on the computer

If you view the full size picture you can even make out the logos on the food exit sign in the bottom right, glad I did it at ISO 100

This was the longest 30 minutes of my life!

Now all I have to do is find a new scene

View attachment 24797

How did you arrive at 32 minutes for he shot? A guess?
 

Scott Murray

Senior Member
An interesting read for you. From here - How to Photograph Star Trails: The Ultimate Guide

[h=2]One Long Exposure[/h]To capture star trails using one long exposure, there are a couple important things to consider. You need to let as much light into your lens as possible for those stars to register (the why’s of this are explained below) – this means using a fast lens, preferably in the f/2.8 range.
When photographing stars under one exposure, you need to do it during a new moon night – meaning that the moon is nowhere to be seen. If you have anything more than a crescent, your exposure will be limited to the 10-minute range because of the ambient light, which won’t do much for star trails. For this kind of photography, darkness is your best friend.
Ultimately, you’re aiming for your environment to be illuminated by the stars themselves – yes it’s possible! However, this entirely depends on the length of your exposure. The image below is the result of an 80 minute exposure taken under a new moon – you can see that the foreground is exposed nicely and the star trails are outstanding.


When calculating your exposure, it would be best to do a shortened test shot so you’re not waiting a ridiculous amount of time just to see if your settings are correct. Many night photographers will jack up their ISO as far as it’ll go and shoot wide open – you’ll rarely find an instance where you’ll be taking a photo shorter than 30 seconds here. Of course the test shot will be entirely unusable due to noise and lack of trails, but it will give you a base to calculate what settings are needed with an ISO of 100.


Click Here: How to Photograph Star Trails: The Ultimate Guide
 

Mfrankfort

Senior Member
Amazing picture. Going to try that at some point. Just need all my neighbors to turn their lights off, and for there not to be an overcast in Michigan for once... haha.
 
Top