Topaz DeNoise practice

Dangerspouse

Senior Member
I'm getting a little better now at using the slider adjustments, both gross and fine, in DeNoise. I'm also getting more comfortable determining which of the 4 general categories might be better suited for any pic I import, before I even see the 4-way comparison screen. The more I use it, the more happy I'm becoming with it. Not so much because I'm such a geek about post processing, but because it's gonna be a long while before I can afford a longer lens to do bird photography. With DeNoise, I'm starting to get a bit more adept at cropping a fair amount without introducing too much noise, and at the same time maintain or even enhance sharpness.

Here's an example. This is a practice shot I took a for this week's "Leading Lines" challenge:

Guy on App Trail-1.jpg


This is the shot run through DeNoise:

Guy on App Trail DN-1.jpg


The difference really becomes apparent though when you crop heavily. Here is the first (non-DeNoised) pic cropped down to just the guy:

Guy on App Trail detail-1.jpg


And here is that same crop applied to the DeNoise processed pic:

Guy on App Trail detail DN-1.jpg


The difference in noise levels between the two is dramatic to my eye. Details are enhanced in the hat logo, the backpack straps and bag, the cargo pants particularly, the wire fence in the background, and the walkway. Basically, everything. So while it may not be as apparent in the larger non-cropped pics, I'm really looking forward to seeing if this same effect can be achieved in my BIF photos where I have to crop heavily because my longest lens is 300mm. Wish me luck!
 

blackstar

Senior Member
Sharpness improvement is visible in the un-cropped images. Yet the improvement in cropped images is surprisingly impressive.
 

Dangerspouse

Senior Member
Spent a day yesterday at the Space Farm animal sanctuary and museums yesterday and came home with a ton of shots. First time I really got to try BIF photography for any length of time, in addition to all the other things to shoot. My god, but that D500 is a joy to shoot with. Aside from everything else, I'm really impressed by the dynamic range improvement over my D5500. Inside the museum buildings the lighting was very poor - in some cases, even non-existant with only high window lights, creating insane contrasts between stygian darkness and glaring sunlight above. But that D500 had no problems keeping everything in the happy range of the histogram.

I'll post more in the coming days, but I just wanted to post this now because I'm trying to decide whether to enter this shot, or the hiker shot in the previous post, as my "Leading Lines" entry:

Line of Cars 2.jpg


This one wasn't bad either, but perhaps not as dramatic:

Line Of Cars 1.jpg


Again: decisions, decisions....
 

hark

Administrator
Staff member
Super Mod
Both the car and hiker images are excellent - I noticed you went with the hiker. That would have been my choice, too.
 

Fred Kingston

Senior Member
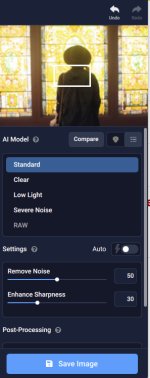
@Dangerspouse I noticed your DeNoise images are at ISO 200... In DeNoise, there's a "sharpness" slider... How much are you adding with that slider?? I imagine the "enhancements" you're seeing is more a function of that "Sharpness" slider than any actual noise reduction at an ISO of 200
 

Dangerspouse

Senior Member
@Dangerspouse I noticed your DeNoise images are at ISO 200... In DeNoise, there's a "sharpness" slider... How much are you adding with that slider?? I imagine the "enhancements" you're seeing is more a function of that "Sharpness" slider than any actual noise reduction at an ISO of 200

Hi Fred. Thanks for the input.

I rarely use the Sharpness slider. Only occasionally in the 4-way comparison screen, making all 4 the same mode (Low-Light, Clear, etc.) and moving the sharpness and Restore Details sliders around so I can compare how the different levels look. Very often, most times really, I find the program's AI does the best job and I leave it as recommended.

Such was the case here. I didn't adjust sharpness at all. I think perhaps in retrospect this may have been a poor example to post because this particular picture has so much fine detail that everything was perceived as noise, and so over sharpened as part of the processing. More sharpening than I may have done in Lightroom alone, certainly. I imagine that had all the foliage in this pic been a body of water or some other more-or-less homogeneous expanse, it would have been a better showcase.
 

Peter7100

Senior Member
Both the car and hiker images are excellent - I noticed you went with the hiker. That would have been my choice, too.

I agree wih Cindy that you have made the correct choice for the 'Lines' entry, however I love the cars, especially the second one with colourful wheels :encouragement:
 

Dangerspouse

Senior Member
I agree wih Cindy that you have made the correct choice for the 'Lines' entry, however I love the cars, especially the second one with colourful wheels :encouragement:

Isn't that great? If I recall correctly, that particular vehicle was a very early pickup truck.
 

Peter7100

Senior Member
@Dangerspouse I noticed your DeNoise images are at ISO 200... In DeNoise, there's a "sharpness" slider... How much are you adding with that slider?? I imagine the "enhancements" you're seeing is more a function of that "Sharpness" slider than any actual noise reduction at an ISO of 200

I have no idea if this is relevant to today's Denoise software, but years ago I watched a video that suggested applying any sharpness should be the last thing you ever do to a RAW image. In fact the person advising this went on to say he never sharpens his images in Lightroom but left it until after he exported them to another program (it was DPP, which is a Canon software program). I just got into a habbit of doing the same thing and on the few tests I carried out myself I thought there was a minor benefit in doing so, although probably not that noticeable.
 

hark

Administrator
Staff member
Super Mod
I have no idea if this is relevant to today's Denoise software, but years ago I watched a video that suggested applying any sharpness should be the last thing you ever do to a RAW image. In fact the person advising this went on to say he never sharpens his images in Lightroom but left it until after he exported them to another program (it was DPP, which is a Canon software program). I just got into a habbit of doing the same thing and on the few tests I carried out myself I thought there was a minor benefit in doing so, although probably not that noticeable.

One problem with sharpening before resizing is that downsizing over-sharpens an image...actually quite a bit. Many times that leaves an image looking extremely crisp (for lack of a better description). I believe BackdoorArts has also mentioned performing sharpening last.

I haven't used DeNoise, but in Lightroom and Camera RAW, there is an option to mask under the sharpening tab. It is helpful to use it so only the details get sharpened, not everything in the image.
 

Fred Kingston

Senior Member
This is the right hand panel in Denoise... Topaz's Noise Removal program... Notice towards the bottom there is a Sharpness Slider... <-- That's the sharpening I was referring to. He was Running Denoise on an image with an ISO of 200... There should be almost no noise on that camera at ISO 200... He commented on how well it improved his image. I was asking what that slider was set to, because as a Topaz user myself, I'd be reluctant to run Denoise on an image with that low/normal as ISO.

I wasn't interested in where in the workflow an image has different processes done... Just thinking that any improvement he saw in his 200 ISO image may be attributed to whatever that "sharpness" slider is set to.


2021-10-25_21-15-48.jpg
 

Dangerspouse

Senior Member
Just thinking that any improvement he saw in his 200 ISO image may be attributed to whatever that "sharpness" slider is set to.

I'm aware that the D500's sensor is good enough that amplifying the signal from Base to 200 will not increase noise perceptibly. However, and this is what is critical for me, the lens is a mitigating factor. I want to do BIF photography, but my longest lens is an inexpensive AF-P 100-300mm Nikkor. My only real option for anything in flight is either lots of negative space, or cropping.

However cropping with that setup produces poor results, even with the vaunted D500 and at 200 ISO. The lens just doesn't give acceptable resolution pushed to that limit, as you can see in the first OOC cropped picture of the hiker. You can imagine what a bird a quarter of his size, at that distance, looks like when cropped down.

So, while there may not be enough noise to warrant a run through Topaz, the program's AI was able to predict and reconstruct details that - to me and my budget, anyway - mimicked having taken the shot through a sharper lens. And for me, that's huge. Distinctions between "noise" and "sharpness" and how a sensor should or shouldn't handle given levels of amplification, are all academic. I want better pictures than I can get with my current gear, and this program allows me to do that. Everything else is irrelevant.
 

hark

Administrator
Staff member
Super Mod
I agree wih Cindy that you have made the correct choice for the 'Lines' entry, however I love the cars, especially the second one with colourful wheels :encouragement:

I also like the second car image. If you hadn't chosen the hiker, IMHO the second car image is the stronger of the two cars for leading lines. There is more detail present in the second because not only are the colors varied, there are more shadowed areas visible on the cars. So my eyes get led in slowly as a I pause to take in the details. Plus that pipe on the left (or whatever it is) also acts as a leading line. The first image has the lines but my eyes just run quickly up the diagonal without absorbing the details.

I have one suggestion for that second car image. Looking at the top right (ceiling), there is a green color cast. I imagine it might be from fluorescent lights. You can try a global color correction by moving the tint/mauve slider to the right a tad, or use an adjustment brush. But overall, the color should be tweaked slightly - maybe even by moving the blue/yellow slider a little to the left. Or try an auto white balance for starters and see if that helps. That second is a great image, DS! :encouragement:
 

Dangerspouse

Senior Member
I also like the second car image. If you hadn't chosen the hiker, IMHO the second car image is the stronger of the two cars for leading lines. There is more detail present in the second because not only are the colors varied, there are more shadowed areas visible on the cars. So my eyes get led in slowly as a I pause to take in the details. Plus that pipe on the left (or whatever it is) also acts as a leading line. The first image has the lines but my eyes just run quickly up the diagonal without absorbing the details.

I have one suggestion for that second car image. Looking at the top right (ceiling), there is a green color cast. I imagine it might be from fluorescent lights. You can try a global color correction by moving the tint/mauve slider to the right a tad, or use an adjustment brush. But overall, the color should be tweaked slightly - maybe even by moving the blue/yellow slider a little to the left. Or try an auto white balance for starters and see if that helps. That second is a great image, DS! :encouragement:


Thanks for all that Cindy, especially for the helpful advice on color! I see what you mean about the green cast. I'll head back to Lightroom and try your suggestions. Muchas gracias AGAIN! Just as a point of interest, there are no artificial lights at all in that buidling, or for that matter many of the others. If it's cloudy and dark out, it's dark inside. I'm sure it cuts down on their energy bills (no heating or AC either!) but it does make it a bit of a crapshoot if you're planning a photo outing!

That "pipe" is the handrail, btw. I was actually straddling it and lying on my stomach on top of it to get the perspective I wanted. I guess the flip side is that it made the vertical posts disappear, giving the appearance of a pipe running the length of the room, lol. There was that same handrail in the first photo also, but I leaned far enough over to get it out of frame. In retrospect, perhaps I should have left it in to create a stronger line. Oh well, live and learn :)
 

Fred Kingston

Senior Member
I'm aware that the D500's sensor is good enough that amplifying the signal from Base to 200 will not increase noise perceptibly. However, and this is what is critical for me, the lens is a mitigating factor. I want to do BIF photography, but my longest lens is an inexpensive AF-P 100-300mm Nikkor. My only real option for anything in flight is either lots of negative space, or cropping.


Read more: https://nikonites.com/post-processing/45670-topaz-denoise-practice.html#ixzz7AQ5oIWHE

Please forgive me, but, as a Topaz beta-tester, and being somewhat familiar with the inner workings of their products, I'd suggest that Denoise for your purpose isn't the correct tool. Resolution after cropping is the issue...

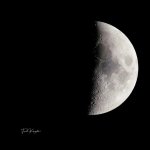
Here's a Moon I shot, hand-held a week or so ago with a D810 and cropped significantly and ran thru Topaz's Sharpen AI... The D810 creates a 36M RAW image, but as you can imagine, gets reduced with the amount of cropping as shown here. I would suggest before you do anything (as a test), first "enhance" or upsize the image before cropping with any one of the available tools... and then Sharpening... Adobe has the "Enhance" feature in both PS and LR, as well as Topaz's GigaPixel AI...

245496051_2288967771255867_2822836991149019123_n.jpeg


Attachments

  • 245496051_2288967771255867_2822836991149019123_n.jpeg
    245496051_2288967771255867_2822836991149019123_n.jpeg
    14.4 KB · Views: 101

Dangerspouse

Senior Member

Please forgive me, but, as a Topaz beta-tester, and being somewhat familiar with the inner workings of their products, I'd suggest that Denoise for your purpose isn't the correct tool. Resolution after cropping is the issue...


Thank you for taking the time to pass on the benefit of your knowledge and insight(s), Fred. I do appreciate it.
 

Peter7100

Senior Member
Today I purchased Topaz Denoise 3.3 since it was on sale and since I have recently upgraded to a more powerful pc.
Spent a long time watching youtube videos on what is the best workflow process to follow. There seems to be a variety of opinions.
So what does everyone do, assuming of course the photo requires to be put through denoise -

1. RAW file to Lightroom (or other software) make all your changes then export TIFF to Denoise.
2. As above then export a jpeg to Denoise.
3. Start in Denoise then export RAW to LR
4. something else

I should say that I have the Lightroom Desktop (cloud version) which doesn't support plug-ins which is a bit annoying.

Hopefully Fred @FredKingston can help as I think he said he worked on a beta version.
Tom @Dangerspouse, how are you getting on with it?
 

Fred Kingston

Senior Member
@Peter7100

Here is what I recommend with LR and Topaz's DeNoise AI... Denoise's best processing is with a RAW file... Denoise is also NOT plug-in friendly... LR doesn't send RAW files to Topaz...it will only send a Tiff as a plug-in... Now, having said all this...

You can process the NEF file directly in DeNoise, and then save it as a DNG file(RAW) and then import the DNG file into LR... If the file is already in LR, you can Export the RAW NEF file as Original, and then Process the file as a stand-alone image in DeNoise.
 

Peter7100

Senior Member
@Peter7100

Here is what I recommend with LR and Topaz's DeNoise AI... Denoise's best processing is with a RAW file... Denoise is also NOT plug-in friendly... LR doesn't send RAW files to Topaz...it will only send a Tiff as a plug-in... Now, having said all this...

You can process the NEF file directly in DeNoise, and then save it as a DNG file(RAW) and then import the DNG file into LR... If the file is already in LR, you can Export the RAW NEF file as Original, and then Process the file as a stand-alone image in DeNoise.


Thanks Fred :encouragement:
 
Top