You are using an out of date browser. It may not display this or other websites correctly.
You should upgrade or use an alternative browser.
You should upgrade or use an alternative browser.
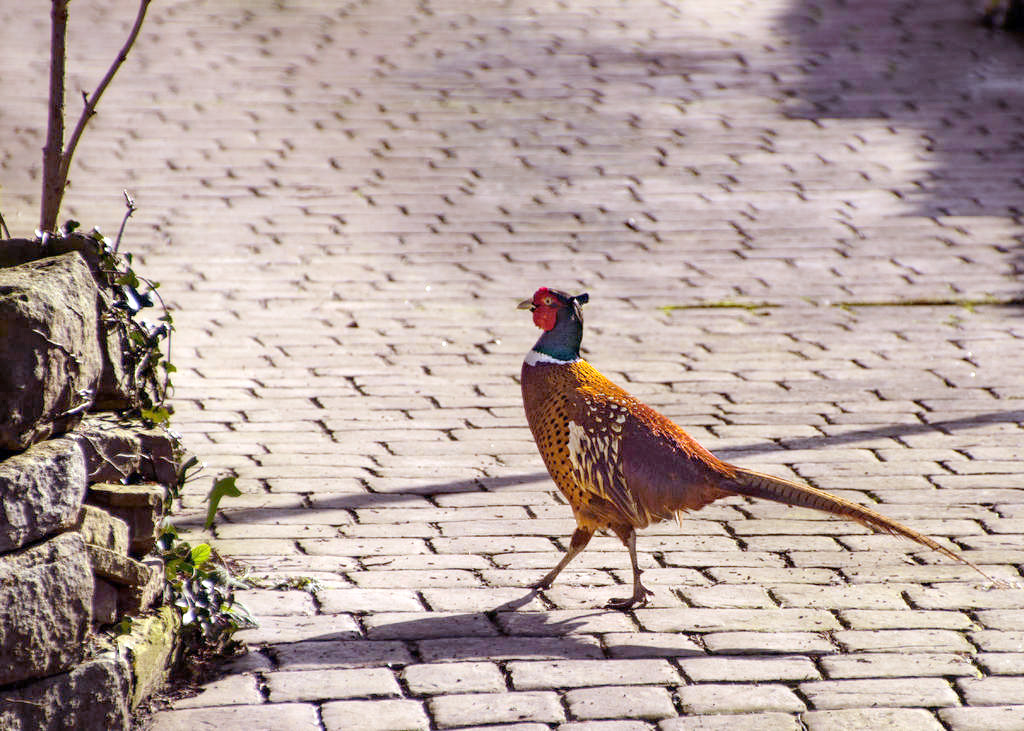
Getting grain when bringing out the shadows?
- Thread starter thequeenscheese
- Start date
BackdoorArts
Senior Member
Lots to say here starting with your image looks to be over a stop underexposed. Fix the exposure first then worry about the shadows. If you have Photoshop use the Levels adjustment to compress your light information (bring the bright marker in from the right until you have actual light information). This will give the shadows adjustment actual shadows to deal with and move some of the shadowy areas out of that area.
Here's your image with just a levels adjustment.

The noise you're getting comes with trying to amplify the low light levels beyond the amount for which they have good information. A proper levels adjustment doesn't amplify as much as it redistributes where each pixel is in the Blacks/Shadows/Highlights/Whites spectrum. If you get into luminosity masking techniques you can also find ways to boost certain areas of an image without using tools that will specifically amplify the pixel information, but there's a lot of stuff there to master.
Here's your image with just a levels adjustment.
The noise you're getting comes with trying to amplify the low light levels beyond the amount for which they have good information. A proper levels adjustment doesn't amplify as much as it redistributes where each pixel is in the Blacks/Shadows/Highlights/Whites spectrum. If you get into luminosity masking techniques you can also find ways to boost certain areas of an image without using tools that will specifically amplify the pixel information, but there's a lot of stuff there to master.
Last edited:
thequeenscheese
Senior Member
Thanks for that, pheasants are also quite a complicated subject with a lot of detail i suppose..
Stoshowicz
Senior Member
If the top photo isnt lightened as is stands then you have plenty of head room for lightening , in shadow areas there just isn't the literal 'shadows and highlights' which can accentuate the textures of the feathers, just fact of life.
At a thousandth of a sec you had a good number of photons hitting your sensor,
so the grainy look upon lightening is probably largely due to method of lightening.
I don't have your camera so I cant be precise, but if you have lightroom , you can prep your photo initially by shifting the tone curve to amplify the darker areas a bit and then hit it with your usual routine,
but avoid lightening with the regular shadows slider , instead , move it a bit to the Left and lighten the pic overall by raising the 'blacks' slider bringing your darkest areas on the histogram away from the far left .
Like I said , I'm guessing , but will say I routinely shoot a full stop underexposed or more as gauged by the meter ,, which is very misleading in any case,, far better to 'chimp' the shot if you have time.
A different approach would be to just raise the lightness of the colors of the bird which are in shadow in this case mostly orange ,
so you could raise the lightness of the oranges and reds after cooling the color tone of the overall pic from the warm sun ,
OR just check and make sure that the white balance its using is the best one for the colors of the pic to look normal.
Generally , shadows shouldn't look purple upon lightening so you may have some oddness in the ambient reflected light on that street.
Just tossing some ideas out for you to try, up to you to see if you can get em to work for you with your gear.
(There's actually quite a large number of options to reduce the appearance of noise like changing grain size, selective noise reduction , gaussian blur adjustment , unsharp mask , resizing etc with variable levels of effectiveness. )
Last edited:
Lots to say here starting with your image looks to be over a stop underexposed. Fix the exposure first then worry about the shadows. If you have Photoshop use the Levels adjustment to compress your light information (bring the bright marker in from the right until you have actual light information). This will give the shadows adjustment actual shadows to deal with and move some of the shadowy areas out of that area.
The noise you're getting comes with trying to amplify the low light levels beyond the amount for which they have good information. A proper levels adjustment doesn't amplify as much as it redistributes where each pixel is in the Blacks/Shadows/Highlights/Whites spectrum. If you get into luminosity masking techniques you can also find ways to boost certain areas of an image without using tools that will specifically amplify the pixel information, but there's a lot of stuff there to master.
Thanks for this, Jake. I wasn't aware of this info so I appreciate it, too.
thequeenscheese, when you sharpen anything (whether an entire image or just parts of it), you can introduce even more noise. If you are going to use the same process as your first image, you should add noise reduction to the area where you said you added sharpening and clarity. You didn't say which program you use, but I prefer using PCC. I go to Camera RAW under the filter tab, and from there, you can do pretty much everything you'd do in Lightroom. If you use LR, you can access the noise reduction brush the same as using a brush for touching up parts of an image.
thequeenscheese
Senior Member
Chasing after a quick moving pheasant and trying to adjust on the fly is definitely an area for improvement on my part i thing lol..
Thanks for the advise from all much appreciated, i didn't think of just adjusting the luminance sliders for specific colour in lightroom that's a good shout to try..
Thanks for the advise from all much appreciated, i didn't think of just adjusting the luminance sliders for specific colour in lightroom that's a good shout to try..

