Camera Settings for First Time Indoor Shooting

Lautermilch

Senior Member
I bought a light kit as I had a lot of requests from models for indoor shots.
One model stopped by and I was not happy with the results. Outdoor lighting is what I have been doing all my life and have a handle on that.

I have a D90, 50mm AF-S G, and a YN565EX flash.

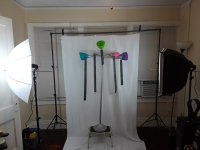
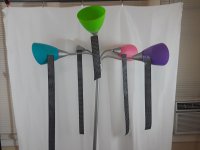
I taped ribbons to this light stand to show focus


My first goal was trying to get all the ribbons in focus. I went up the aperture scale but am satisfied with the results.

What settings would someone with experience suggest for taking images with this setup? Normally I shoot in aperture mode between F/1.8 to F/2.8 and and happy with those results outside but this indoor things is new to me.


closeup.jpgSetup.jpg
 

480sparky

Senior Member
Show us the D90 samples, not your cell phone shots.

There is no such thing as a magic, one-size-fits-all group of settings. Just like outdoors, shooting indoors means your settings need to be set to the results you want.
 

480sparky

Senior Member
Even at f/4, your depth of field isn't enough to get all the ribbons in focus. Your camera is focusing on the center ribbon, closest to the camera. Manually focus on one of the far right or far left ribbons, and stop down to f/5.6 or f/8.
 

Bikerbrent

Senior Member
I know your question is about focus, but I also notice your lighting is very flat. It appears that both lights are about the same power and same distance from the subject. Try either moving one of the lights back, or reducing power in the light (or a little of both). Also setting one light lower or higher might help.
 

480sparky

Senior Member
You're getting the focus now, it's an issue of ISO. Lots of noise from shooting at 1250. The D90 isn't a really stellar high-ISO performer. You're basically demanding too much from the camera. You're either going to need a lot more light, or up your game by investing in strobes or another (better) camera.
 

RocketCowboy

Senior Member
Indoor lighting is tough because you have complete control over the lighting. You have to decide if you want to use the ambient light at all, or just completely provide your own light. Outdoors, it's a bit harder to overpower the sun ... at least to the point where your light is the sole light source for the image (unless shooting at night).

I haven't looked at the raw files you provided, but agree that overall it sounds like you're probably shooting at too high of an aperture and you need to stop down in order to achieve some Depth of Field. When using flash, the camera is going to meter for just the ambient light, so will usually try to push your lens as wide as it will go. You can control that, and still provide the right amount of artificial light to get the proper exposure. While using TTL flash can help speed things along, for the tests that you're using I would try using manual power settings so you can see the differences immediately.
 

Horoscope Fish

Senior Member
If you want to learn studio lighting I strongly suggest you start here:

Stobist: Lighting 101

I would make some slightly different equipment suggestions but the techniques you will learn on that website will get you comfortable with the basics of off-camera flash quickly and without spending a lot of money.


.....
 
Last edited:

spb_stan

Senior Member
A few other suggestions, the set up for lights is causing shadows to be more of a problem than they should be. Move the subject away from the backdrop because you are fighting the inverse square law instead of using it to your advantage. The light source position determines where the shadows fall on the backdrop. If you raise the lights and shoot down onto the subject, and the subject is further in front, where are the shadows going to fall? Low down on the background and the light falling on the subject will be much stronger than the light on falling on the background.
Mixing ambient light and Xeon light from a flash is going to cause color cast in shadows even if you can get a decent white balance. If you want to use some ambient light you can use a Gel over the flash so it matches the color temperature of the ambient. It might be easier to use the ambient only for set up and dim it when shooting.
You should not have to be at 1200 iso for that scene. How are you controlling the flash ower? Are you using flash controllers or optical CLS? Using iTTL metering?

Another flash pointed right at the white background can overexpose it so it is pure white and will not show the texture or wrinkles. I would not go over ISO 200 for that shot. If you still don't have enough light, something else is wrong. Again, using the inverse square law means you can quadruple the light intensity by moving the lights to 1/2 the current distance. Distance causes light fall off from a point source as the square of the distance and knowing that it is possible to use it to your advantage in may ways.
 

spb_stan

Senior Member
The cool thing about having lighting is all the camera settings can be set independently in M (manual mode) for the optical effects your wish. Since you control the background and position relationship between subject and background your Aperture setting is not so critical for exposure when using flash so you can select an aperture that fits your depth of field preference. For this scene, f/5.6 to f/8.0 would assure lens peak performance and deep enough depth of field for sharp focus on all the ribbons. Since you want the least noise, set the ISO to 100, or 200 hundred if your flash is not strong enough
Next, Shutter speed, for sharp images you usually set it fast enough to minimum camera shake blur when shooting with ambient light but your main exposure light with flash is a very fast pulse of light that will freeze any camera or subject movement. The flash duration is around 1/20,000 to 1/30,000 of a second. To synchronize the shutter and flash you need to reduce the shutter speed to be no faster than 1/250th of a second. The second source of light is the ambient light in the room, which is continuous so any camera shake will be recorded before and after the flash goes off. Keeping the shutter speed up to 1/250 will keep the ambient light underexposed enough to not be visible. Lowering the shutter to 1/10...will expose the shake, however. Turn off the flash and take a test shot with ambient light, if the resulting image is dark enough to mask any shake detail you are set.
So now, set the metering to Spot and flash to iTTL mode and make sure the focus point box is right over one of the ribbons so it meters on the subject. The flash power and duration to expose the subject is calculated by the flash so the only variable left determine exposure is the light on the subject is reflected back to the camera. As I mentioned in the prior post, get the subject further away from the background farther will reduce shadow, decrease the brightness of the background and blur it a bit.
Shooting in MANUAL exposure mode is much easier than in any auto mode since the flash contribution is not present when the metering is done so you end up with low flash power, high ISO, slow shutter and long exposure times calculated by the camera. When the flash is absent, the camera, in auto mode meters based on the low ambient light it sees. 99% of Flash and 100% of strobe photography is done in manual exposure mode. Snapshots out walking on the streets or action sports are good times to use Auto exposure, but not when using flash. Manual mode gives control to you for background vs subject exposure,depth of field, and noise control. With enough added light and smaller apertures, the sharpest images you take will be when using flash.
 
Top