You are using an out of date browser. It may not display this or other websites correctly.
You should upgrade or use an alternative browser.
You should upgrade or use an alternative browser.
I went down to the mission yesterday
- Thread starter Mtrain
- Start date
Joseph Bautsch
New member
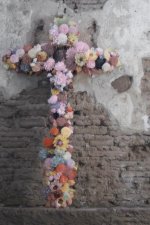
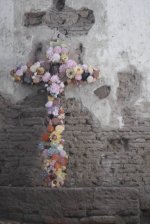
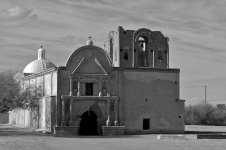
Both shots show a good eye for composition. The cross has very good color contrasted by the broken white plaster and red brick wall. Great texture. I would suggest a little different cropping on the cross shot. (I took the liberty of copying the shot and re-cropping to demonstrate.) That large opening where the plaster is missing above the cross and the large brick platform underneath I find distracting. A little different cropping de-emphasizes these objects and makes the cross a little more dominate as the subject. The B&W shot has a shadow across the front of the subject and lighter areas behind. That's distracting and should be the other way around. The light should be on the face of the building. I also agree with cnyram, the more interesting shots probably lie on the right where the bell tower ?? structure is located. Shoot at a time of day when the sun is lower on the horizon and more to your back or side.


Last edited:
The cross picture isn't color against black and white, I tried that and didn't like the results–*felt quite passe to me. I use aperture for post-processing but the image is very similar to what one would get with a '70s color' CS4 effect. I simply bumped down the saturation considerably. Here it is in black and white with color:

The hours of the mission prevent me from getting shots in proper sunlight during the summer unfortunately. The bell-tower area is off limits, but the cross photo was taken inside the structure in the second image in very low light wide open at 1.4. Around the side near the bell-tower and around back there are clay pots and gravestones and the like but it is off-limits currently for restoration. I peaked around the corner and shot this:

With regard to the cropping–*I 100% agree and was thinking the same thing when I uploaded it... but I've been forcing myself to compose and straighten as I shoot as opposed to after the fact and I find fighting the urge to crop helps me slow down and take better images–*but yes, 100% looks better.

The hours of the mission prevent me from getting shots in proper sunlight during the summer unfortunately. The bell-tower area is off limits, but the cross photo was taken inside the structure in the second image in very low light wide open at 1.4. Around the side near the bell-tower and around back there are clay pots and gravestones and the like but it is off-limits currently for restoration. I peaked around the corner and shot this:

With regard to the cropping–*I 100% agree and was thinking the same thing when I uploaded it... but I've been forcing myself to compose and straighten as I shoot as opposed to after the fact and I find fighting the urge to crop helps me slow down and take better images–*but yes, 100% looks better.
Joseph Bautsch
New member
Understood, you have to work with the conditions that can't be changed. Very good shot of the clay pots. Very good composition, color and texture. Only thing I would do is dull down the bright area in the upper left. The eye is first attracted to highlights (bright areas) and the eye should go straight to that first pot in the row. I compose my shots in camera but do not crop in camera. I almost always leave a cropping margin in camera. I then use the cropping tool to fine tune the final composition. I also use Aperture. Aperture has a B&W function including sepia and other colors in the adjustments. There is also a B&W preset group that can be used to simulate a number of different film types and speeds. I like the cross in color with the background in B&W. That is also a process that can be done in Aperture adjustments.
Last edited:
I literally JUST started using Aperture so I haven't gotten the chance to understand it fully–*I'll have to check-out those presets. I'm not opposed to post-cropping, but with a non-distortion lens like the nifty fifty I shouldn't be coming home with grossly slanted horizons and improperly composed images. There are those that for some odd reason think it is cheating to crop your image in post-processing and I think that's just silly-*I was more using it as a learning experience. I'm gonna go in with the highlights bar for that clay pot image, I didn't even notice it was that bad until you pointed it out. Thanks for the critiques, been quite helpful!
Mike
Mike
Last edited by a moderator:
Joseph Bautsch
New member
If you go to the Adjustments pane and click on the Adjustments drop down near the top of the page you will find a whole host of available adjustments including a B&W conversion near the bottom of the list. On that list near the top is "Quick Brushes" which contains a "dodge or burn" brush that may help with the bright spot. It may not. That spot is about devoid of details and may not respond to "burning in". In that case go to "retouch" just below "quick brushes". That brush will allow you to clone out that bright spot.
Last edited:
Joseph Bautsch
New member
If you use any of those adjustments on that list frequently you can add any of them to the default list. There is a gear wheel top right corner of each adjustment with another list of functions. I would recommend adding the "sharpen" adjustment as a default.


