What did I do wrong with D600?

mrpbnm

Senior Member
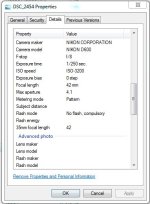
DSC_2454.jpg2454 Data.JPG

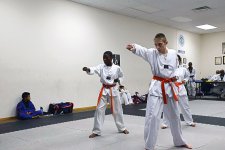
I took a bunch of photos at grandson's Tae Kwon Do testing. I thought ISO 3200 would get something decent. But all I got was dark grainy photos. I shot RAW and JPEG but I don't know how to fix the RAW. Were my expectations too high for D600? Would anyone be interested in tweaking the RAW and telling me what to do to salvage the rest of the shots, if that is possible. I can give you the RAW via dropbox.
Thanks,
Phil
P.S. I think I see oil spots on left side of photo too...
 

mikew_RIP

Senior Member
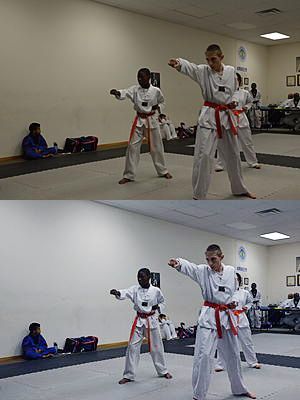
Phil not skilled enough yet to do it but if that's a jpeg i would guess you have all you need in the raw files.just a level tweak improves it,

54975d1381078690-what-did-i-do-wrong-d600-dsc_245m4.jpg

54975d1381078690-what-did-i-do-wrong-d600-dsc_2454.jpg

There is more to do and you may struggle a bit with that one because of the different skin tones but i dont think all is lost.
 

480sparky

Senior Member
Are you checking the histogram while shooting? That's your best option for obtaining optimum exposure.

Looks like dust spots to me.
 

Marcel

Happily retired
Staff member
Super Mod
what you did wrong was forget that your meter is trying to get the picture you take to 18% grey. In this example, the subject (including walls) are white. The meter, wanting the white to go grey underexposed the scene. For some scenes (beach, snow) you've got to manually increase the exposure to match the subject's or picture's overall color. In this case, using the exposure increase button and go +.7 or +1.0 would have gotten you a result that would have been more acceptable. The pictures still can be salvaged, but at the expense of introducing more noise and grain...
 

WayneF

Senior Member
Marcel is right, it is just the normal expected underexposure of white scenes. You have to expect this, and apply at least +1 EV compensation, maybe more sometimes. Watch the result and histogram in the camera at the time, so you can correct it then. RAW would be the same, but it also does not have White Balance in it yet, which you have to add.

See How light meters work . Good stuff to know and expect.
 

mrpbnm

Senior Member
Thanks everyone for quick replies. I was not checking the histogram while shooting. A levels adjust in Photoshop does improve the photo. But I was hoping Adobe camera raw could do better and reduce the graininess... If so, I'd really like to see ACR can do.

Marcel many thanks for your explanation of how to get better exposure with mostly white subject & background. I'll try that for sure.

I thought the camera automatically cleaned the sensor, so any spots were probably the dreaded oil spot issue I've heard about. I guess I need to read the guide and try to clean it manually. Thanks sparky.
I just read Wayne's reply. Thanks for the link. Going to read it now.
Phil
 
Last edited:

STM

Senior Member
This looks to me like a normal occurrence when photographing a scene where white predominates. Regardless of how "sophisticated" the metering, it will still try go expose for Zone V (for you Zone System fans out there) or 18% Neutral Gray. If there were more areas of dark in the scene, it may not have been as underexposed. This image, on the other hand, is maybe a half stop underexposed, very easily remedied by any graphics program. Even applying D-Lighting to the image while still in the camera should fix it .

It also looks like the incorrect white balance was used, I detect a noticeable reddish-yellow cast. Below I have made all the necessary corrections.


taiquando_zps3ba4e800.jpg
 
Last edited:

WayneF

Senior Member
You said you had Adobe Levels, which is a great tool. For exposure, lower the White Point (at 255) to be where the graph data begins, at about 170. That brightens it, same as more exposure in camera would have done (but with more noise that more camera exposure could have removed). Technically, that says, "I want this new spot at 170 to become 255, and to be as bright as it is possible to be".)

Then, if you want it even brighter, then second, also lower the MID Point (center slider) from 1.0 to maybe 1.3 - adjusted by eye to preference (this is gamma, but it brightens low and middle range without clipping high end). These are Standard tools, everyone ought to be intimate with these.

Then for White Balance, Levels has three Eyedropper tools, Black, White, and the center tool is GRAY. It is your White Balance tool (if in Levels - ACR has its own similar ways). Select that center Gray eyedropper, and then click something in the image that should be actual White. I would suggest the white uniforms, in a fairly bright spot on them. That removes any color cast there, to make that clicked spot be actually white. It also removes the same color cast from the entire image. Clicking different spots can give slightly different results, but the white uniform is a good bet.

Or, you can click the walls, which will make that clicked spot be white (or neutral gray, no color cast), but I fear they were not white or gray to begin with. Looks like they ought to be more beige or a bit yellow, but if you want it really white, that would do it (but I think the uniforms will have a slight blue cast then).

There are often a few options to try.
See White Balance Correction, with or without Raw

 
Last edited:

STM

Senior Member
Thanks STM. Do you mind telling me how you did it?

I copied and pasted the image into CS5 and adjusted exposure curves until the brightness levels looked right. I then went into color balance and got rid of the reddish cast first and then the yellow.
 

Horoscope Fish

Senior Member
This was easy to fix...

Here I've upped the exposure to +1.25, tweaked the contrast, balanced the color and sharpened it. Took about two minutes...
 

Attachments

  • DSC_2454.jpg
    DSC_2454.jpg
    378.9 KB · Views: 243

BackdoorArts

Senior Member
Thanks everyone for quick replies. I was not checking the histogram while shooting. A levels adjust in Photoshop does improve the photo. But I was hoping Adobe camera raw could do better and reduce the graininess... If so, I'd really like to see ACR can do.

Phil

Phil, I'm not sure what version of AcR you're using, but in the latest version if you go to the Detail section there are Noise Reduction sliders. Zoom to 100% and see if you have color issues at the default of 25. At 3200 ISO you probably should not. So play with the Luminance slider looking at a fairly plain section, like the white wall, until you eliminate the noise. Then go to a detailed section and see how much it softened the details and then use the other sliders to bring back as much as you can.

Here's a decent little tutorial on how to use it.


FYI, I always do NR first and then leave my sharpening to normal postprocessing in Photoshop with their sharpening tools or using Nik's Sharpener Pro. I occasionally do it in RAW when I have so much noise that NR has oversoftened. In these cases I will mask almost always to 90-95, bringing back only the edges, and I usually won't go beyond 70 on the slider. For the D600 a radius of 1.3 seems to work perfectly.

Since adapting the Nik tools I've abandoned the manual process and use Nik's DFine 2.0 as it seems to do as good or better a job as I could tweezing the settings, and does it in under 30 seconds. But it's still good to practice how to do it manually and understand the types of noise you're trying to reduce.
 
Last edited:

LensWork

Senior Member
I noticed that you were shooting at f/8; indoors, low-light, action shot, f/8 is not realistic. Open the aperture wide-open, lower the ISO and use +1 exposure comp (at least) for the white walls, floor and uniforms.
 

fotojack

Senior Member
This is my version of the correction using Irfanview. Took about 15 seconds, tweaking the brightness, contrast, sharpening and gamma levels. Nothing fancy, just simple corrections:

DSC_2454.jpg
 

BackdoorArts

Senior Member
I noticed that you were shooting at f/8; indoors, low-light, action shot, f/8 is not realistic. Open the aperture wide-open, lower the ISO and use +1 exposure comp (at least) for the white walls, floor and uniforms.

Agreed, though depending on the lens you may want to close up one stop if you lose sharpness wide open. Also, shoot in Aperture Priority mode and set Auto ISO so that your minimum shutter speed is sufficient to stop action and/or eliminate camera movement blur (i.e. slowest speed should be 1/focal-length (max focal length on a zoom)).
 
Top