Portrait Edit

Pretzel

Senior Member
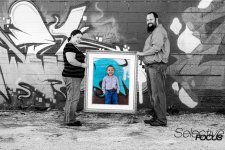
Had an idea with my 1st ever portrait session, went for it with the basic tools I have, and here it is... the couple really seemed to like it, but I'm interested in the nitty gritty feedback I know I'll get here. The original raw file was sharpened up a bit in LR5, then I used the new MacPhun Intensify Pro demo to set a couple of layers to separate the two areas before converting all but inside the frame to B&W.

Their file, of course, does not have the logo.

JLH6BWEdit.jpg
ISO 200
f2.8
1/800
50mm 1.8G
 
Last edited:

wud

Senior Member
It's really working. I'm not a huge fan of selective color but this works :) and the image itself is very good.

Impressive with f/2.8


Sent from my iPhone using Tapatalk
 

BackdoorArts

Senior Member
Nicely done. The one thing I can't seem to decide about is whether or not I like that you can see a small piece of the child's foot under the frame. If I saw more it would seem intentional, which would be be fine, because you want to know that he was present and not an actual framed portrait. But as is it blends in with the rest of the scattered stuff along the base of the wall. I probably would have either masked it out using smart fill in PS (or spot healing in LR if PS isn't available). Or I may have tried extending the selective color outside the box to his foot if I wanted it to be noticeable, as if it was the child that brings the color and not the frame. Either way, I want to see either more of it or none of it. Other than that I like the photo a lot.
 

BackdoorArts

Senior Member
I've been staring at this some more because there's something about it that just doesn't "feel" right. Did you utilize the lens correction feature in Lightroom, because I'm seeing a touch of barrel distortion inherent to the 50mm f1.8. I pulled a copy into Photoshop and used the lens correction filter to pull 2 points of distortion out of frame, effectively pulling the outer edges toward the eye, and it looks better to me. It's an extremely subtle change, and one that's almost impossible to see in a side by side, but when done with the tool you can see it plainly when you toggle back and forth with ctrl-Z. The lens profile is something I apply by default in Lightroom and it works wonders.

If you are using it, then for some reason it's not correcting it as much as it should - or more appropriately, as much as I think it should. LOL But for me it's the lines in the wall, they just fall off at the edges, which is something that probably would not have been noticeable on a less linearly textured background.

Sorry for being a little picky on your shot, but I actually really like it, and really want to like it more than I do because there are just these minor things that keep me from loving it.
 

Pretzel

Senior Member
There's a bit of an auto correction that occurs when I go to edit the pics in LR re: barrel distortion, but perhaps it's not enough. You can see it kick in as you scroll through the pics in an import the first time. Maybe I should go with Ken Rockwell's settings? (snark here for some of the folks on the forums ;) )

Also, re: the foot. Good thoughts! My thought would be to just mask it out, as messing around with it a tad this morning, the extra bit of color outside of the frame just reached out and punched me in the face. I'll see what I can mess with tonight.

I will say this though, with the simple tools I have to apply layers and get that effect, I'm wishing there was an easier way! That Intensify Pro is a fantastic tool so far, but it doesn't have the auto-mask features of LR that would make it so much easier, and I haven't figured out how to get the preset look for both the color and B&W portions in LR. I've gotta hit a TON more tutorials online it would seem!

​Why can't ya just create a custom shape with some drag and click options and be done? LOL

Sorry for being a little picky on your shot, but I actually really like it, and really want to like it more than I do because there are just these minor things that keep me from loving it.

Thanks for the kind words, and know this: Apologies aren't necessary at all. It's comments/critique like this that I was looking for when posting the pic here, in the photo evaluation and critique section, so I appreciate all of the insight!

I'm just now diving into this huge world of photography, and I'm driven to improve. Can't do that without some input and guidance from those who have been where I am and advanced well beyond, right?
 
Last edited:

Mike D90

Senior Member
Had an idea with my 1st ever portrait session, went for it with the basic tools I have, and here it is... the couple really seemed to like it, but I'm interested in the nitty gritty feedback I know I'll get here. The original raw file was sharpened up a bit in LR5, then I used the new MacPhun Intensify Pro demo to set a couple of layers to separate the two areas before converting all but inside the frame to B&W. Their file, of course, does not have the logo. View attachment 58303 ISO 200 f2.8 1/800 50mm 1.8G

I love this but I do agree about the foot being visible below frame. However, that may actually work, giving a hint that the child was actually real and not a photograph.
 
Top