Star shot advice

TonyD315

Senior Member
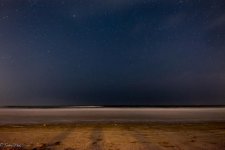
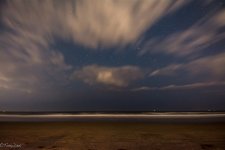
I had the opportunity to attend a workshop over the weekend that introduced me to shooting the stars. It was very informative and fun, even though the weather wasn't 100% cooperative. I've never shot at night like this, using high ISO, so editing these photos are fairly new to me. Using Lightroom I made some adjustments to remove some of the noise without removing the stars. I was wondering how this is, am I on the right track? Is there anything that I should do differently?? BeachStars-2.jpg
 

Blade Canyon

Senior Member
Be sure to shoot in RAW. Your picture looks great.

I don't have any tips on producing better star photos, but I did discover that using a camera can help me find galaxies I'm trying to see in a telescope or with binoculars. Just make a long exposure shot of the part of the sky where the galaxy is supposed to be, and sure enough it will show up as a tiny cloud on a long exposure (30 seconds) high-ISO shot. The main problem is that anything over 30 seconds is enough time to see some motion blur, so the pics are not really good for anything else. You can see a little motion blur in the stars in your 25 second exposure.
 

TonyD315

Senior Member
This was shot in RAW and edited in Lightroom. Part of the class was learning how long of a shutter speed I could have, given my camera and focal length, before the stars start to trail. We calculated 27 seconds on mine, so I shot at 25 just to be safe. I might have to reduce it a second or two. I want to let the most amount of light in while not blurring the stars. With 25 sec being my max, and my lens stopped down as much as possible, the only other thing I could do was bump the ISO. We practiced setting different ISOs so that I can see what I'm comfortable with noise wise. As I said, unfortunately the clouds didn't stay away long enough, but I got some decent shots in the beginning that I'm looking at now. I chose this one because I liked the dimension that the clouds gave it. I'll get back with some of the others.
 

Blade Canyon

Senior Member
I like the clouds! Also, I assume you are using Long Exposure Noise Reduction and High ISO Noise Reduction, but turn them on if you're not.
 

SteveL54

Senior Member
I like the clouds! Also, I assume you are using Long Exposure Noise Reduction and High ISO Noise Reduction, but turn them on if you're not.

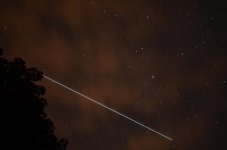
This is excellent advice, but I find no need for high ISO. Waiting for the weather to warm up a bit before I start shooting the stars again. One of my favorites is the International Space Station.
Getting the stars in there was an added bonus. Exposure was 30 sec. ISO 100 35mm f1.8.

14974980332_2e69a43134_o.jpg
 

Blade Canyon

Senior Member
That's a great shot. I've tried shooting the ISS through a telescope, but couldn't get it in the frame. I regularly check the heavens-above.com website to see when it's coming over.
 

Panza

Senior Member
I think you're on the right track. I would try with various ISO's and shutterspeeds until I find a maximum ISO I find comfortable using. You might want to aim to shoot a little bit brighter so you can bring it down levels in LR and adjust as needed. The noise should be reduced when you darken the image in LR but look a bit messy on camera monitor when first shot. : )

My other tip is to know the direction of the Milky Way Galaxy and try to shoot in either direction of it. There are two sides to the Milky Way in the night sky (for me it's North East and South West at this time of year). If the sky is clear enough and the condition is right you can bring out the MWG in LR.

T2ANZMp.png

16mm iso6400 30s f/4.0

I'm okay with a fair bit of noise ... this one was for instagram anyway so most people shouldn't pixel peep.
 
Last edited:

TonyD315

Senior Member
I think you're on the right track. I would try with various ISO's and shutterspeeds until I find a maximum ISO I find comfortable using. You might want to aim to shoot a little bit brighter so you can bring it down levels in LR and adjust as needed. The noise should be reduced when you darken the image in LR but look a bit messy on camera monitor when first shot. : )

My other tip is to know the direction of the Milky Way Galaxy and try to shoot in either direction of it. There are two sides to the Milky Way in the night sky (for me it's North East and South West at this time of year). If the sky is clear enough and the condition is right you can bring out the MWG in LR.

16mm iso6400 30s f/4.0

I'm okay with a fair bit of noise ... this one was for instagram anyway so most people shouldn't pixel peep.

I see what you mean about overexposing, we talked about that at the class. I tried to do that when I was shooting the other night. As far as shooting towards the MWG, I really want to get into that, and would love to give is a shot, but where we were wasn't exactly ideal. I think we would have had light from other beach towns in the picture. I am just going to have to really mess with the ISO and see what I'm comfortable with. Here is another shot, I didn't go as heavy on the noise reduction and it seems to bring out more stars. Like you said, I'm not looking to print a giant photo from this, so I might be able to get away with some noise...

BeachStars-4.jpg
 

Moab Man

Senior Member
Good first shot. The key to night photography is good clean sky (avoiding light pollution), the widest aperture you can come up with, and really learning and practicing editing technique.

Next time you shoot, try out the 35mm f/1.8. In combination with a much wider aperture and great glass it will really clean up some of the noise due to reducing exposure time (increases noise) or reducing ISO (reduces noise). The one challenge you run into is that the greater the focal length, the shorter the time you can expose before the stars are trailing. That is why the 12mm is nice in that you can expose for longer before you get star trails. One of my all time favorite lenses for stars on a DX camera is the Tokina 11-16mm f2.8. Larger aperture and nice and wide.

It takes practice, but in time you can figure it out. Practice, practice, practice.

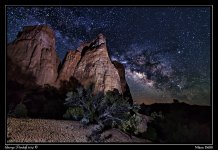
One of my first before I had any clue.
http://nikonites.com/attachments/low-light-and-night/45409d1394862676t-milky-way-6.jpg

With some practice. This image actually looks much better than it looks on this page (post #30)
http://nikonites.com/monthly-assign...31st-3.html?highlight=milky+way#axzz3VDf186tO

Eventually, with a lot of practice, improved technique, and improving my gear because I was in pursuit of great night photography... I figured it out. It's definitely a journey and not a destination to capturing great night photography.

Day122MilkyWay1.jpg

Great start and keep at it.
 

Panza

Senior Member
I see what you mean about overexposing, we talked about that at the class. I tried to do that when I was shooting the other night. As far as shooting towards the MWG, I really want to get into that, and would love to give is a shot, but where we were wasn't exactly ideal. I think we would have had light from other beach towns in the picture. I am just going to have to really mess with the ISO and see what I'm comfortable with. Here is another shot, I didn't go as heavy on the noise reduction and it seems to bring out more stars. Like you said, I'm not looking to print a giant photo from this, so I might be able to get away with some noise...

I can see there's light shining from behind you on the sands of the beach. The bright lights of cities tends to create an "aura" of light in the distance and can easily be seen in photos but light pollution is harder to gauge when you're in it. Using the same settings above in my backyard, I'm barely lucky enough to get some basic large stars.

I like to do a 45 minute drive away on a new moon night, but I know that some people will drive two or three hours away to get to the perfect secluded location. Bring a flash light and a jacket : )!

If you shoot at interesting times of day (not limited to night) you can capture orange/red hues in the clouds in your star landscape shots.

Weather can be a pain and a blessing. Best of luck and most of all, have fun.

- Pan
 

TonyD315

Senior Member
Good first shot. The key to night photography is good clean sky (avoiding light pollution), the widest aperture you can come up with, and really learning and practicing editing technique.

Next time you shoot, try out the 35mm f/1.8. In combination with a much wider aperture and great glass it will really clean up some of the noise due to reducing exposure time (increases noise) or reducing ISO (reduces noise). The one challenge you run into is that the greater the focal length, the shorter the time you can expose before the stars are trailing. That is why the 12mm is nice in that you can expose for longer before you get star trails. One of my all time favorite lenses for stars on a DX camera is the Tokina 11-16mm f2.8. Larger aperture and nice and wide.

It takes practice, but in time you can figure it out. Practice, practice, practice.

One of my first before I had any clue.
http://nikonites.com/attachments/low-light-and-night/45409d1394862676t-milky-way-6.jpg

With some practice. This image actually looks much better than it looks on this page (post #30)
http://nikonites.com/monthly-assign...31st-3.html?highlight=milky+way#axzz3VDf186tO

Eventually, with a lot of practice, improved technique, and improving my gear because I was in pursuit of great night photography... I figured it out. It's definitely a journey and not a destination to capturing great night photography.

View attachment 146760

Great start and keep at it.
Thanks for the sound advice and encouragement. Honestly, I was torn between the Nikon and the Tokina. I ultimately went with the Nikon because I want to get into some long exposure day shots, like seascapes and waterfalls...the difference between the 4 and 2.8 wouldn't matter there...but it totally matters in this case. I will definitely give my prime a shot...I don't know off the top of my head, but I would guess the exposure time would be around 20 seconds or just under that until the stars start to trail. I think I really need to read up on how to edit these shots once I get them. I understand it will take a lot of trial and error. Thanks again.
 

TonyD315

Senior Member
I can see there's light shining from behind you on the sands of the beach. The bright lights of cities tends to create an "aura" of light in the distance and can easily be seen in photos but light pollution is harder to gauge when you're in it. Using the same settings above in my backyard, I'm barely lucky enough to get some basic large stars.

I like to do a 45 minute drive away on a new moon night, but I know that some people will drive two or three hours away to get to the perfect secluded location. Bring a flash light and a jacket : )!

If you shoot at interesting times of day (not limited to night) you can capture orange/red hues in the clouds in your star landscape shots.

Weather can be a pain and a blessing. Best of luck and most of all, have fun.

- Pan

The class was at the New Jersey shore, to our north about 30 minutes was Atlantic City, in-between where we were and AC there are a few other beach towns. The light coming from my back is from a street light on the other side of the sand dune. I have a few pictures at high iso that start to show light peaking in from both sides (the neighboring beach towns) and the bottom (the street lights). The photographer who did the class chose this past weekend because of the new moon, and the location and time of year because it is somewhat secluded and desolate. If we did the same class in the middle of the summer there would be more light pollution. I should have asked this at the class and didn't even think of it...would shooting with the lens hood have made a difference?
 

Moab Man

Senior Member
The lens hood only really comes into play if you have light hitting and reflecting off the glass. However, I usually have mine on anyway for stray light and glass protection.
 

Panza

Senior Member
The lens hood only really comes into play if you have light hitting and reflecting off the glass. However, I usually have mine on anyway for stray light and glass protection.
I had placed my Manfrotto RC2 quick release plate on backwards in the dark night of the most recent new moon. The camera fell off the tripod during a strong gust. The camera landed in the direction of the front element. What saved that 16-35 lens? The lens hood of course (filter gave me peace of mind as well). ;) Lens hoods are awesome.
 

TonyD315

Senior Member
28ca554dce0e58ee4328274eda859c79.jpg


I had the chance to shoot the stars with a clear sky this past weekend...this is 250 shots at 25 sec, f4, 14mm and 1250 ISO. There was more light pollution then I expected down the shore but I'm pretty happy with the results. I'm headed up to Cape Cod, Ma this weekend and I'm going to try to get out while I'm there.


Sent from my iPhone using Tapatalk
 

TonyD315

Senior Member
Nice shot. What program did you use to put it all together?

I edit in Lightroom, export them as jpegs and then use StarStaX, it's free and pretty easy to use. It also has tutorials right in the program if you're unsure.


Sent from my iPhone using Tapatalk
 
Top