My First Attempts at Milky Way

WyoDuner

Senior Member
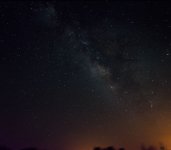
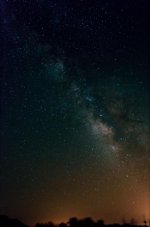
My first ever attempt at photographing the Milky Way. These shots were taken north of Florence, AZ (source of light pollution) on a new moon night. The first square looking image was taken with a Nikon D5200, 18-55mm kit lens at 18mm and f/3.5 aperture, ISO 2000 and 20 sec exposure. This is a compilation of 15 exposures aligned and hot pixel removal in Deep Sky Stacker and stacked in Photoshop CS6. RAW images were processed in LightRoom 4 to correct for white balance, lens distortion, noise reduction, etc. The second vertical image was processed the same way except it was 6 exposures of 20 seconds taken at ISO 3200. Both exposures had a fair amount of noise and I think the 90 degree nighttime heat didn't help matters either. I was surprised how much more color I had in the ISO 3200 shots compared to ISO 2000.

Biggest lesson I learned is that to the naked eye the light pollution didn't look too bad but once exposed - wow - is it obtrusive. I'm pretty happy with the results considering this is the cheap kit lens. I really want a faster/wider lens now....

Oh, one other thought, focusing was a challenge even with highest ISO and zoomed in with Live View. I just focused on illuminated cactus as far as flashlight would reach and took a few high ISO test exposures to make sure it looked OK but I still don't feel as though it was as well focused as it could be.... Maybe a faster lens would make focusing on bright stars possible.

Any feedback would be appreciated - good, bad or otherwise. Full resolution version are on my Flickr page.
 

Attachments

  • _MW_ISO2000_PS_Final_1000px.jpg
    _MW_ISO2000_PS_Final_1000px.jpg
    87.7 KB · Views: 1,737
  • MW_ISO33200_Vert_PS_Final_1000px.jpg
    MW_ISO33200_Vert_PS_Final_1000px.jpg
    70.8 KB · Views: 609

Dave_W

The Dude
Nice!! I really love shooting star images but I absolutely hate dealing with that damn sodium light pollution. You think you're out in the middle of nowhere taking photos of the black sky only to come home and see all the sodium orange down at the horizon. Try playing around with the individual color saturation levels and you can desaturate some of that orange-yellow glow so that it's a little less intrusive.
 

WyoDuner

Senior Member
Thanks, Dave. Yes, I actually did reduce the individual yellow and orange luminance levels in LR4 but apparently to no great effect. I also had a strange purple-ish cast from the left side of all my exposures which is fairly apparent on the first image. It wasn't generated in-camera as it was always in geographically the same place - not sure what that's from but that combined with the yellow cast from the sodium lights mad a mess of the whole bottom of the images. Need to driver farther next time. :)
 

Dave_W

The Dude
Instead of turning down their luminances, try desaturating those colors and once desaturated try increasing the luminance a tiny bit and it will somewhat washout the color and turn it more white-ish. I also tend to increase the luminance of the color blue to wash back to white some of the stars that turned blue when dialing in the WB.

What lens and ISO did you use and what was the length of your exposures?
 

WyoDuner

Senior Member
Ok, thanks for the tip... I get what your saying and it makes sense. Lens was 18-55mm kit lens at 18mm and f/3.5. 20 seconds at ISO 2000 in first image, 20 seconds at ISO 3200 on second image. Both samples were aligned and stacked 15 and 6 exposures respectively - primarily to average out the noise.
 

Samsonite

Senior Member
Wow, absolutely lovely colors... Well done! I don't think the light pollution takes anything away from these photos, infact in this case, I think it adds a really nice color contrast to the photos....


Sent from my iPhone using Tapatalk!
 

WyoDuner

Senior Member
When stacking the images, how do you align them to avoid getting the trails due to movement?

When stacking the images, how do you align them to avoid getting the trails due to movement?

Samsonite, thanks for the nice comments. I use Deep Sky Stacker (freeware) for stacking the images. It identifies the stars and places them on top of each other. As a result, it appears that the ground is actually rotating but the stars are static - you can see the blurred sections of the ground as a result. I have to limit exposure time to about 20 seconds with to prevent the stars from looking too oval.

Here is a 100% crop showing the oval shape of the stars due to the long exposure.

Stars_Crop.jpg
 

Samsonite

Senior Member
So it does all that automatically? That's quite impressive! Obviously can't be used for star trails then hehe... So even if you take for example 50 shots, which in reality would be significant movement, it superimposes each frame and matched the right stars onto each other?


Sent from my iPhone using Tapatalk!
 

WyoDuner

Senior Member
Correct - the software superimposes each frame and matches the correct stars together. The advantage, in the case of these 2 images, is that stacking is a good way to significantly reduce any random noise that occurs on each image. I had to shoot at ISO 2000 and 3200 at 20 seconds so I had a good bit of noise in each image. The stacking software is smart enough to know that if something is in one image but not others it is probably not wanted and probably noise. So, while each image does have noise it is different in each one and the stacking software basically removes it. Stacking can also be used to effectively increase your exposure time by aligning the images then adding exposure up instead of averaging the exposures.

For star trails (which I have not yet tried - still new to all of this) you would stack the images together but NOT align them. You can do this in Photoshop fairly easily and no need to use dedicated stacking software. Next dark night I would like to attempt some star trails.
 
Top