heathramos
Senior Member
I'm a newbie when it comes to SLR cameras and just started taking pics with my D5200.
I tried a few random pics and everything looked okay but then I took a bunch of pics at the zoo and I ran into issues.
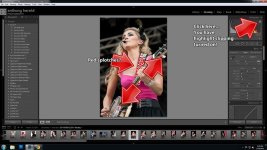
When I looked at the pics from the camera, they looked okay but when I transferred the RAW pics to my computer and viewed them within Lightroom, most of the pics had what I can only describe as red blotches in areas that were either really bright or had a reflective surface. I don't know exactly what to call this so it's hard to Google it and find out what the issue really is. Never had this issue when using a point and shoot camera.
Keep in mind that I took pics with 3 different lens (mainly the 55-300mm though), it was outdoors, sunny and taken 11am to 2pm. About half the pics were taken with the auto/no flash setting but others were kind of random, since I just wanted to try different settings. Sometimes shutter priority (various speeds) and a few aperture priority.
Most of the pics with issues seemed to be when the background was bright but subjects were in shade but that wasn't true 100% of the time.
A little frustrated since I can't really see the issue until I transfer the pics to my computer.
I know I shouldn't have used auto and I should have just researched the correct settings and set it manually (F16 rule maybe) but I thought I would see the issue and adjust while I was taking pics.
Going on a safari in 6 weeks so really need to figure this out.


