Cheat Sheet for Amateurs

shamreez

Senior Member
Hi,Would any of you amazing photographer be willing to produce a cheat-sheet which we can use kind of like a benchmark and improve upon.Most of the times when I take a pic in manual (A noob here bye the way) I take a pic see it in playback and change the shutter speed / aperture / etc This does work and I know with experience I will know what to go for but I was looking for a cheat-sheet till I reach there. I was looking for something like the table below. It would help us a lot. The aperture values I have given below is just something I thought of. I am not sure if this sounds too crazy or stupid.In that case apologies in advance.
Location Aperture Shutter Speed Exposure
Indoors 1.8
2.4
3.2
5.6
8
Outdoor (Bright light) 1.8
2.4
3.2
5.6
8
Outdoor Soft light1.8
2.4
3.2
5.6
8
Twilight1.8
2.4
3.2
5.6
8
Low light 1.8
2.4
3.2
5.6
8
PS: Not able to show the borders of the table. Not sure why
 

FastGlass

Senior Member
There are a few "rules of thumb" and some people can assume what to start at but there just a starting point. The only starting point I use is to determine if shutter or aperture is going to dominate the scene and go from there. There is no cheat sheet of spot on settings to speak of. Every situation has it's own settings and within each situation depending on how you frame the shot, which angle of view you choose. The setting will be totally different. Plus you may want to see motion in a scene or you may not. You may want more DOF in the shot and you may want less. If using a variable aperture lens. If shooting in manual, every time you change the zoom setting your going to have to adjust your settings because the aperture constantly moves around. If there's a cheat sheet out there I can't see how it would possibly work.
 

Horoscope Fish

Senior Member
For shooting outdoors on a bright sunny day the basic rule is: ISO 100, 1/125 @ f/11.

To adjust aperture or shutter speed for varying conditions, apply exposure reciprocity:

f/11 @ 1/125 = f/8 @ 1/250 = f/5.6 @ 1/500 = f/4 @ 1/1000, etc.

Or go to ISO 200 and double, or halve, one of the other values to compensate:

ISO 200: 1/125 @ f/8 = 1/250 @ f5.6 = 1/500 @ f/4, etc.

It's all a matter of remembering that each full stop halves, or doubles, exposure and that each full increment in shutter speed does the same thing. What complicates matters is that modern DLSR's often use 1/2 or 1/3 increments when adjusting ISO or shutter speed. I don't use 1/3 increments on my camera because I'm used to working in full stops. I can calculate using half-stops fast enough but using one-third stops is not something I've taken the time to master.

....
 

shamreez

Senior Member
For shooting outdoors on a bright sunny day the basic rule is: ISO 100, 1/125 @ f/11.

To adjust aperture or shutter speed for varying conditions, apply exposure reciprocity:

f/11 @ 1/125 = f/8 @ 1/250 = f/5.6 @ 1/500 = f/4 @ 1/1000, etc.

Or go to ISO 200 and double, or halve, one of the other values to compensate:

ISO 200: 1/125 @ f/8 = 1/250 @ f5.6 = 1/500 @ f/4, etc.

It's all a matter of remembering that each full stop halves, or doubles, exposure and that each full increment in shutter speed does the same thing. What complicates matters is that modern DLSR's often use 1/2 or 1/3 increments when adjusting ISO or shutter speed. I don't use 1/3 increments on my camera because I'm used to working in full stops. I can calculate using half-stops fast enough but using one-third stops is not something I've taken the time to master.

....
This does help a lot
 

skene

Senior Member
For shooting outdoors on a bright sunny day the basic rule is: ISO 100, 1/125 @ f/11.

To adjust aperture or shutter speed for varying conditions, apply exposure reciprocity:

f/11 @ 1/125 = f/8 @ 1/250 = f/5.6 @ 1/500 = f/4 @ 1/1000, etc.

Or go to ISO 200 and double, or halve, one of the other values to compensate:

ISO 200: 1/125 @ f/8 = 1/250 @ f5.6 = 1/500 @ f/4, etc.

It's all a matter of remembering that each full stop halves, or doubles, exposure and that each full increment in shutter speed does the same thing. What complicates matters is that modern DLSR's often use 1/2 or 1/3 increments when adjusting ISO or shutter speed. I don't use 1/3 increments on my camera because I'm used to working in full stops. I can calculate using half-stops fast enough but using one-third stops is not something I've taken the time to master.

....
Thank you, as I have now been scarred for life in over thinking what settings I should now use.

While there are those general rules of thumb, every situation is different. Lighting in the same place at different times of days will change all of your settings. It's one of those things that you will need to accept and need to be able to recover and adapt to changing settings when needed.
 

hrstrat57

Senior Member
Internet forums are great places to start and this is a good one!

Join dPS it is free, sign up also for a streaming program like news 360 on your smartphone and drive photography articles to yourself....I get huge tips sent my way via this method (tho a lot of it links back to dPS)

The nikon website has loads of free material, lots of it aimed at beginners.....and of course youtube is there you should be able to find good stuff linked directly to your camera.

Since it is a Nikon of course the quick start card that comes with your camera is a golden cheat sheet

Digital Photography School - Digital Photography Tips and Tutorials

To answer your question specifically my cheat sheet recco would be set your camera to A and learn what how it sets exposure with you controlling the f stop...
 

Horoscope Fish

Senior Member
Thank you, as I have now been scarred for life in over thinking what settings I should now use.
It's just exposure reciprocity, a simple concept photographers should understand. I just used Sunny 16 as a launch point.

While there are those general rules of thumb, every situation is different. Lighting in the same place at different times of days will change all of your settings. It's one of those things that you will need to accept and need to be able to recover and adapt to changing settings when needed.
Well of course every situation is different but reciprocity always works. If your shot is underexposing when using 1/125 @ f5.6 and ISO200 how do you quickly compensate by one-and-a-half EV? Reciprocity gives you that answer.

....
 

Browncoat

Senior Member
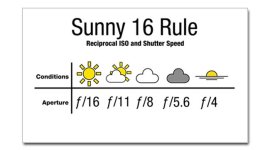
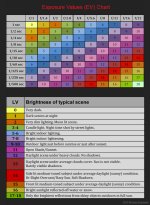
You'll get the hang of it eventually. After awhile, this will all be second nature. I used to have problems with this as well, and then I found the Sunny 16 Rule...going off of your makeshift chart, I think you could benefit from it as well:

Sunny 16 Rule

Sunny-16-sticker1.jpg

light-metering-033.jpg
 

nickt

Senior Member
Your 'cheat sheet' is built into your camera. In manual, watch your meter at the bottom of the viewfinder. Its the '+ 0 -' thing. Pick either a shutter or aperture. Pick whichever is important to the what you want to achieve. Then adjust the other until the meter indicates good exposure. From that point, you could then adjust either the shutter or aperture to get an effect that your meter would otherwise not recommend.

I would recommend shooting in shutter or aperture priority for most everyday stuff. It is somewhat 'manual', but your meter helps you out more directly. In shutter priority, you pick the shutter speed, the camera picks the aperture. In aperture priority, you pick the aperture and the camera picks the shutter speed.

Certainly explore Manual and be comfortable with it, but I would only use it for when you can't trust your meter and for some flash situations.

For instance, a night scene... Your meter will attempt to make it look like daylight. You can't trust your meter in this situation, so you need to manually adjust the exposure so the picture is underexposed and looks like a night scene. You could achieve that desired underexposure by either raising the shutter speed OR closing down (higher numbered) the aperture.

Here are some good videos on exposure.

https://www.youtube.com/watch?v=F8T94sdiNjc

https://www.youtube.com/watch?v=Nzn6yKTVcfs
 

FastGlass

Senior Member
The more I think about the question the more I don't understand why. When I see something I want an image of the first thing I decide is what setting I want more control of. Aperture or shutter speed. I then dial that in and aim at what ever it is I'm interested in. Looking at the light meter I dial in the correct exposure. All this takes the most of 5-10 seconds. Why the cheat sheet if you still need to dial it in?
 

g4crx

Senior Member
When I first got my camera after using it on Auto for a while, switching to manual confused the s1it out of me lol. Should have read the manual etc but being a typical guy went straight to it, I used to do what you’re doing i.e. take a picture then look at the screen and adjust aperture, shutter speed, ISO accordingly. I was doing this a while until a friend pointed out what the light meter was and how it worked – it was like a halleluiah moment!

Not looked back since, 99% I can get the exposure correct without having to review pics and just going on the light meter index.
 
Top